
The festive season brings joy, cheer, and the delightful aroma of baked treats that fill our homes. Among the numerous desserts that grace holiday tables, the Snowy Christmas Tree Cake stands out as a true showstopper. With its vibrant green layers, snowy white frosting, and dazzling decorations, this cake encapsulates the spirit of Christmas. As you delve into the world of baking this enchanting cake, you’ll discover not just the delicious flavors but also the joy of creating a masterpiece that will wow your friends and family.
Why We Love This Snowy Christmas Tree Cake Recipe
There’s something truly magical about the Snowy Christmas Tree Cake beyond its stunning appearance. This cake is not only visually appealing but also incredibly simple to make, making it an ideal dessert for both novice and experienced bakers. The white cake infused with a hint of almond extract offers a delightful flavor that everyone will cherish. The cake’s versatility allows you to customize it with your favorite toppings, sprinkles, and more, making each creation unique.
The sense of accomplishment that comes with baking this gorgeous cake is like none other. Picture yourself gathering around the table, unveiling this festive creation, and watching the smiles bloom on the faces of your loved ones. Each bite transports you into the warmth and joy of the holiday season. This Snowy Christmas Tree Cake is not just a dessert; it’s an experience that ties together memories, flavors, and the essence of togetherness.
Ingredients about Snowy Christmas Tree Cake
Creating your Snowy Christmas Tree Cake requires a few simple ingredients that you may already have in your pantry. The following ingredients combine to create the vibrant, flavorful cake layers and the sweet almond glaze that ties everything together.
- 1 box white cake mix
- 1 tsp green gel food coloring
- 1 cup powdered sugar
- 2 tablespoons melted butter
- 3/4 teaspoon almond extract
- 1 tablespoon milk (or as needed)
- Gold and silver sugar pearls for decorating
- Powdered sugar for dusting
How to Make Snowy Christmas Tree Cake Directions
Your holiday baking adventure begins with preheating your oven. Start by setting the temperature according to the package instructions, usually around 325°F (or 163°C). Prepare the cake batter as detailed on the box, ensuring that it’s mixed until smooth and free of lumps. Once your batter is ready, make an exciting modification: reserve approximately half a cup of the plain white batter in a separate bowl.
Next, add the green gel food coloring to the remaining batter and mix thoroughly until the color is evenly distributed. This green layer will resemble the foliage of a Christmas tree, giving your cake a vibrant look.


Now, it’s time to prepare your baking pan. Brush it with pan release or spray it with baking spray to prevent sticking. Pour the green batter into the pan. Gently tap the pan on your countertop to release any air bubbles, ensuring an even bake.
Take your reserved white batter and pour it over the green layer, carefully spreading it to reach the edges of the pan. This combination creates a lovely contrast when sliced, revealing the festive layers. Bake the cake as instructed on the package; anticipate the delightful scent that will start wafting through your kitchen.
After the baking time is complete, let the cake cool in the pan for about ten minutes. Then, carefully turn it out onto a wire rack to cool completely. This step is essential to prevent sogginess and allow your cake to set properly.
While you wait for the cake to cool, prepare the delicious glaze. In a bowl, stir together the powdered sugar, melted butter, almond extract, and milk, adjusting milk as needed to achieve a slightly runny consistency. This glaze will add an extra layer of sweetness and flavor to your cake.
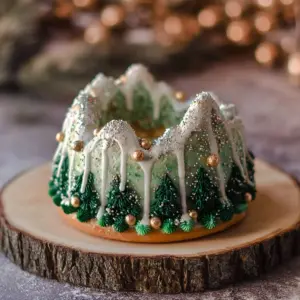
When the cake is fully cooled, pour a small amount of the glaze over the top of the cake, allowing it to drip slightly down the sides. Use a pastry brush to spread the glaze evenly. While it’s still wet, sprinkle gold and silver sugar pearls generously over the top and sides, giving your cake a festive sparkle. Finally, dust the whole cake lightly with powdered sugar for a snowy effect that completes the Christmas look.
How to Serve Snowy Christmas Tree Cake
When it’s time to serve your Snowy Christmas Tree Cake, presentation is key. For an enchanting holiday touch, place your cake on a decorative cake stand. This elevates not only the cake but the festive spirit of your gathering. You might consider garnishing with additional sprinkles or edible glitter for that extra sparkle.
Slice the cake into generous portions, allowing everyone to enjoy the rich flavors and festive presentation. Pair your cake with hot cocoa or a warm cup of tea, enhancing the cozy atmosphere of the holiday season. Whether you’re hosting a party or enjoying a quiet festive evening at home, this cake is sure to impress and satisfy.
Expert Tips: Snowy Christmas Tree Cake
Creating the perfect Snowy Christmas Tree Cake can be achieved with a few handy tips. First and foremost, ensure that all your ingredients are at room temperature for a smoother batter. This will help the cake rise evenly and achieve that desirable fluffy texture.
When mixing the food coloring into the batter, add a little at a time until you reach your desired shade of green. Keep in mind that the color will lighten a bit during baking.
For a more profound almond flavor, consider using almond cake mix instead of a regular white mix. This tweak will enhance the taste without overwhelming the cake’s delicate essence.
Remember to grease your pans adequately, even if you’re using a non-stick variety. This precaution will guarantee your cake releases cleanly and retains its shape upon turning out.
Lastly, as you sprinkle the sugar pearls on your glaze, try to add them while it’s still wet. This will help them adhere better and create a beautiful, cohesive look.
How to Store Snowy Christmas Tree Cake
To maintain the freshness of your Snowy Christmas Tree Cake, store any leftovers properly. Wrap the cake, or transfer it to an airtight container. Keeping it at room temperature is sufficient if you consume it within a couple of days. For longer storage, place it in the refrigerator to prolong its lifespan.
If you wish to keep it for an extended period, consider freezing individual slices. Wrap each slice tightly in plastic wrap, then place them in a zip-top freezer bag. This way, you can enjoy a festive treat even after the holiday season has ended. Just let the slices come to room temperature or warm them slightly in the microwave before indulging.
Variation of Snowy Christmas Tree Cake
While the classic Snowy Christmas Tree Cake is irresistibly delightful, feel free to explore creative variations that will cater to different tastes. One charming option is to substitute the green food coloring with various hues, creating a rainbow effect. This colorful twist could be especially fun for children’s parties or any occasion that calls for whimsy.
Consider incorporating different flavors into your cake layers. Instead of, or alongside the almond extract, using vanilla or coconut extract can add delightful flavors that warm the heart. Try adding a layer of melted chocolate or a fruit filling, such as raspberry jam, between the layers to take your cake to a whole new level.
For a healthier twist, explore using whole grain flour in your cake mix or consider a gluten-free cake mix to accommodate dietary restrictions. These adaptations will allow everyone to join in on the festive fun.
FAQ about Snowy Christmas Tree Cake
What is the best way to decorate the Snowy Christmas Tree Cake?
When decorating your Snowy Christmas Tree Cake, the key is to have fun and be creative. Use sugar pearls, edible glitter, and various sprinkles to adorn your cake, ensuring it captures the festive spirit.
Can I make the Snowy Christmas Tree Cake ahead of time?
Absolutely! You can prepare the cake up to a day in advance. Just make sure to store it in an airtight container to keep it fresh. You can glaze it on the day you plan to serve it for the best presentation.
Can I use a different cake mix for a Snowy Christmas Tree Cake?
Yes, feel free to experiment with different flavors of cake mix! Chocolate, lemon, or even red velvet cake mixes could add a delightful twist to the Snowy Christmas Tree Cake.
How should I store leftover Snowy Christmas Tree Cake?
Wrap any leftover slices in plastic wrap and keep them in an airtight container. The cake can stay at room temperature for a couple of days or be stored in the refrigerator or freezer for longer freshness.
Is almond extract necessary for the recipe?
While almond extract adds a lovely flavor, you may choose to substitute it with vanilla extract or omit it entirely. The cake will still be enjoyable without it.
Snowy Christmas Tree Cake
Ingredients
- 1 box white cake mix
- 1 tsp green gel food coloring
- 1 cup powdered sugar
- 2 Tbsp melted butter
- 3/4 tsp almond extract
- 1 Tbsp milk (or as needed)
- as needed gold and silver sugar pearls for decorating
- as needed powdered sugar for dusting
Instructions
- Preheat your oven according to package instructions (usually around 325°F or 163°C).
- Prepare the cake batter as per the package instructions, mixing until smooth. Reserve 1/2 cup of the plain batter in a separate bowl.
- Add green gel food coloring to the remaining batter and mix until the color is evenly distributed.
- Brush your baking pan with pan release or spray with baking spray. Pour the green batter into the pan and tap to release air bubbles.
- Pour the reserved white batter over the green layer and spread it to the edges. Bake according to package instructions.
- Let the cake cool in the pan for 10 minutes, then turn it out onto a wire rack to cool completely.
- Prepare the glaze by mixing powdered sugar, melted butter, almond extract, and milk until you achieve a slightly runny consistency.
- Once the cake is cooled, pour the glaze over the top, allowing it to drip slightly down the sides. Use a pastry brush to spread it evenly.
- Sprinkle gold and silver sugar pearls over the top and sides, then dust with powdered sugar for a snowy effect.
Send me this recipe!
Just enter your email below and get it sent straight to your inbox!