
When winter rolls around, it brings a sense of magic and wonder, especially with the holiday season in full swing. One delightful treat that captures this spirit is the Melted Snowman Cookie. These adorable cookies not only serve as a fun activity for family and friends but also make for an eye-catching dessert that delights both kids and adults alike. Their whimsical appearance and delicious taste will surely put a smile on anyone’s face!
Why We Love This Melted Snowman Cookies Recipe
Melted Snowman Cookies are more than just a sweet treat; they embody the joy of the holiday season. One of the reasons we crank up this recipe during winter is the sheer fun of decorating. Each cookie transforms into a charming little snowman, providing an avenue for both children and adults to unleash their inner artists. The combination of sugar cookie dough, fluffy marshmallows, and colorful decorations makes these cookies visually appealing and deliciously irresistible.
Not only are these cookies pleasing to the eye, but they also offer a variety of flavors and textures. The crunch of the cookie, the creaminess of the frosting, and the soft marshmallow all come together to create a delightful harmony in every bite. Moreover, this recipe is simple enough for everyone, regardless of baking expertise—making it an excellent choice for family cooking sessions or holiday get-togethers.
Ingredients about Melted Snowman Cookies
To whip up these delightful cookies, you’ll need the following ingredients:
- 16 oz Sugar Cookie Dough (or your favorite sugar cookie recipe, yielding 24 cookies)
- 1 1/2 cups white Frosting
- 12 large marshmallows
- 4 Pull ‘n Peel Twizzlers
- 12 orange sprinkles
- 1/4 cup mini chocolate chips
- 36 pearl sprinkles (in any color)
- Decorating piping gel (brown or black)
Gathering these ingredients will ensure you’re all set to create your perfect Melted Snowman Cookies.
How to Make Melted Snowman Cookies Directions
Creating Melted Snowman Cookies is an enjoyable and straightforward process. Start by preheating your oven according to the instructions provided with your sugar cookie dough. This essential first step ensures that your cookies bake evenly and turn out perfectly every time.


- Grab two pieces of cookie dough from the 16 oz package, combining them until they’re pliable. Roll the dough between your palms to form a cookie dough ball.
- Position the dough balls on an ungreased cookie sheet, spacing them about two inches apart. Repeat this until you have twelve cookie dough balls ready to go.
- Bake the cookies based on the package instructions. Keep an eye on them to prevent over-baking. When they’re done, remove them from the oven and allow the cookies to cool completely. This is important—you want to make sure they are cool before applying the frosting and decorations.
Now, let’s get into the fun part—decorating:
- Measure the white frosting into a microwave-safe bowl and warm it in the microwave for 10-15 seconds. The goal here is to make the frosting thinner and more liquid-like but avoid melting it completely.
- Use a spoon to take about 1-2 tablespoons of the warmed frosting and pour it onto each cookie. Spread it out gently, creating a puddle effect around the cookie’s edge.
- Take one marshmallow and place it on top of each cookie, positioning it toward one end to mimic a snowman that’s melting into a puddle.
- From the Pull ‘n Peel Twizzlers, carefully remove two connected strands and wrap them around the base of each marshmallow. This will represent a cozy little scarf! For added flair, slightly separate the ends of the strands for a more scarf-like appearance.
- Next, insert one end of an orange sprinkle into the marshmallow’s center to create a snowman nose.
- For the eyes and mouth, melt the mini chocolate chips in a microwave-safe bowl. Heat them for 30 seconds at a time, stirring in between until fully melted.
- Using a toothpick or the tip of a chopstick, put two dots above the carrot nose for the eyes and a larger dot below it for a surprised mouth expression. This adds character to your snowman!
- For some decorative touches, add three pearl sprinkles on the cookie to form buttons down the front of the snowman.
- Finally, using your brown piping gel, add a few whimsical arms on either side of the buttons, completing the look!
Your Melted Snowman Cookies are now ready to enjoy—simply serve and watch everyone’s eyes light up in delight!
How to Serve Melted Snowman Cookies
Now that your melted snowmen are all dressed and ready to impress, serving them is a breeze. Place your cookies on a decorative platter or cookie stand where everyone can admire their whimsical charm. For an added touch, you might consider making a themed dessert table during the holidays, showcasing the cookies alongside other festive treats.
These cookies make for a great conversation starter as well. Invite your guests to take a cookie and enjoy it while sharing stories and laughter. You can even encourage guests to get creative and decorate their own cookies if you have the supplies on hand!
Consider pairing these delightful cookies with a warm beverage. Hot cocoa, apple cider, or even a cup of herbal tea complements their sweet flavor perfectly. You could also use them as a centerpiece for holiday gatherings, bringing a smile to everyone as they admire your charming winter creations.
Expert Tips: Melted Snowman Cookies
To elevate your Melted Snowman Cookies to the next level, keep the following tips in mind:
- Chill the Dough: If your cookie dough is too soft and sticky, consider putting it in the fridge for about 30 minutes before shaping the dough balls. This will make it easier to handle while rolling.
- Customize Your Scarf: Get creative with the Twizzlers. You can use different colors to match your theme or even combine two colors for a fun striped appearance!
- Use Different Sprinkles: Instead of sticking with just pearl sprinkles, feel free to mix in some colorful holiday-themed sprinkles to give your snowman a cheerful personality.
- Make it a Family Activity: Invite your kids or family members to help decorate the cookies. This could become a fun holiday tradition!
- Watch the Baking Time: Ovens can vary, so keep a close eye after the first batch to ensure they bake perfectly. Slightly underbaked cookies also soften when they cool, giving you that perfect texture.
How to Store Melted Snowman Cookies
Storing your Melted Snowman Cookies correctly will help them stay fresh and delicious. Once your cookies have cooled completely, place them in an airtight container. These containers keep the moisture in while protecting your snowy friends from the elements (like air that can make them harder).
If you find yourself with leftover cookies after the holiday celebrations, don’t fret! They can last for up to a week at room temperature if stored properly. If you want to keep them for a longer period, consider freezing them. Wrap each cookie in plastic wrap and place them in a sealed freezer bag. They can last for 2-3 months in the freezer, allowing you to enjoy your wintry treats even after the holidays!
Variation of Melted Snowman Cookies
Though the classic version of Melted Snowman Cookies is delightful, you can get creative with variations to keep things fresh and exciting. Here are some ideas to ignite your imagination:
- Chocolate Sugar Cookies: Swap out the traditional sugar cookie dough for chocolate cookie dough for a richer flavor contrast. The darker cookie combined with white frosting will resemble an even more “melting” snowman.
- Different Frosting Flavors: Instead of the classic white frosting, consider flavors like cream cheese or vanilla buttercream. These will provide a different taste while maintaining the festive look.
- Fruit Toppings: Get playful with toppings; instead of using just sprinkles for buttons, why not use mini fruit slices like dried mango or even mini chocolate-covered pretzels?
- Add a Hat: Use mini chocolate cookies or candies on top of the marshmallows to create a cute snowman hat. It adds another layer of creativity.
- Mini Snowman Pops: Instead of making cookies, you can create mini snowman pops by stacking marshmallows on a lollipop stick, decorating them similarly with frosting and candies.
FAQ about Melted Snowman Cookies
What are Melted Snowman Cookies?
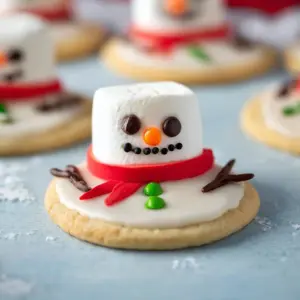
Melted Snowman Cookies are fun, festive treats designed to look like snowmen that have melted into a puddle. They consist of sugar cookies topped with frosting, marshmallows, and various candies for decoration.
How do I make the frosting thinner for decorating?
To make the frosting easier to spread, simply warm it up in a microwave-safe bowl for about 10-15 seconds. Stir until it reaches a smoother, more liquid consistency that you can easily spread.
Can I use store-bought cookie dough?
Absolutely! Store-bought sugar cookie dough is perfect for this recipe and saves time. You can choose your favorite brand or homemade recipe—whichever you prefer.
How long do Melted Snowman Cookies last?
If stored properly in an airtight container, your cookies can last for up to a week at room temperature. For longer storage, wrap each cookie and freeze them for up to three months.
Can I customize the decorations?
Definitely! You have the freedom to personalize your snowmen with different colors, shapes, and themes. Let your imagination run wild with the decorations!
Melted Snowman Cookies
Ingredients
- 16 oz. sugar cookie dough (or your favorite sugar cookie recipe, yielding 24 cookies)
- 1 1/2 cups white frosting
- 12 large marshmallows
- 4 pieces Pull ‘n Peel Twizzlers
- 12 pieces orange sprinkles
- 1/4 cup mini chocolate chips
- 36 pieces pearl sprinkles (in any color)
- as needed decorating piping gel (brown or black)
Instructions
- Preheat your oven according to sugar cookie dough instructions. Grease two mini muffin tins with cooking spray.
- Form cookie dough balls and position them on an ungreased cookie sheet, spacing them about 2 inches apart.
- Bake the cookies as directed, then allow them to cool completely.
- Warm the white frosting in a microwave-safe bowl for 10-15 seconds to make it easier to spread.
- Pour about 1-2 tablespoons of the warmed frosting onto each cookie, spreading to create a puddle effect.
- Place one marshmallow on top of each cookie, positioning it toward one end.
- Wrap a strand of Pull ‘n Peel Twizzlers around the base of each marshmallow to create a scarf.
- Insert an orange sprinkle into the center of each marshmallow to create a nose.
- Melt the mini chocolate chips and use a toothpick to create eyes and a mouth on each marshmallow.
- Add three pearl sprinkles down the front of the cookie to resemble buttons.
- Use piping gel to draw arms on either side of the buttons, completing the snowman look.
Send me this recipe!
Just enter your email below and get it sent straight to your inbox!