
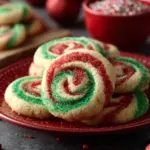
When the holiday season rolls around, one of the most beloved traditions is baking festive cookies that bring joy and warmth to your home. Santa’s Swirl Sugar Cookies are a delightful treat that not only looks great on a holiday platter but tastes even better. These cookies are perfect for sharing with friends and family, or even leaving out for Santa on Christmas Eve. With their vibrant red and green swirls, they embody the spirit of the season and are sure to become a new favorite in your holiday baking repertoire.
Why We Love This Santa’s Swirl Sugar Cookies Recipe
What makes Santa’s Swirl Sugar Cookies so special? First, they are incredibly easy to make, making them a great activity for all ages. You can involve your children or any family member in the rolling and decorating process. The colors bring life to your cookie platter, making them a visual feast! Moreover, the classic sugar cookie flavor, with its buttery richness and hint of vanilla, is simply irresistible. You can enjoy them fresh from the oven or dress them up with a light dusting of powdered sugar. Each bite is a little taste of festive magic, bringing cheer to any holiday gathering.
Ingredients about Santa’s Swirl Sugar Cookies
To create these delightful cookies, gather the following ingredients:
- 2 3/4 cups all-purpose flour
- 1 teaspoon baking powder
- 1/4 teaspoon salt
- 1 cup unsalted butter, softened
- 1 1/2 cups granulated sugar
- 1 egg
- 1 teaspoon vanilla extract
- Food coloring (red and green)
- Powdered sugar for dusting (optional)
How to Make Santa’s Swirl Sugar Cookies Directions
Now that you have everything you need, let’s dive into the steps for making Santa’s Swirl Sugar Cookies:
- Preheat Your Oven: Begin by preheating your oven to 350°F (175°C). This ensures that your cookies bake evenly and come out perfect.
- Mix Dry Ingredients: In a medium bowl, combine the all-purpose flour, baking powder, and salt. Whisk them together until they’re well mixed. This step is crucial as it helps evenly distribute the leavening agent throughout the flour.
- Cream Butter and Sugar: In a large bowl, using an electric mixer or a wooden spoon, cream together the softened unsalted butter and granulated sugar. Mix until the texture is light and fluffy; this should take about 4-5 minutes. This step incorporates air into the mixture, which helps create lovely, soft cookies.
- Incorporate Egg and Vanilla: Beat in the egg and then add the vanilla extract, mixing until everything is combined. The egg provides moisture and binding, while vanilla enhances the flavor of your dough.
- Combine Dry and Wet Ingredients: Gradually add the flour mixture to the wet mixture, stirring until fully combined. Be careful not to overmix, as that can lead to tougher cookies.
- Divide and Color the Dough: Once the dough is ready, divide it into two equal portions. In one bowl, add a few drops of red food coloring and mix until the dough is beautifully tinted. In the other bowl, do the same with green food coloring. Feel free to add more food coloring to achieve your desired intensity of color.
- Shape the Dough: Roll each colored dough into a log shape, ensuring they are about 1 to 1.5 inches in diameter. This gives you the characteristic swirl when you slice the cookies later.
- Chill the Dough: Wrap the dough logs in plastic wrap and chill in the refrigerator for about 1 hour. Chilling helps the dough firm up, making it easier to cut and helps maintain the shape while baking.
- Slice and Bake: After chilling, remove the dough from the refrigerator. Use a sharp knife to slice the logs into rounds about 1/4-inch thick. Place them on a baking sheet lined with parchment paper, leaving some space between each cookie.
- Bake: Put the cookies in your preheated oven and bake for about 8 to 10 minutes, or until the edges are lightly golden. Keep an eye on them to prevent over-baking.
- Cool Before Serving: After taking them out of the oven, let the cookies cool on the baking sheet for a few minutes before transferring them to a wire rack. Allow them to cool completely. You can dust them with powdered sugar before serving, if desired.
How to Serve Santa’s Swirl Sugar Cookies
Serving Santa’s Swirl Sugar Cookies is all about presentation and sharing the joy of baking. Arrange the cookies on a festive platter, highlighting their beautiful red and green swirls. For an extra touch, you can sprinkle some powdered sugar over the top just before serving; this not only adds decoration but also a lovely contrast against the colors of the cookies.
These cookies can be enjoyed warm right out of the oven, or they can be stored in an airtight container to maintain their freshness. Pair them with milk, hot cocoa, or your favorite warm beverage for a cozy winter treat. They also make wonderful gifts! You can package them in clear bags tied with holiday ribbons for a heartfelt gesture during the holiday season.


Expert Tips: Santa’s Swirl Sugar Cookies
- Room Temperature Ingredients: Ensure your butter and egg are at room temperature before beginning. This will make mixing easier and result in a smoother dough.
- Don’t Overmix: When combining the wet and dry ingredients, mix just until incorporated. Overmixing can lead to dense cookies instead of the light and fluffy texture you desire.
- Cool Logs Before Slicing: If your dough becomes too soft during the rolling process, return them to the fridge for a short time to firm up. This makes slicing much simpler.
- Add Flavor Variations: Consider adding other flavors to the dough, such as almond extract or citrus zest, for a unique twist.
- Use Quality Food Coloring: For vibrant colors, use gel food coloring instead of liquid food coloring. It provides a more intense color and does not change the consistency of the dough significantly.
- Don’t Forget the Chill Time: Chilling the dough not only makes it easier to handle but also helps prevent the cookies from spreading too much while they bake.
How to Store Santa’s Swirl Sugar Cookies
To keep your Santa’s Swirl Sugar Cookies fresh, store them in an airtight container at room temperature. They should stay good for up to a week. If you want to keep them for longer, you can freeze them. Make sure they are completely cooled, then layer them between sheets of wax paper in a freezer-safe container. They can be frozen for up to three months. When you’re ready to enjoy them, let them thaw at room temperature; they’ve got the same delicious taste and texture!
Variation of Santa’s Swirl Sugar Cookies
While the traditional red and green swirl is perfect for the holiday season, don’t hesitate to get creative with variations! Here are a few ideas:
- Different Color Combinations: You can use different colors to suit various celebrations. For Valentine’s Day, use pink and red. For Easter, opt for pastel colors like yellow and pink.
- Flavored Dough: Incorporate different flavor extracts into the dough, such as peppermint for a wintery twist or almond for a rich, nutty flavor.
- Sprinkle Toppings: Before baking, sprinkle colored sugar or holiday-themed sprinkles on top for added texture and visual appeal.
- Chocolate Swirls: Add cocoa powder to one portion of the dough for a chocolate swirl effect. This not only looks beautiful but adds a rich chocolatey flavor.
- Icing Decorations: After the cookies cool, consider drizzling them with royal icing or decorating them with holiday-themed sugar decorations for an elegant finish.
FAQ about Santa’s Swirl Sugar Cookies
Can I make Santa’s Swirl Sugar Cookies ahead of time?
Absolutely! You can prepare the dough in advance, shape it into logs, and store it in the refrigerator for up to 2 days. You can also freeze the logs for up to 3 months and slice the cookies as needed.
What can I substitute if I don’t have food coloring?
If you don’t have food coloring, you can use natural colorants like beet juice for red and matcha powder for green. They may alter the flavor slightly, but they are great natural alternatives.
Are Santa’s Swirl Sugar Cookies suitable for gifting?
Yes, these cookies make excellent gifts! Package them in decorative boxes or tins, and they will be a hit at any holiday gathering.
Can I double the recipe?
Certainly! This recipe can be easily doubled if you want to make a larger batch for parties or sharing with friends and family.
Santa's Swirl Sugar Cookies
Ingredients
Dry Ingredients
- 2 3/4 cups all-purpose flour
- 1 teaspoon baking powder
- 1/4 teaspoon salt
Wet Ingredients
- 1 cup unsalted butter, softened Ensure at room temperature for better mixing.
- 1 1/2 cups granulated sugar
- 1 egg Use at room temperature.
- 1 teaspoon vanilla extract
Coloring and Decoration
- as needed Food coloring (red and green) Use gel food coloring for vibrant colors.
- for dusting cups Powdered sugar Optional for serving.
Instructions
Preparation
- Preheat your oven to 350°F (175°C).
- In a medium bowl, whisk together the all-purpose flour, baking powder, and salt.
- In a large bowl, cream together the softened butter and granulated sugar until light and fluffy.
- Beat in the egg and vanilla extract until well combined.
- Gradually add the flour mixture to the wet mixture, mixing until just combined.
- Divide the dough into two equal portions and add red food coloring to one and green food coloring to the other.
- Roll each colored dough into logs about 1 to 1.5 inches in diameter.
- Wrap the logs in plastic wrap and chill in the refrigerator for about 1 hour.
Baking
- After chilling, slice the logs into rounds about 1/4-inch thick.
- Place the slices on a baking sheet lined with parchment paper.
- Bake for about 8 to 10 minutes, or until the edges are lightly golden.
- Let the cookies cool on the baking sheet for a few minutes before transferring to a wire rack.
- Dust with powdered sugar before serving if desired.
Send me this recipe!
Just enter your email below and get it sent straight to your inbox!