
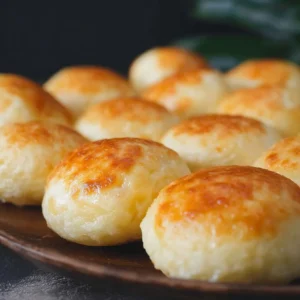
When it comes to delectable snacks that can steal the spotlight, Brazilian Cheese Buns, or Pão de Queijo as you might hear it called, tops the list. These delightful little baked goods are a staple in Brazil and have captured the hearts of many around the world. Their unique combination of flavors and textures makes them an irresistible treat that you’ll want to whip up time and again.
Why We Love This Brazilian Cheese Buns Recipe
One of the best aspects of Brazilian Cheese Buns is their versatility. They can serve as a snack, appetizer, or even a side dish. Their charming, golden-brown appearance and airy texture really set them apart from other bread rolls. Not to mention, they are gluten-free, making them suitable for a wider audience!
This recipe also allows for flexibility with ingredients. You can experiment with different types of cheese or even add your favorite herbs for an extra flavor punch. The preparation method is straightforward and doesn’t require extensive baking knowledge, making it perfect for both novice cooks and experienced bakers alike.
Most importantly, you will love how quick they are to prepare. In just a short while, you can enjoy warm, cheesy buns fresh from the oven!
Ingredients about Brazilian Cheese Buns
To make these irresistible Brazilian Cheese Buns, gather the following ingredients. Each one plays a crucial role in achieving that perfect texture and flavor.
- 200 g sour tapioca flour
- 100 g sweet tapioca flour (substitute with sour if needed)
- 100 g Parmesan cheese, grated
- 100 g mature cheddar or any other aged cheese, grated
- 250 ml milk
- 125 ml sunflower oil (or olive oil, or any vegetable oil)
- 2 eggs
- Salt to taste
These ingredients come together in a harmonious blend, creating the signature flavor that is beloved by many.


How to Make Brazilian Cheese Buns Directions
Now, let’s dive into the preparation process of your Brazilian Cheese Buns. First, it’s essential to gather all your ingredients and have them ready to go.
Start by pouring the milk and sunflower oil into a saucepan. Add a pinch of salt to enhance the flavor and bring the mixture to a boil. Whisk it gently until you see bubbles forming, indicating that it’s ready for the next step.
Once the mixture reaches a boiling point, turn off the heat. The next step is to incorporate both types of tapioca flour into the hot mixture. Stir it vigorously until it becomes a smooth, cohesive dough. This dough is what gives your cheese buns that delightful chewy texture.
Now that the dough is ready, transfer it to a mixing bowl. Allow it to cool slightly before proceeding with your next steps. It’s important to avoid burning your hands in the process of mixing.
In a separate bowl, beat your eggs until they are frothy. Gradually add the beaten eggs to the dough, mixing thoroughly after each addition. This step helps bind the mixture, making it easier to shape the buns.
Next up, it’s time to add in the cheesy goodness! Incorporate the grated Parmesan and mature cheddar cheese. The combination of these cheeses creates a rich flavor that will make your buns absolutely scrumptious. Mix everything together until the cheese is evenly distributed.
After you have mixed in the cheese, allow the dough to rest for about five minutes. This resting period helps the tapioca flour hydrate and contributes to a better texture.
Once the dough has rested, oil your hands lightly to prevent sticking. Begin forming small balls, around 50g each, and place them on a baking tray lined with a nonstick mat or parchment paper. Make sure to leave enough space between each bun to allow for rising.
Preheat your oven to 180°C (350°F) while you prepare the buns for baking. Once warmed, place your baking tray in the oven and let them bake for approximately 20 minutes. Keep a close eye on them; they should turn golden brown and puff up nicely.
After baking, allow your buns to cool on a wire rack for about five minutes before serving. This is a crucial moment, as it helps maintain that delightful texture.
Enjoy them warm, fresh from the oven!
How to Serve Brazilian Cheese Buns
Serving your Brazilian Cheese Buns can be a delightful experience in itself. These cheese-filled wonders pair exceptionally well with various accompaniments. For a classic choice, you can serve them with a generous spread of butter or a dollop of cream cheese.
If you want to elevate your serving game, consider jazzing things up with a sprinkle of fresh herbs or a dash of chili flakes for those who enjoy a bit of a kick. These cheese buns also serve wonderfully alongside soups or salads, adding an extra layer of deliciousness to your meal.
For gatherings or parties, arrange your freshly baked buns on a beautiful platter. Their inviting aroma and golden color will surely impress your guests, making them the highlight of your spread.
Expert Tips: Brazilian Cheese Buns
Cheese Choice: While the recipe calls for Parmesan and mature cheddar, feel free to experiment with your favorite cheeses! Mozzarella or Gouda can also provide a unique flavor twist.
Consistency Matters: If you find the dough too wet, you can add a bit more tapioca flour. On the other hand, if it’s too dry, a splash of milk can help. Strive for a smooth and pliable consistency.
Shaping the Buns: When forming the balls, it’s helpful to keep your hands lightly oiled. This way, the dough won’t stick and will retain its shape better.
Baking Time: Keep an eye on the buns as they bake. Every oven is a bit different. If your buns are not golden brown after 20 minutes, let them bake a little longer.
Variations: Consider adding ingredients like herbs, garlic powder, or even chopped jalapeños to the dough for added flavor.
How to Store Brazilian Cheese Buns
Storing your Brazilian Cheese Buns properly is essential for maintaining their freshness. Once the buns have cooled, place them in an airtight container. If you have extras, you can keep them at room temperature for about 2 days.
For longer storage, these delightful treats freeze exceptionally well. Simply place them in a freezer-safe container or a resealable bag and freeze for up to 2 months. When you’re ready to enjoy them again, you can reheat the buns in the oven for a few minutes to restore their fresh-baked taste.
Variation of Brazilian Cheese Buns
If you’re feeling adventurous, there are numerous ways to switch up this Brazilian Cheese Buns recipe. Consider trying some of these fun variations:
Herbed Version: Add a teaspoon of dried herbs like oregano or thyme to the dough for an aromatic boost.
Spicy Option: Add finely chopped jalapeños or chilies for those who love a spicy kick in their snacks.
Garlic Lovers’ Delight: Incorporate garlic powder or minced fresh garlic into the cheese mixture for added depth of flavor.
Quirky Cheese Combos: Experiment with a mix of cheeses! Try feta for a tangy twist or try a smoked cheese for a bolder flavor.
Sweet Twist: For a unique take, try adding a touch of sugar along with some grated coconut for a sweet version of these cheese buns.
FAQ: Brazilian Cheese Buns
What are Brazilian Cheese Buns?
Brazilian Cheese Buns, also known as Pão de Queijo, are deliciously light and cheesy snacks made primarily from tapioca flour and cheese. They have a chewy texture and are loved worldwide!
Are Brazilian Cheese Buns gluten-free?
Yes, Brazilian Cheese Buns are naturally gluten-free, making them an excellent choice for those with gluten sensitivities or celiac disease.
Can I use different types of cheese for the recipe?
Absolutely! While the recipe suggests Parmesan and cheddar, you can use any cheese you prefer. Just keep in mind that different cheeses can change the flavor and texture slightly.
How long do Brazilian Cheese Buns last?
Once baked, these buns can be stored in an airtight container at room temperature for up to two days. For longer storage, freeze them for up to two months.
Can I bake the dough ahead of time?
Yes! You can prepare the dough ahead of time and keep it in the fridge for a day or two. Just remember to let it come to room temperature before baking.
Brazilian Cheese Buns (Pão de Queijo)
Ingredients
- 200 g sour tapioca flour
- 100 g sweet tapioca flour (substitute with sour if needed)
- 100 g Parmesan cheese grated
- 100 g mature cheddar cheese or any other aged cheese, grated
- 250 ml milk
- 125 ml sunflower oil (or olive oil, or any vegetable oil)
- 2 eggs
- Salt to taste
Instructions
- In a saucepan, combine the milk and sunflower oil with a pinch of salt. Bring to a boil while whisking gently.
- Once boiling, turn off the heat and stir in both types of tapioca flour until you achieve a smooth dough.
- Transfer the dough to a mixing bowl and let it cool slightly.
- In a separate bowl, beat the eggs until frothy, then gradually mix them into the dough.
- Add the grated Parmesan and mature cheddar cheese, mixing until evenly incorporated.
- Let the dough rest for about five minutes to hydrate the tapioca flour.
- Preheat your oven to 180°C (350°F).
- With lightly oiled hands, form the dough into small balls (about 50g each) and place them on a baking tray lined with parchment paper.
- Bake for approximately 20 minutes or until golden brown and puffed up.
- Allow to cool on a wire rack for about five minutes before serving warm.
Send me this recipe!
Just enter your email below and get it sent straight to your inbox!