When it comes to holiday treats, there’s something truly magical about merging the classic cookie with the grand presentation of a cake. Enter the Christmas Cookie Cake, a delightful dessert that combines the best of both worlds. This festive dessert captures the quintessential flavors of Christmas and presents them in a way that is both beautiful and delicious. Picture a soft, chewy cookie infused with warm hints of vanilla and brown sugar, topped with a luscious frosting that’s as colorful as the season itself. Not only is this dessert a treat for the taste buds, but its festive decor makes it a centerpiece for holiday gatherings.
Why We Love This Christmas Cookie Cake Recipe
You might be wondering what makes this Christmas Cookie Cake stand out among the multitude of holiday desserts. Its allure lies in its versatility and the comfort it brings. First, the combination of flavors is superb. Each bite delivers a delightful mix of buttery sweetness and chocolate richness that dances on your palate. The cake has a wonderful cookie-like texture, which is sure to please cookie lovers while also appealing to those who enjoy cake.
Another reason why you’ll adore this recipe is its simplicity. You don’t need to be a master baker to achieve stunning results. The straightforward directions make it accessible for bakers of all skill levels, which means you can easily share this Christmas joy with family and friends. Plus, decorating the cake is a creative joy. With festive colors and sparkly sprinkles, you can let your imagination run wild. Whether you choose a simple wreath design or a more elaborate holiday scene, your Christmas Cookie Cake can become a unique centerpiece for your table.
Lastly, the Christmas Cookie Cake evokes the spirit of togetherness. Baking together with loved ones, sharing in the gift of creation, and ultimately serving a slice of joy to friends and family make this recipe a winning addition to your holiday festivities.
Ingredients for Christmas Cookie Cake
To get started on this delicious Christmas Cookie Cake, you’ll need the following ingredients:
- 3/4 cup unsalted butter, softened to room temperature
- 3/4 cup light brown sugar
- 1/4 cup granulated sugar
- 1 large egg
- 2 teaspoons pure vanilla extract
- 2 cups unbleached all-purpose flour
- 2 teaspoons cornstarch
- 1 teaspoon baking soda
- 1/2 teaspoon salt
- 3/4 cup bittersweet or semi-sweet chocolate chips
- 3 cups powdered sugar
- 3 tablespoons milk
- Green and red gel food coloring
- Holiday sprinkles for decoration
Gathering these ingredients will ensure that you’re well-prepared for a delightful baking session. Make sure to set out your butter, milk, and egg in advance so that they reach room temperature, which is essential for achieving that creamy texture in your cake batter.


How to Make Christmas Cookie Cake
Now that you have your ingredients ready, let’s dive into how to create this delightful Christmas Cookie Cake. Follow these simple steps to produce a festive treat that you—and your loved ones—will adore:
- Preheat Your Oven: Start by preheating your oven to 350°F (180°C). This ensures that your cookie cake bakes evenly.
- Prepare Your Ingredients: Allow the butter, milk, and egg to reach room temperature. This is key to creating a smooth batter that mixes well.
- Cream the Sugars and Butter: In a large mixing bowl, add the softened unsalted butter, brown sugar, and granulated sugar. Using a handheld mixer or a stand mixer, cream these ingredients until they become light and fluffy. This usually takes about 2-3 minutes.
- Incorporate the Egg and Vanilla: Next, crack the large egg into the bowl and add the pure vanilla extract. Mix until everything is well combined, scraping the sides of the bowl as necessary.
- Mix the Dry Ingredients: In a separate bowl, whisk together the unbleached all-purpose flour, cornstarch, baking soda, and salt. This step is important to evenly distribute the leavening agents throughout the flour.
- Combine Wet and Dry Ingredients: Gradually add the dry mixture to the wet ingredients, mixing on low speed to avoid a flour cloud. Combine until just incorporated.
- Fold in the Chocolate Chips: Once your batter is ready, gently fold in the bittersweet or semi-sweet chocolate chips. This adds pockets of melty chocolate throughout your cake.
- Prepare Your Pan: Line the bottom of a springform pan with parchment paper to prevent sticking, then press the dough evenly into the pan.
- Bake: Place the pan in the preheated oven and bake for 18-22 minutes. Use a toothpick to check for doneness. It should come out with a few moist crumbs but not wet batter.
- Broil for a Golden Top: If you desire a beautiful golden-top, switch your oven settings to broil for the last minute. Watch closely to ensure it doesn’t burn!
- Cool Completely: Remove the cake from the oven and allow it to cool completely in the pan on a wire rack. It’s essential to let it cool thoroughly before frosting.
- Make the Frosting: For the frosting, beat more softened butter in a bowl until it’s creamy. Gradually add the powdered sugar, mixing until smooth. Then, add in vanilla and milk. Adjust the consistency until it’s perfect for piping.
- Color your Frosting: Divide the frosting into two bowls—one for green and one for red. Use the gel food coloring to tint accordingly.
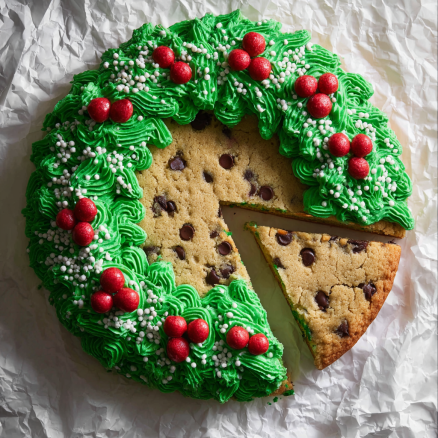
- Decorate Your Cake: Once your cookie cake is completely cool, use a piping bag to pipe the green frosting around the edges, resembling a wreath. Add little dots of red frosting for berries.
- Add Holiday Sprinkles: Finish off your creation by sprinkling festive holiday sprinkles on top.
Your Christmas Cookie Cake is now ready to dazzle anyone who lays eyes on it. The combination of flavors and the visual delight makes this dessert an unforgettable holiday favorite.
How to Serve Christmas Cookie Cake
Serving your Christmas Cookie Cake is as delightful as making it. Start by slicing the cake into generous wedges, allowing guests to indulge in a hearty piece. For an extra festive touch, you might consider serving each slice with a dollop of whipped cream or a scoop of vanilla ice cream on the side. The cool creaminess perfectly complements the slightly warm cookie cake, creating a delicious contrast that enhances the overall eating experience.
If you’re hosting a holiday gathering, setting up a dessert table where this cake takes center stage will surely impress your guests. Garnish the table with additional holiday decorations—perhaps some twinkling lights or seasonal foliage—for a festive atmosphere. Remember, the way you present the cake adds to the overall experience and enhances the joy of savoring this holiday treat.
Moreover, don’t forget about the kids! The colorful frosting and sprinkles will be especially exciting for younger guests. Encourage them to participate in the decorating process, allowing them to make their version of the cake. This interaction not only makes serving more fun but also enhances the likelihood of lasting family memories.
Expert Tips: Christmas Cookie Cake
To ensure your Christmas Cookie Cake is a resounding success, consider these expert tips that can elevate your baking skills:
- Use Room Temperature Ingredients: For the best texture, always allow your butter, egg, and milk to reach room temperature before mixing. This allows for better emulsification.
- Don’t Overmix: When combining the wet and dry ingredients, mix just until incorporated. Overmixing can lead to a denser cake rather than a moist and chewy texture.
- Keep an Eye on Baking Time: Oven temperatures can vary, so start checking your cake a few minutes before the time is up. A toothpick should come out with a few moist crumbs, but not wet batter.
- Cool Completely Before Frosting: Allowing the cake to cool thoroughly is crucial. If you frost it when warm, the frosting might melt and lose its shape.
- Experiment with Flavors: You can enhance the flavor profile by incorporating spices such as cinnamon or nutmeg into the batter, giving it that extra holiday kick.
- Get Creative with Decorations: Allow your artistic side to shine by decorating your cake with colorful holiday themes. Consider using edible glitter, different shapes of sprinkles, or even fondant decorations for a festive finish.
By following these tips, you will not only improve your baking technique, but you will also ensure your holiday centerpiece is one that everyone is talking about.
How to Store Christmas Cookie Cake
If you happen to have leftover Christmas Cookie Cake (hard to believe, we know!), storing it properly will help keep it fresh. Allow the cake to cool completely, then wrap it in plastic wrap or place it in an airtight container. It can be stored at room temperature for up to three days.
For longer storage, consider placing it in the fridge, where it can last for about a week. If you’d like to keep it longer, you can freeze the cake. Wrap it tightly in plastic wrap and then in aluminum foil. When you’re ready to enjoy it again, let it thaw in the refrigerator overnight before serving.
Keep in mind that if you have decorated the cake, it’s best to freeze it without the frosting. You can frost it fresh once thawed for the best presentation.
Variations of Christmas Cookie Cake
As much as we adore the classic Christmas Cookie Cake, don’t hesitate to make it your own by incorporating different flavors and add-ins! Here are some fun variations to try:
- Nutty Delight: Add chopped walnuts or pecans to the batter for a delightful crunch that pairs wonderfully with the creamy frosting.
- Candy Cane Crunch: Crush some candy canes and fold them into the batter for a minty flavor. This is a festive twist that adds a delightful crunch and visual pop.
- Caramel Drizzle: Drizzle caramel sauce over the top of the frosted cake for an indulgent touch that elevates the flavor profile.
- Changes to the Chocolate Chips: Swap out chocolate chips for white chocolate or even butterscotch chips for a different flavor combination, adding variety to the cake.
- Fruit Flavors: Experiment with dried cranberries, mini marshmallows, or even citrus zest to create a fresh burst of flavor in each bite.
With these variations, you can customize your Christmas Cookie Cake to suit your personal taste or please the palate of guests, making it even more memorable.
Frequently Asked Questions
To help you on your journey of baking the perfect Christmas Cookie Cake, here are some frequently asked questions that may address any concerns or queries you might have:
What makes this Christmas Cookie Cake different from regular cookies?
The Christmas Cookie Cake merges the chewiness of a cookie with the layered appeal of a cake. It offers a unique texture and presentation while retaining all the lovely flavors you love about traditional cookies.
Can I use margarine instead of butter for this recipe?
While butter is recommended for the best flavor and texture, margarine can be used in a pinch. However, it may slightly alter the taste and consistency of your cake.
How long does the Christmas Cookie Cake last?
When properly stored in an airtight container, the cake will stay fresh for up to three days at room temperature, about a week in the fridge, or up to three months in the freezer.
Can I make the batter ahead of time?
Yes! You can prepare the batter and store it in the fridge for up to 24 hours before baking. Just give it a good stir before pouring it into the pan.
What are some tips for decorating the cake?
Using different colors of frosting, festive sprinkles, and edible decorations can elevate the look of your cake. Consider holiday themes like snowflakes or wreath shapes to enhance your festive presentation.

Christmas Gnome Cookies
Ingredients
- 1 package refrigerated sugar cookie dough
- 1 cup unsalted butter, softened
- 4 cups powdered sugar
- 1/4 cup heavy whipping cream
- 1 tsp vanilla extract
- 24 strawberries, leaves removed
- 24 small candy balls
Instructions
- Preheat your oven to 350°F (175°C).
- Spray a mini muffin pan with non-stick cooking spray.
- Scoop small balls of refrigerated sugar cookie dough into the mini muffin cups, ensuring even distribution.
- Bake for about 20 minutes until light golden brown. Allow to cool in the pan for a few minutes before transferring to a wire rack to cool completely.
- Beat the softened butter in a large mixing bowl on medium speed until smooth and creamy, about 3 minutes.
- Gradually add powdered sugar, heavy whipping cream, and vanilla extract while mixing on low speed.
- Increase the speed to high and beat for another 3 minutes until fluffy. Adjust consistency with more cream if needed.
- Frost the cooled cookie cups with buttercream, creating a fluffy beard.
- Place a strawberry upside down on each cookie to resemble the gnome’s hat and add a candy ball for the nose.
- Arrange on a festive plate and serve.
Send me this recipe!
Just enter your email below and get it sent straight to your inbox!