Cranberry Walnut Bread is warm, hearty, and full of flavor. With tart cranberries and crunchy walnuts in every bite, it’s perfect for breakfast, snacking, or sharing. Easy to bake and even easier to love.
Why We Love This Cranberry Walnut Bread Recipe
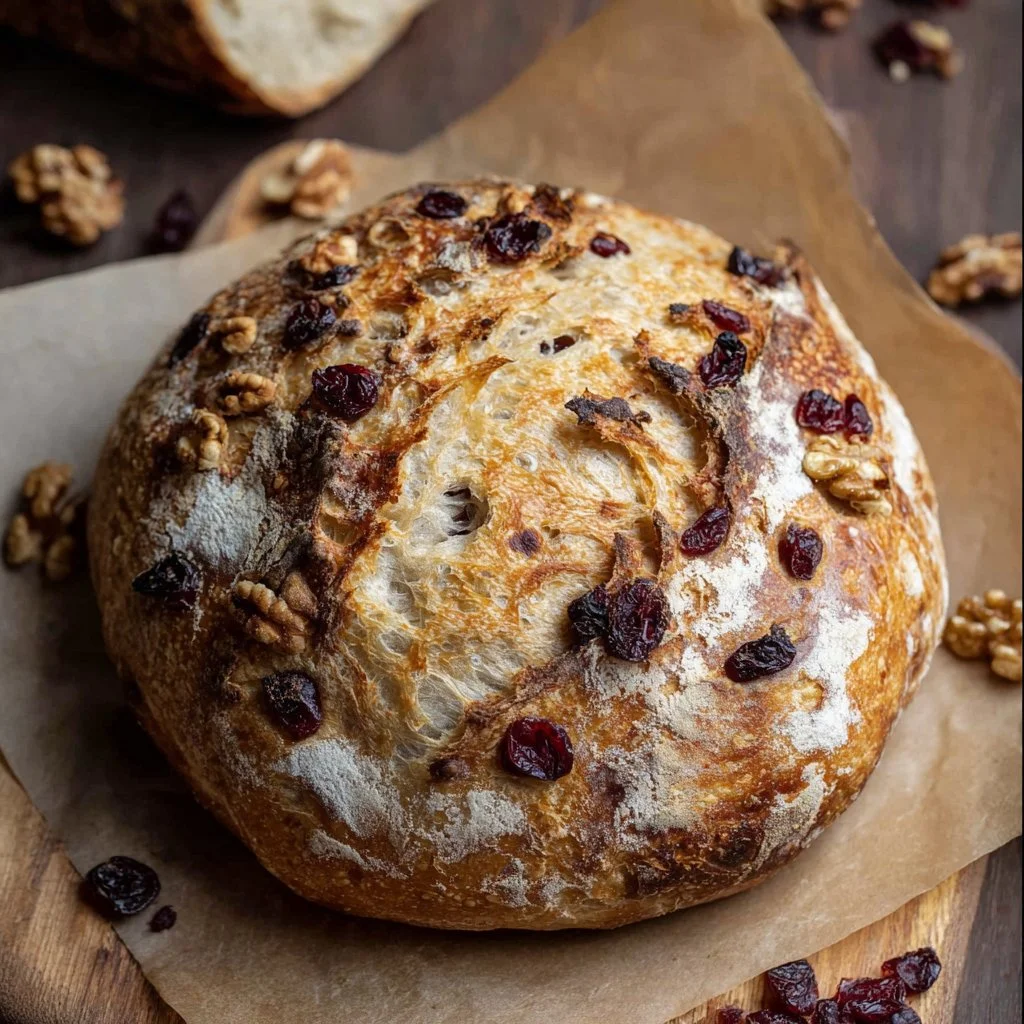
The charm of Cranberry Walnut Bread goes beyond its dazzling appearance and mouthwatering taste. This recipe is as approachable as it is rewarding, making it perfect for both baking novices and seasoned pros. Its simplicity allows anyone to create a beautiful loaf with little effort. The combination of sweet, slightly tangy cranberries with the satisfying crunch of walnuts makes each bite a culinary adventure. Furthermore, the long fermentation process ensures your bread has a depth of flavor that shop-bought loaves simply cannot match. This is a bread that sustains you, nourishes the soul, and leaves you with not just a satisfied palate but also a proud heart.
Ingredients for Cranberry Walnut Bread
To embark on your baking adventure, you will need the following ingredients to create your very own Cranberry Walnut Bread.
- All-purpose flour: 3 cups (375 g)
- Kosher salt: 1 teaspoon
- Rapid-rise yeast: 1 teaspoon
- Room temperature water: 1 1/2 cups
- Honey: 2 tablespoons
- Dried cranberries: 1 cup (110 g)
- Walnuts, roughly chopped: 1/2 cup (58.5 g)
Each ingredient plays a crucial role in building the texture and flavor of your bread. The combination of flour and yeast creates the structure, while honey offers a hint of sweetness. The cranberries contribute a delightful tanginess, and the walnuts add depth with their robust crunch.
How to Make Cranberry Walnut Bread Directions
Creating your Cranberry Walnut Bread is straightforward and satisfying. Let’s walk through the steps together.
Mix the Dry Ingredients: Begin by grabbing a large mixing bowl. In it, combine the all-purpose flour, kosher salt, and rapid-rise yeast. Use a whisk to blend these dry ingredients until they’re evenly mixed. This ensures that the salt and yeast are distributed uniformly throughout the flour, leading to consistent flavor and fermentation.


Add Wet Ingredients: Next, introduce the room temperature water and honey to the mixture. The honey not only sweetens your bread but also aids in achieving a lovely crust during baking. Stir these ingredients together until they form a shaggy dough. It may seem a bit sticky, and that’s perfectly fine.
Incorporate the Cranberries and Walnuts: Gently fold in the dried cranberries and chopped walnuts using a spatula or your hands. This adds the exciting blend of flavors and textures that make this bread special. Ensure that they are evenly distributed throughout the dough.
Initial Rise: Pour the dough into a clean, greased bowl, and cover it tightly with plastic wrap. Allow it to rise at room temperature for about 18 hours. This long, slow rise is essential, as it helps develop the flavors beautifully and creates a perfect texture.
Shape the Dough: Once your dough has doubled in size, lightly flour a piece of parchment paper and turn the dough out onto it. Use your hands to shape it into a ball by stretching the dough, folding it over itself, and tucking the edges firmly underneath.
Rest the Dough: After shaping, spray the top of the dough with nonstick cooking spray and cover it with plastic wrap again. Let it rest for an additional 30 minutes. This short break will help it relax and make it easier to score and bake.
Preheat the Oven: As the dough rests, place a Dutch oven into your cold oven. Preheat both the oven and the pot to 450°F (232°C). Preheating the Dutch oven will create a lovely steam environment that mimics professional bread-baking conditions, yielding a perfect crust.
Score and Bake the Bread: After the resting period, use a very sharp knife to score the top of the loaf with an ‘X.’ This scoring technique allows the bread to expand beautifully while baking. Carefully transfer the dough (along with the parchment paper) into the hot Dutch oven. Cover the pot, and let it bake for 30 minutes.
Finish Baking: Once the initial baking time is up, remove the lid and continue to bake for an additional 15 minutes or until the crust turns a golden brown. You want to achieve a deep, inviting color that beckons you to slice into it.
Cool and Serve: After baking, carefully remove the loaf from the Dutch oven using oven mitts. Allow it to cool on a wire rack for about 30 minutes before slicing and serving. This cooling time helps set the structure of the bread, making it easier to slice.
How to Serve Cranberry Walnut Bread
Once your Cranberry Walnut Bread has cooled, the real joy begins. This delicious loaf can be enjoyed in numerous ways, making it a versatile addition to your baking repertoire. Here are some ideas for serving:
- Breakfast Delight: A warm slice of Cranberry Walnut Bread is an excellent addition to your breakfast table. Spread a thin layer of butter or cream cheese on top, allowing the spread to melt into the warm loaf. And for an added touch, drizzle some honey on top.
- Coffee Companion: Pair a slice with your favorite cup of coffee or tea. The sweet and tangy flavors of the cranberries complement hot beverages perfectly, creating a lovely afternoon snack.
- Savory Pairing: If you’re feeling adventurous, consider pairing it with cheese or savory spreads. Soft goat cheese or sharp cheddar can dramatically elevate this delightful bread. You can even enjoy it with a light salad for a light lunch.
- Snack Time: Enjoy it plain or with a simple smear of nut butter for a healthy snack. This bread is not just for special occasions—it’s perfect for everyday indulgence.
Expert Tips for Perfect Cranberry Walnut Bread
To achieve the best results with your Cranberry Walnut Bread, keep these expert tips in mind:
- Ingredient Quality: Always use high-quality ingredients. Fresh cranberries and premium walnuts will significantly boost the flavor of your bread.
- Room Temperature Water: Ensure that the water you’re using is at room temperature. This can encourage proper activation of the yeast and promote a better rise.
- Flour Selection: While all-purpose flour works wonderfully, you can experiment with whole wheat flour for a heartier loaf. This will change the texture but can create a lovely richness.
- Don’t Rush the Rise: Patience is key. The long fermentation time may feel tedious, but it allows for complex flavors to develop, leading to a superior bread.
- Check Doneness: When you take your bread out of the oven, tap the bottom. If it sounds hollow, it’s done. If not, give it a few more minutes.
How to Store Cranberry Walnut Bread
If you find that you have leftovers, storing your Cranberry Walnut Bread properly is essential for maintaining its freshness. Here’s how to do it:
- Cool Completely: Before storage, ensure that your bread has cooled completely. Storing warm bread can create condensation and lead to unwanted sogginess.
- Wrap Well: Wrap the bread in plastic wrap or aluminum foil tightly. This protects it from air and moisture, keeping it from drying out.
- Room Temperature or Freezer: Store the wrapped bread at room temperature for 2-3 days. For longer-term storage, consider freezing it. Slice it before freezing so you can easily take out individual pieces. Just be sure to wrap each slice in plastic wrap and place them in a freezer-safe bag.
- Thawing: To enjoy your frozen bread, remove it from the freezer and let it thaw at room temperature. You can also toast individual slices for a warm, fresh taste.
Variation of Cranberry Walnut Bread
The beauty of baking lies in its adaptability. Here are some variations you can try with your Cranberry Walnut Bread recipe:
- Add Spices: Incorporate spices like cinnamon or nutmeg for a warm, cozy flavor profile that adds to the overall bread experience, especially during the holiday season.
- Use Different Nuts: If walnuts aren’t your favorite, feel free to substitute with pecans or even almonds. Each nut will offer a unique flavor and texture to the bread.
- Cheese Enrichment: Shredded cheese can be folded into the dough along with the cranberries and walnuts for a delightful twist. Consider using cheddar for its sharpness or Parmesan for a nutty flavor.
- Fruit Variety: Experiment with other dried fruits such as figs or apricots. The sweetness of these alternatives can add exciting dimensions to your loaf.
Frequently Asked Questions about Cranberry Walnut Bread
How do I know when my Cranberry Walnut Bread is done baking?
You will know your bread is done when it has a golden brown crust, and tapping the bottom sounds hollow. Utilize a thermometer; the internal temperature should reach around 200°F (93°C).
Can I reduce the amount of honey in the recipe?
Yes, if you prefer a less sweet bread, you can adjust the honey amount. However, keep in mind that it also acts as a yeast activator, so reducing it too much may impact the rise.
Can I use fresh cranberries instead of dried?
While you can use fresh cranberries, you will need to adjust the sweetness and liquid in the recipe, as fresh cranberries are more tart. Dried cranberries also provide a better texture in the bread.

Cranberry Walnut Bread
Ingredients
Dry Ingredients
- 3 cups all-purpose flour 375 g
- 1 teaspoon kosher salt
- 1 teaspoon rapid-rise yeast
Wet Ingredients
- 1.5 cups room temperature water
- 2 tablespoons honey
Add-ins
- 1 cup dried cranberries 110 g
- 1/2 cup walnuts, roughly chopped 58.5 g
Instructions
Preparation
- In a large mixing bowl, combine the all-purpose flour, kosher salt, and rapid-rise yeast. Whisk until evenly mixed.
- Add the room temperature water and honey to the mixture, stirring until a shaggy dough forms.
- Gently fold in the dried cranberries and chopped walnuts until evenly distributed.
- Pour the dough into a greased bowl, cover tightly with plastic wrap, and allow it to rise at room temperature for about 18 hours.
- Once the dough has doubled in size, turn it out onto a floured parchment paper and shape it into a ball.
- Spray the top of the dough with nonstick spray, cover again, and let it rest for 30 minutes.
- Preheat a Dutch oven in a cold oven to 450°F (232°C).
- After resting, score the top of the loaf with a sharp knife and carefully transfer it to the hot Dutch oven. Cover and bake for 30 minutes.
- Remove the lid and continue baking for an additional 15 minutes or until the crust is golden brown.
- Remove the loaf from the Dutch oven and let it cool on a wire rack for about 30 minutes before slicing.
Send me this recipe!
Just enter your email below and get it sent straight to your inbox!