There’s something truly magical about the aroma of freshly baked bread wafting through your home. When you think of comfort food, nothing quite beats the simple pleasure of biting into a warm, crusty loaf. Dutch oven bread allows you to make artisanal-quality bread right in your own kitchen without any special equipment or advanced baking skills. This guide will walk you through every step of making delicious Dutch oven bread—a process that’s rewarding, satisfying, and utterly delightful.
Why We Love This Dutch Oven Bread Recipe
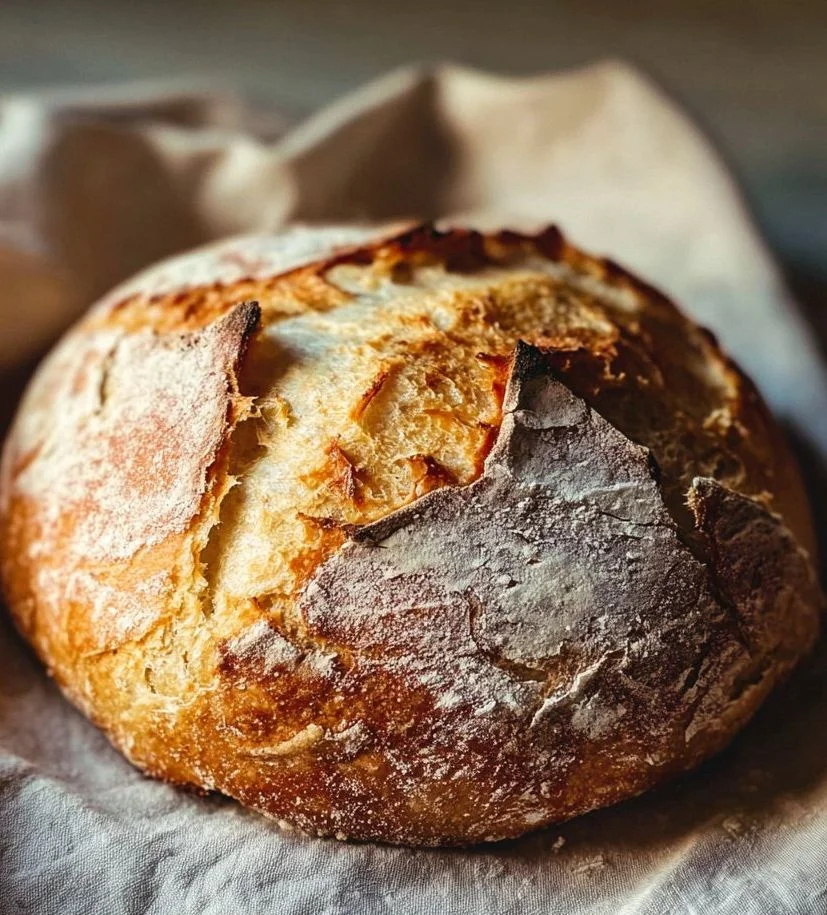
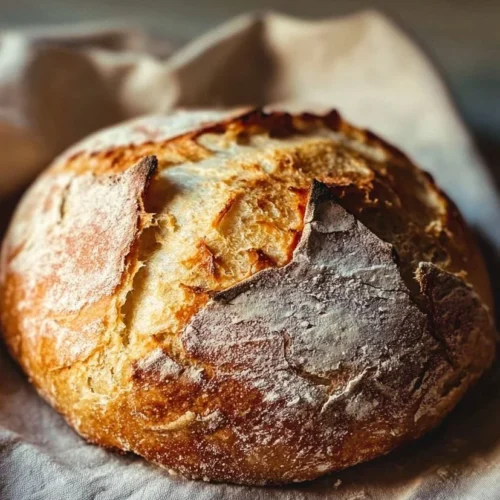
This Dutch oven bread recipe is beloved for several compelling reasons. First and foremost, it’s incredibly straightforward. With just a handful of ingredients, you can produce a loaf that rivals those from your favorite bakery. The crust is wonderfully crispy, while the inside is soft and fluffy, providing the perfect balance that everyone craves in a good bread.
Additionally, the use of a Dutch oven mimics a professional steam-injected oven, promoting excellent oven spring without any extra equipment. This method helps retain moisture during baking, resulting in a wonderfully chewy crust and a delightful open crumb structure. The end product? A homemade bread that’s impressive enough for guests yet easy enough for everyday enjoyment.
Ingredients for Dutch Oven Bread
To get started on your bread-making journey, here’s what you’ll need:
- 500 g strong white bread flour
- 1 1/2 teaspoons salt
- 7 g active dried yeast (1 packet)
- 350 ml warm water (around 40°C / 104°F)
- 1 tablespoon honey
- Extra flour, for dusting
How to Make Dutch Oven Bread
Making your own Dutch oven bread is not just fulfilling; it’s also a step toward mastering a fundamental cooking skill. Here’s a detailed look at the steps you’ll follow:
Mix the Dry Ingredients: Start by grabbing a large mixing bowl. Take the strong white bread flour and combine it with the salt and the dried yeast. Ensure that the yeast is mixed in well to guarantee even fermentation throughout the dough.
Prepare the Liquid: In a jug, mix the warm water with the honey, stirring until the honey is completely dissolved. The warmth of the water will help activate the yeast, so it’s essential to get it to approximately 40°C (104°F).
Combine Ingredients: Pour the honey-water mixture into the bowl with the dry ingredients. Begin mixing with a wooden spoon or your hands until a rough dough starts to form. Don’t worry about making it perfect at this point.
- Knead the Dough: Transfer the dough to a lightly floured surface. Knead the dough for about 10 minutes, pushing it away from you and then folding it back over itself repeatedly. You’ll know it’s ready when it becomes smooth and elastic—this is key for that perfect texture.
First Rise: Place the kneaded dough into a lightly oiled bowl, turning it around so it’s coated with oil. Cover the bowl with a clean kitchen towel and leave it in a warm area for about 1 to 1.5 hours, or until it has doubled in size.
Shape the Dough: After it has risen, punch down the dough gently to release the air. Transfer it back onto your floured surface and shape it into a round ball. Place it seam-side down on a piece of baking parchment.
Second Rise: Cover the dough with a towel again and allow it to rise for another 30 to 45 minutes while you preheat the oven to 220°C (425°F). This second rise will add to the loaf’s volume and lightness.
Bake the Bread: Carefully take the Dutch oven out of the oven. Place the dough, along with the parchment paper, into the heated Dutch oven. Cover it with the lid and bake for 25 minutes. After that, take off the lid and bake for another 15 to 20 minutes. Keep an eye on it—you want it to turn a golden brown.
Cool Down: Once done, carefully remove the bread from the Dutch oven and allow it to cool on a wire rack for at least 30 minutes. This cooling period is crucial; slicing too soon can result in a gummy texture.


How to Serve Dutch Oven Bread
Now that you have your beautifully baked Dutch oven bread, it’s time to enjoy it! There are countless ways to serve this delightful loaf. You can slice it thick for sandwiches or serve thin slices with a medley of cheeses and fresh vegetables. If you’re feeling indulgent, consider toasting slices and topping them with a smear of butter or your favorite spreads, like avocado or hummus.
For a more cozy experience, serve warm slices alongside homemade soups or hearty stews. The incredible crust and soft interior of your bread will beautifully complement any dish. Don’t forget; using your leftover bread for sandwiches the next day is just as rewarding!
Expert Tips for Perfect Dutch Oven Bread
To ensure that your bread turns out perfectly every time, consider these expert tips:
Temperature Matters: Make sure your water is warm enough to activate the yeast but not so hot that it kills it. The ideal range for warm water is between 38°C to 43°C (100°F to 110°F).
Kneading Technique: Keep your dough covered while you’re working to prevent it from drying out. The temperature of your kitchen can affect the proving time; if it’s too cool, you may need to extend the rising times.
Preheating the Dutch Oven: Always preheat your Dutch oven before placing the dough inside; this step is indispensable for creating that crispy crust.
Don’t Rush the Cooling: Allow your bread to cool on a wire rack before slicing. This prevents moisture from building up and keeps your crumb structure intact.
Experiment with Flavor: After you become comfortable with the basic recipe, consider adding herbs, cheese, or seeds for additional taste and texture.
How to Store Dutch Oven Bread
To keep your Dutch oven bread fresh for as long as possible, store it in a paper bag or wrapped in a clean kitchen towel. This method allows for adequate airflow while maintaining some level of moisture. If you need to keep your bread for more than a couple of days, consider freezing it. Slice the loaf before freezing so you can toast individual slices as needed. Wrap the bread securely in plastic wrap or aluminum foil before placing it in a freezer-safe bag. When you’re ready, just take out the slices and toast or reheat them—no one will know they were frozen!
Variations of Dutch Oven Bread
Once you master the basic recipe, the fun doesn’t have to stop there. You can experiment with a variety of flavors and textures.
Herb-Infused Bread: Mix in dried or fresh herbs such as rosemary, thyme, or basil. This is perfect for serving with Italian dishes or as a flavorful accompaniment to any meal.
Cheese and Garlic: Incorporating shredded cheese and minced garlic into your dough creates a wonderful savory bread that’s perfect on its own or as a side dish.
Seeds and Nuts: Adding a handful of seeds like sunflower, sesame, or even chopped nuts can enhance the texture and add a nutty flavor.
Whole Wheat Variation: You can substitute part of the strong white bread flour with whole wheat flour for a denser, fiber-rich bread.
Olive Oil Bread: Replace some of the water with olive oil for a richer flavor profile. This bread is fantastic when served with dips or salads.
Frequently Asked Questions
What makes Dutch oven bread different from regular bread?
Dutch oven bread differs primarily in the baking technique. Using a Dutch oven traps steam, allowing the bread to rise better and creating a crispy crust and tender interior—qualities that can be hard to achieve in a conventional oven without additional humidity methods.
How long does Dutch oven bread stay fresh?
When stored correctly, your Dutch oven bread can stay fresh for about 3-5 days. Freezing it extends its shelf life significantly—up to 3 months. Just remember to wrap it well.
Can I use instant yeast instead of active dried yeast?
Yes, you can. If you’re using instant yeast, skip the activation step; mix it directly with the dry ingredients. This type of yeast is quicker and often more potent.
What can I do if my dough doesn’t rise?
If your dough doesn’t rise, it might be due to expired yeast or low temperature. Make sure to check the expiration date on your yeast packets and ensure your rising environment is warm.
Can I make this recipe gluten-free?
While this recipe is designed for strong white flour, you can try substituting it with gluten-free flour blends specifically designed for bread. Be sure to adjust the liquid ratios as needed and include a binding agent like xanthan gum if your blend doesn’t already contain it.
Dutch Oven Bread
Ingredients
- 500 g strong white bread flour
- 1 ½ teaspoons salt
- 7 g active dried yeast (1 packet)
- 350 ml warm water (around 40°C / 104°F)
- 1 tablespoon honey
- Extra flour for dusting
Instructions
- In a large mixing bowl, combine flour, salt, and dried yeast.
- In a jug, mix warm water with honey until dissolved.
- Pour the honey-water mixture into the dry ingredients and mix until a rough dough forms.
- Knead the dough on a lightly floured surface for about 10 minutes until smooth and elastic.
- Place the dough in a lightly oiled bowl, cover, and let rise for 1 to 1.5 hours until doubled in size.
- Punch down the dough, shape it into a round ball, and place it seam-side down on baking parchment.
- Cover and let rise for another 30 to 45 minutes while preheating the oven to 220°C (425°F).
- Transfer the dough into the preheated Dutch oven. Cover and bake for 25 minutes, then uncover and bake for another 15-20 minutes until golden brown.
- Remove from the oven and let cool on a wire rack for at least 30 minutes before slicing.
Send me this recipe!
Just enter your email below and get it sent straight to your inbox!