
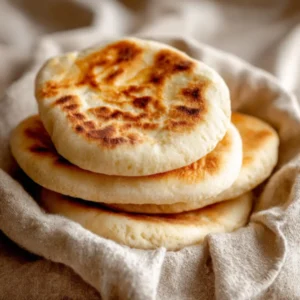
This gluten-free pita bread is soft, light, and easy to make. It doesn’t crumble like many gluten-free breads and works great for sandwiches or dipping. You’ll enjoy its tender texture and mild taste every time.
Why You’ll Love This Gluten Free Pita Bread Recipe
This pita bread stands out because it manages to be both gluten-free and incredibly soft, a rare combination in gluten-free baking. The careful blend of ingredients, including psyllium husks and a custom gluten-free flour mix, gives it a beautiful elasticity that mimics traditional pita bread. It also benefits from a long chill time, which enhances flavor and improves texture, making the bread easier to handle and puff up in the oven. Whether you’re gluten-sensitive or just looking for a healthier alternative, this recipe won’t disappoint.
Ingredients for Gluten Free Pita Bread
- 150 grams cold water
- 150 grams cold milk
- 56 grams olive oil (or substitute with canola or vegetable oil)
- 385 grams gluten-free bread flour blend
- 2 teaspoons instant yeast
- 2 teaspoons sugar
- 10 grams kosher salt
- 5 grams whole psyllium husks (or 1½ teaspoons psyllium husk powder)
- Butter for brushing (use dairy-free butter if preferred)
These ingredients work together to give you a dough that’s easy to work with and yields soft, flavorful pita pockets. Psyllium husks are key for adding structure and moisture, so don’t skip them if you want the best results.
How to Make Gluten Free Pita Bread
Start by adding all the ingredients to your mixing bowl in the order listed. Use a dough hook attachment on a stand mixer and knead the dough on medium speed for about five minutes. If you don’t have a stand mixer, you can use a handheld mixer with dough hooks or even a Danish dough whisk — just be prepared to mix vigorously until the dough comes together with a smooth texture.
Once mixed, cover the dough tightly and refrigerate it for at least 24 hours, though up to four days is fine. This chilling period allows the flavors to develop and helps the dough become easier to handle.
When you’re ready to bake, preheat your oven to 450°F and position a baking steel, stone, or an overturned baking sheet on the lowest rack. This setup mimics the intense heat of a traditional pita oven and encourages the bread to puff perfectly.


Lightly flour your work surface with gluten-free flour and knead the chilled dough until smooth. Divide it into eight equal portions, each weighing about 95 grams. Roll each piece into a smooth ball.
Coat each dough ball generously with gluten-free flour on both sides, then roll it out into a 6-inch diameter circle, no more than ¼ inch thick. Place two rolled-out pita on a sheet of parchment paper and prepare to bake.
Transfer two pita at a time (with the parchment) onto the hot baking steel or stone. Bake for two minutes, then carefully flip each pita using a spatula and bake for an additional 2 to 3 minutes until they puff up and turn a light golden color.
Remove the pitas from the oven and place them on a paper towel-lined baking sheet. Brush each side with butter while still warm, then cover with another paper towel and a kitchen towel to keep them soft. Repeat the process with the remaining dough balls.
For a smoky twist, you can grill your pita instead. Preheat your grill to high, place the rolled-out pita dough on the grates over direct heat, close the lid, and cook for 2 to 3 minutes. Some may not puff on the grill, but they will still taste fantastic.
How to Serve Gluten Free Pita Bread
This pita bread is wonderfully versatile. Serve it warm, stuffed with your favorite Mediterranean fillings like falafel, grilled vegetables, or chicken shawarma. It also makes an excellent accompaniment to dips such as hummus, baba ganoush, or tzatziki.
You can tear it into pieces and use it as a scoop for stews or salads, or slice it open to create perfect pockets for sandwiches. Its soft texture and subtle flavor make it suitable for breakfast too—try it with a smear of avocado or your favorite nut butter.
Expert Tips for Perfect Gluten Free Pita Bread
For the best results, be sure to use cold water and milk as specified, which helps control the dough temperature and fermentation. The psyllium husks are essential for moisture retention and structure, so don’t replace them with something else.
Refrigerating the dough for at least 24 hours is crucial; this slow fermentation improves flavor and makes the dough easier to roll without cracking. When rolling, try to keep the dough as even as possible and avoid rolling it too thin, which can prevent proper puffing.
Use a very hot baking surface and place the pita close to the heat source to encourage steam pockets that cause puffing. If you don’t have a baking stone or steel, an overturned heavy baking sheet will work as a substitute.
Don’t skip brushing the pitas with butter while they’re warm. It keeps the surface soft and adds a delicious flavor layer. If you prefer dairy-free, vegan butter works just as well.
How to Store Gluten Free Pita Bread
Once baked and cooled, store your pita bread in an airtight container or a zip-top bag at room temperature for up to five days. This will keep them soft and ready to use.
For longer storage, freeze the pitas individually wrapped in plastic wrap and placed in a freezer bag or airtight container. When you want to enjoy them, thaw at room temperature or warm gently in the oven or toaster.
Avoid refrigerating the bread for long periods as this can dry it out.
Variations of Gluten Free Pita Bread
You can easily adapt this recipe to suit your tastes or dietary needs. For a dairy-free version, simply swap out the milk for an unsweetened plant-based milk like almond or oat, and use a dairy-free butter alternative for brushing.
If you want a heartier flavor, consider adding herbs like rosemary or oregano into the dough before kneading. You could also mix in some garlic powder or sumac for a Middle Eastern flair.
To make whole-grain gluten-free pita, substitute a portion of the flour blend with gluten-free oat or buckwheat flour, keeping in mind this might change the texture slightly.
For a low-carb twist, try replacing some of the flour with almond flour and increase the psyllium husks to maintain structure.
FAQ About Gluten Free Pita Bread
Can I make this pita bread without psyllium husks?
Psyllium husks help bind the dough and add moisture. If you don’t have them, reduce the water amount to about 100 grams and expect a different texture, often less elastic and more crumbly.
How long does it take to make this recipe?
While the active prep and baking time are short (about 20 minutes total), the dough needs to chill in the fridge for at least 24 hours to develop flavor and improve texture.
Can I freeze the pita bread?
Yes, you can freeze the baked pita bread. Wrap each pita individually in plastic wrap, then place them in a freezer bag. They will keep well frozen for up to 3 months.
What flour blend should I use?
Use a gluten-free bread flour blend that includes xanthan gum or another binding agent for best results. Avoid all-purpose gluten-free flour as it may not produce the right texture.
Will this recipe work on a grill?
Yes! Grilling pita adds a lovely smoky flavor. Preheat the grill to high heat and cook the rolled-out dough for 2-3 minutes on each side. Watch carefully to avoid burning.
Is this pita suitable for people with dairy allergies?
Yes, you can substitute dairy milk with plant-based milk and use dairy-free butter alternatives for brushing, making it friendly for those with dairy allergies or sensitivities.
Gluten Free Pita Bread
Equipment
- Mixing Bowl
- Stand Mixer or Hand Mixer
- Baking Steel or Stone
- Rolling Pin
Ingredients
- 150 grams cold water
- 150 grams cold milk
- 56 grams olive oil or substitute with canola or vegetable oil
- 385 grams gluten-free bread flour blend
- 2 teaspoons instant yeast
- 2 teaspoons sugar
- 10 grams kosher salt
- 5 grams whole psyllium husks or 1½ teaspoons psyllium husk powder
- Butter for brushing use dairy-free butter if preferred
Instructions
- Add all ingredients to a mixing bowl in the order listed. Use a dough hook attachment on a stand mixer to knead on medium speed for about five minutes until smooth.
- Cover the dough tightly and refrigerate for at least 24 hours (up to 4 days) to develop flavor and improve texture.
- Preheat the oven to 450°F (232°C) and position a baking steel, stone, or an overturned baking sheet on the lowest rack.
- Lightly flour a work surface with gluten-free flour and knead the chilled dough until smooth. Divide into 8 equal portions (about 95 grams each) and roll into balls.
- Coat each dough ball with gluten-free flour and roll into 6-inch diameter circles (no more than ¼ inch thick).
- Transfer two rolled pitas at a time onto the hot baking surface. Bake for 2 minutes, then flip and bake for an additional 2-3 minutes until puffed and golden.
- Remove from the oven and brush each side with butter while warm. Cover with a paper towel and a kitchen towel to keep soft.
- For a smoky flavor, grill the pita on high heat for 2-3 minutes on each side instead of baking.
Send me this recipe!
Just enter your email below and get it sent straight to your inbox!