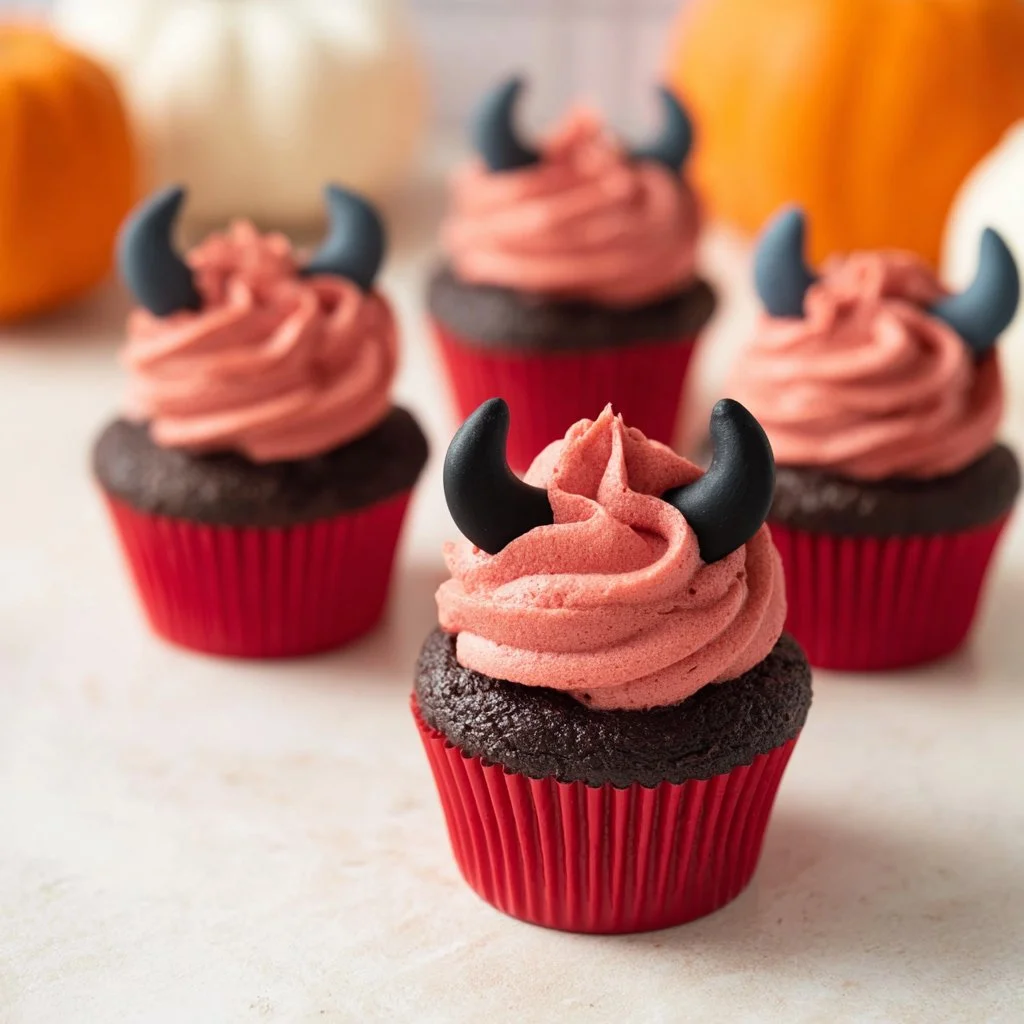
When Halloween rolls around, you might find yourself in search of treats that are as whimsical as they are delicious. Enter Halloween Devil Cupcakes. These delightful chocolate cupcakes, decorated with vibrant red buttercream and devilish black fondant horns, encapsulate the spirit of Halloween while satisfying your sweet tooth. Not only are they easy to make, but they also bring a fun and festive atmosphere to any Halloween gathering.
Why We Love This Halloween Devil Cupcakes Recipe
There’s something enchanting about cupcakes, especially during Halloween. They are easy to share, fun to decorate, and perfect for showcasing a myriad of spooky designs. Halloween Devil Cupcakes take that idea and elevate it with their playful devil theme. The combination of rich chocolate cake and vibrant red frosting creates the perfect visual and flavor contrast that makes these cupcakes truly special.
One of the best things about this cupcake recipe is its versatility. You can easily adjust the amount of food coloring to achieve the perfect hue for your buttercream. Plus, whether you’re a novice in the kitchen or an experienced baker, this recipe calls for simple ingredients that streamline the baking process. You’ll find joy in crafting each cupcake to resemble little devils, bringing smiles to the faces of everyone who gets to enjoy them.
Ingredients for Halloween Devil Cupcakes
To whip up a batch of these hauntingly delicious Halloween Devil Cupcakes, you will need the following ingredients:
- Chocolate cake box mix: 15.25 ounces (plus all necessary ingredients as per the box instructions)
- Butter: 1 stick (approx. 1/2 cup, softened)
- Confectioners’ sugar: 2 cups
- Cocoa powder: 1 tablespoon
- Milk: 1 1/2 tablespoons
- Red gel food coloring: 1/2 teaspoon
- Black fondant: 4 ounces
These ingredients come together effortlessly to create a dessert that will not only look amazing but taste heavenly too!
How to Make Halloween Devil Cupcakes
Creating these cupcakes is as fun as they are rewarding. Here’s how to bring your Halloween Devil Cupcakes to life:


Start with Your Base: First, you’ll prepare your chocolate cupcakes. Follow the instructions on your cake mix box. Remember to preheat your oven according to the package directions, and fill your cupcake liners in a muffin tin.
Bake to Perfection: Place your cupcake tray in the oven and bake until a toothpick inserted in the center comes out clean. Once baked, let the cupcakes cool thoroughly on a wire rack. This step is crucial so that your frosting doesn’t melt!
Prepare the Buttercream: In a large mixing bowl, combine your softened butter, confectioners’ sugar, cocoa powder, and milk. Use an electric mixer to beat the mixture until it’s smooth and well-combined.
Add Some Color: Once your buttercream is ready, it’s time to make it festive! Add the red gel food coloring to the bowl and continue to mix until the buttercream is fully tinted a vibrant red.
Frosting Fun: Scoop the red buttercream into a piping bag fitted with a round Wilton icing tip (#12 for a nice size). Begin frosting each cupcake generously, creating a nice swirl or dome shape.
Craft the Devil Horns: Next, grab your black fondant. Divide it into 3/4 inch spheres—approximately 24 will be needed. Roll each sphere into a cylinder shape about 1 inch long and 1/2 inch wide, then point one end upward to create a horn shape.
Assemble the Cupcakes: Take two black fondant shapes and place them on each frosted cupcake, sticking the pointy ends out to serve as the devil horns.
Serve and Enjoy: Your Halloween Devil Cupcakes are now ready to shine! Place them on a plate or spooky cake stand for the ultimate presentation.
How to Serve Halloween Devil Cupcakes
Serving your Halloween Devil Cupcakes can be just as gratifying as making them. Here are a few ideas to create an inviting and festive display:
Theming: Consider placing the cupcakes on a themed tray or a spooky tablecloth. Adding props like spider webs, little plastic spiders, or Halloween-themed decorations can elevate your serving setup.
Individual Wrapping: For parties or gatherings, you can wrap each cupcake with clear or Halloween-themed wrappers. This not only keeps them fresh but also adds to the festive cheer.
Accompanying Beverages: Pair these devilish treats with warm apple cider or homemade pumpkin spice latte. These beverages complement the seasonal flavors perfectly and enhance the Halloween spirit.
Gifting: If you want to spread the joy, consider making a box of these devil cupcakes to gift to friends or neighbors. A cheerful card with Halloween wishes will make it even more special!
Expert Tips: Halloween Devil Cupcakes
To ensure your Halloween Devil Cupcakes turn out as perfect as possible, here are some expert tips:
Coolness is Key: If your cupcakes are warm, your frosting will likely melt and slide off. Always allow them to cool completely.
Practice Piping: If you’re new to piping, practice on a sheet of parchment paper until you feel comfortable. This can help you achieve the shapes and designs you’re looking for.
Keep Fondant Fresh: When working with fondant, keep it covered when not in use to avoid it drying out, making it easier to mold and shape into horns.
Color Consciousness: If you prefer a more subdued color or want to match a specific theme, adjust your food coloring accordingly. The great thing about buttercream is its flexibility!
How to Store Halloween Devil Cupcakes
After your delightful Halloween Devil Cupcakes are created and devoured, you may be left with a few extras. Here’s how to store them properly:
Room Temperature: If you plan to eat them within a day or two, simply store the cupcakes in an airtight container at room temperature. This keeps the frosting fresh and maintains the cupcake moisture.
Refrigeration: For longer storage, pop them in the refrigerator. Make sure they are in a sealed container to prevent them from drying out or absorbing any odors.
Freezing: If you want to save some cupcakes for a later date, freeze them without the frosting. Place them in a freezer-safe container or wrap them securely in plastic wrap. When ready to eat, let them thaw at room temperature before frosting.
Variation of Halloween Devil Cupcakes
The beauty of Halloween Devil Cupcakes lies in their versatility. Here are some fun variations to consider:
Different Flavors: Swap the chocolate cake mix for a vanilla or red velvet cake mix for a twist. Red velvet cupcakes with red buttercream can give you a different devilish look.
Colorful Cream: Try different shades of buttercream by using other gel colors such as orange or purple in place of red. Each color will change the theme while remaining festive.
Filling: Add a surprise filling to your cupcakes! Consider using raspberry preserves or cream cheese filling for an added layer of flavor. Just make a small hole in the center of each cooled cupcake, fill it with a teaspoon of filling, and then frost.
Toppings Galore: Get creative with toppings! Add edible glitter for some sparkle or use candy eyes atop the frosting for an even spookier effect.
FAQ
How do I make sure my Halloween Devil Cupcakes do not stick to the liners?
To keep your cupcakes from sticking to the liners, ensure that you properly grease the muffin pan and use quality cupcake liners. You can also lightly dust the liners with a bit of flour before pouring in the batter.
Can I make the frosting ahead of time?
Yes! You can prepare the red buttercream ahead of time and store it in the refrigerator. When you’re ready to use it, just give it a good stir or whip it a little before piping to ensure it’s smooth.
How many cupcakes does this recipe make?
This recipe typically yields about 24 cupcakes, depending on how full you fill your liners. Aim to fill each liner about two-thirds full for the best results.
Can I replace the butter in the frosting with something else?
You can substitute the butter for a dairy-free alternative if you have dietary restrictions. Just note that it may slightly alter the flavor and texture of the buttercream.

Halloween Devil Cupcakes
Equipment
- Muffin tin
- Mixing Bowls
- Electric Mixer
- Piping bag
Ingredients
- 1 box chocolate cake mix 15.25 ounces (plus all necessary ingredients as per the box instructions)
- 1 stick butter 1/2 cup, softened
- 2 cups confectioners’ sugar
- 1 tablespoon cocoa powder
- 1 1/2 tablespoons milk
- 1/2 teaspoon red gel food coloring
- 4 ounces black fondant
Instructions
- Preheat your oven according to the chocolate cake mix package instructions and line a muffin tin with cupcake liners.
- Prepare the chocolate cake mix according to the package instructions.
- Fill each cupcake liner about two-thirds full with the batter.
- Bake according to package instructions, checking with a toothpick until it comes out clean.
- Allow the cupcakes to cool completely on a wire rack.
- In a mixing bowl, combine softened butter, confectioners’ sugar, cocoa powder, and milk. Beat until smooth and creamy.
- Add red gel food coloring to the buttercream and mix until the desired color is achieved.
- Using a piping bag, frost each cooled cupcake generously with the red buttercream.
- Shape black fondant into small horns and place two on top of each frosted cupcake.
- Serve and enjoy your Halloween Devil Cupcakes!
Send me this recipe!
Just enter your email below and get it sent straight to your inbox!