
When the winter season rolls in, so does a wave of holiday joy, cheer, and a long-standing tradition of baking delightful treats. One such treat that brings smiles to faces young and old alike is the charmingly whimsical Melting Snowman Cookies. These adorable cookies are not just a feast for your taste buds; they are little canvases of creativity that you can personalize according to your style. Whether you are hosting a winter bash, a holiday party, or simply want to spread some cheer, these cookies are sure to impress!
Why We Love This Melting Snowman Cookies Recipe
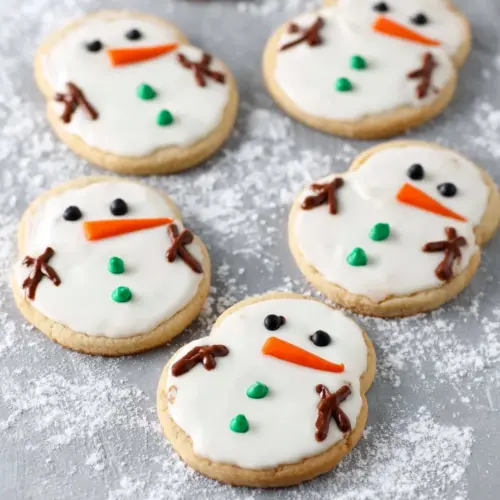
Melting Snowman Cookies are irresistibly cute and offer a perfect blend of sweetness that embodies the holiday spirit. What sets these cookies apart is their unique presentation and the chance to engage in a fun decorating activity, making them an ideal treat for families to create together. You’ll appreciate how forgiving the decorating process can be — whether you’re a novice or a cookie artist, there’s no wrong way to create your own melting snowman. The soft cookie base combined with the sugary royal icing creates a delightful texture, and the creative possibilities are endless. And let’s not forget: they make fantastic gifts or party favors to spread holiday cheer!
Ingredients for Melting Snowman Cookies
To create these delightful cookies, you’ll require a handful of simple ingredients. Gather the following:
- Cookie Dough: Enough for rolling out circles.
- Royal Icing: A crucial element for decorating.
- Circle Cookie Cutter: 2 ½ inches in diameter.
- Food Coloring: Black, brown, orange, white, and your preferred colors for embellishment.
- Disposable Decorating Bags: Essential for piping the icing.
- Couplers: To switch out icing tips easily.
- Decorating Tips: Sizes 2 and 3 for precision in decorating.
The beauty of this recipe lies in its flexibility. You can make the cookie dough from scratch or use a pre-made version, depending on your time and comfort level in the kitchen.
How to Make Melting Snowman Cookies
Now, let’s dive into the fun part: making and decorating your Melting Snowman Cookies! Follow these steps to create your cookie masterpiece.
- Prepare the Cookie Dough: Start by mixing your cookie dough according to your chosen recipe. If you’re working with a pre-made dough, just make sure it’s well-chilled before rolling.
- Chill and Roll Out: Once your dough is ready, chill it in the fridge for about 30 minutes. This will make it easier to roll out and cut. On a floured surface, roll out the dough to about ¼ inch thickness.
- Cut Out Circles: Using your 2 ½ inch round cookie cutter, cut out circles from the dough. Place them on a lined baking sheet and space them about an inch apart.
- Bake the Cookies: Preheat your oven to the temperature specified in your cookie dough recipe. Bake the cookies for the recommended time until they are lightly golden. Allow them to cool completely on a wire rack.
- Prepare the Royal Icing: While your cookies cool, prepare the royal icing. Use a basic recipe that includes powdered sugar, egg whites (or meringue powder), and water. Whip it up until it’s stiff but spreadable.
- Divide and Tint Icing: Divide your royal icing into separate bowls and tint with food coloring. Most will remain white for the snowy base, but you’ll need some black, brown, orange, and any other colors you prefer for decoration.
- Set Up Decorating Bags: Fit your disposable decorating bags with couplers and tips. Fill the bags with the appropriately colored icing, reserving some white icing for the body of the snowman.
- Decorate the Cookies: Start by piping blobs of white icing onto each circle cookie to represent melting snow. Use a size 3 tip for this. Then, thin out some reserved white icing with drops of water to fill in these blobs, giving a smooth finish. Next, let the icing set for a bit.
- Add Features: Use the black icing to pipe on the eyes and mouth using a size 2 tip. For the snowman’s arms, use the brown icing for sticks. Pipe an orange carrot nose and color buttons in anything you like with size 3 tips.
- Let the Icing Dry: For the best results, allow your cookies to dry overnight. This ensures that the icing sets perfectly, so you don’t risk smudging when serving.
Once your cookies are dry, they’re ready for the magic moment — enjoying them with family and friends!


How to Serve Melting Snowman Cookies
Serving your Melting Snowman Cookies can be just as fun as making them. Consider presenting these whimsical treats on a decorative platter or in festive gift bags for friends and family. For a delightful touch, you can even accompany these cookies with holiday-themed drinks like hot cocoa or warm cider, enhancing your festive atmosphere. Placing them next to a cozy fireplace or on a dessert table during gatherings adds a special charm. The laughter and joy these cookies bring make them perfect for sharing — each melting snowman varying in design and personality.
Whether you enjoy them fresh or gift them to loved ones, these cookies are sure to elicit smiles and evoke fond memories of the magical winter season.
Expert Tips for Melting Snowman Cookies
To ensure your Melting Snowman Cookies turn out beautifully, here are some expert tips to keep in mind:
- Chill Your Dough: Always chill your cookie dough before rolling it out. It assists in maintaining the cookies’ shape during baking.
- Consistent Icing: Aim for a piping consistency with your royal icing that is just runny enough to flow from the piping bag but thick enough to hold shapes. Adjust with water as needed.
- Thin Icing for Filling: To fill in the blobs, make sure your thinned icing is not too watery; otherwise, it can puddle and lose shape.
- Allow Drying Time: Don’t rush the drying process for your icing. Ideally, let your cookies dry overnight to ensure everything sets properly.
- Limit Color Mixing: When you tint your icing, avoid mixing too many colors in one bag. This keeps designs neat and visually appealing.
By following these tips, you’ll elevate your baking game and impress guests with the professional quality of your cookies!
How to Store Melting Snowman Cookies
To ensure your Melting Snowman Cookies stay fresh and intact, proper storing is key. After icing has fully dried, you can store them in an airtight container at room temperature. This will keep them deliciously soft and flavorful. If you are planning to keep them for a longer period, consider freezing the undecorated cookies. Simply wrap them tightly in plastic wrap and place them in an airtight freezer bag. When you’re ready to enjoy, thaw at room temperature and decorate as desired.
These cookies can last up to a week at room temperature, and a few months in the freezer, making them a great option for early holiday preparations!
Variations of Melting Snowman Cookies
If you’re feeling adventurous, there are numerous ways to mix things up with your Melting Snowman Cookies. Here are a few delightful variations you could try:
- Different Cookie Flavors: Instead of the classic sugar cookie, experiment with gingerbread or chocolate-dough bases for a unique take.
- Alternative Icing Styles: Try using different types of icing, such as cream cheese frosting or fondant, for a twist on the traditional royal icing.
- Themed Decorations: Customize decorations by adding a tiny scarf, sunglasses, or even a top hat using fondant to create diverse snowman designs.
- Add Sprinkles: Incorporate colorful sprinkles or edible glitter to enhance the festive look — perfect for children’s parties!
- Use Flavored Icing: Infuse your royal icing with flavors such as peppermint, vanilla, or almond to add an additional layer of taste.
These variations allow you to get creative, providing an opportunity to enjoy these cookies in exciting new ways. Sharing new twists on traditional recipes is a fun way to bond with family and friends.
Frequently Asked Questions about Melting Snowman Cookies
What are Melting Snowman Cookies?
Melting Snowman Cookies are adorable round cookies adorned with royal icing designed to look like a snowman in a sweet, comical pose. They are perfect for holiday celebrations and a fun project to create with family!
How long do Melting Snowman Cookies stay fresh?
When stored properly in an airtight container, these cookies can stay fresh for up to a week at room temperature. If frozen, they can last for up to three months.
Can I make the cookie dough ahead of time?
Absolutely! You can prepare the cookie dough beforehand and refrigerate or freeze it. Just make sure to thaw it slowly to maintain the texture before rolling and cutting.
Is royal icing difficult to make?
Not at all! Royal icing is simple to prepare with just a few ingredients. Following the ratios for powdered sugar and egg whites (or meringue powder) will yield great results.
What can I do if my icing is too runny?
If your icing seems runny, add more powdered sugar to thicken it to your desired consistency. Remember that for filling, you want it to be slightly more runny than piping consistency.
Melting Snowman Cookies
Equipment
- Mixing Bowls
- Baking Sheets
- Parchment Paper
- Electric Mixer
- Disposable Decorating Bags
- Couplers
Ingredients
- 2 tablespoons Vegetable Oil
- 3 tablespoons Butter Melted
- 2 large Eggs
- 2 teaspoons Vanilla Extract
- 1 teaspoon Salt
- 2 teaspoons Baking Powder
- 1 cup Powdered Confectioners Sugar For dough
- 2 ½ cups All-Purpose Flour
- 1 cup Powdered Confectioners Sugar For icing
- 2 tablespoons Milk For icing
- 4 teaspoons Light Corn Syrup For icing
- As needed Food Coloring Black, brown, orange, white, and any other colors for decoration
- As needed Sprinkles Festive colors
Instructions
- Prepare the cookie dough by mixing vegetable oil, melted butter, eggs, and vanilla extract in a large bowl.
- Add salt and baking powder, mixing until well combined.
- Gradually add powdered sugar and mix until smooth.
- Slowly incorporate all-purpose flour until a dough forms.
- Chill the dough in the refrigerator for at least 30 minutes.
- Preheat your oven to 375°F (190°C) and line baking sheets with parchment paper.
- Roll out the chilled dough to about ¼ inch thickness and cut into round shapes.
- Place the cookies on the prepared baking sheets and bake for 9 to 11 minutes or until lightly golden.
- Cool the cookies on a wire rack before decorating.
- Prepare royal icing by mixing powdered sugar, milk, and light corn syrup until smooth.
- Divide and color the icing as desired for decoration.
- Once the cookies are cool, dip or pipe icing onto the cookies and decorate with sprinkles.
- Allow the icing to dry completely before serving or storing.
Send me this recipe!
Just enter your email below and get it sent straight to your inbox!