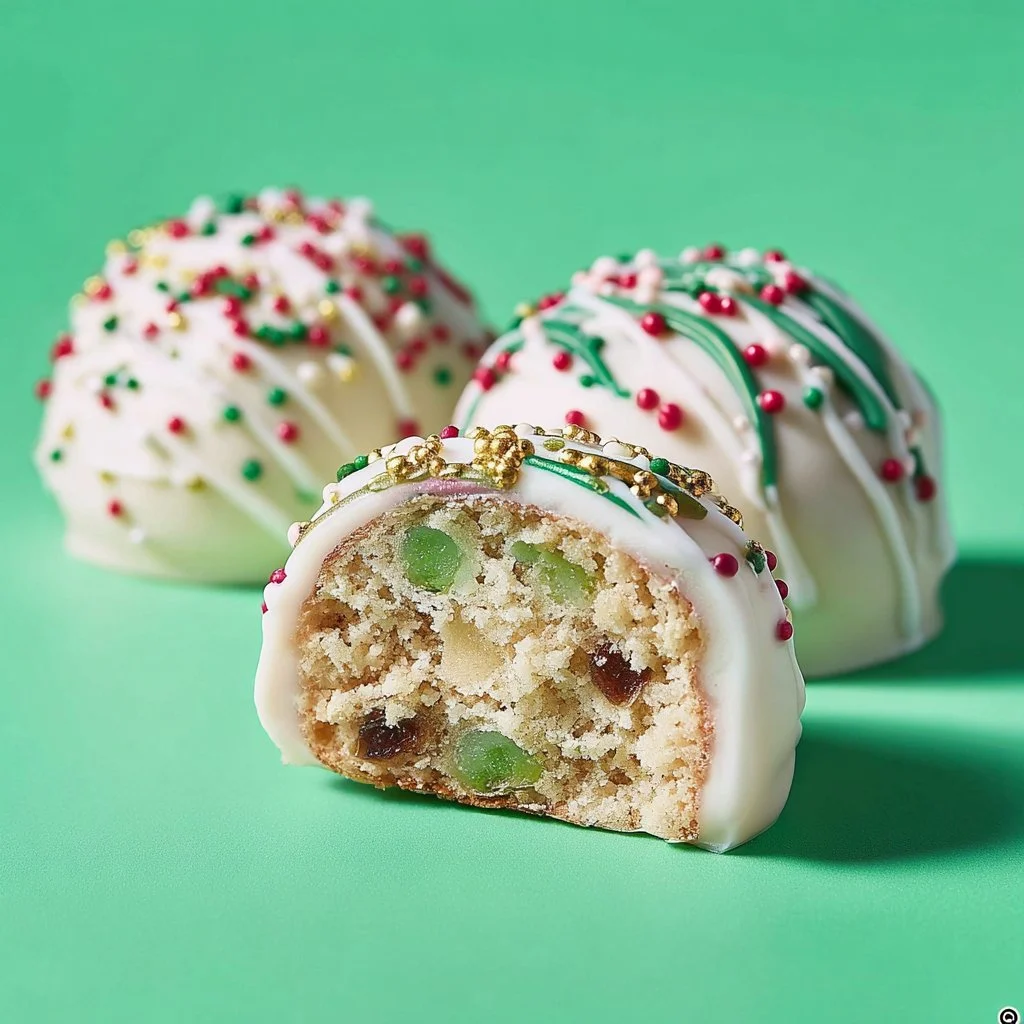
Nilla Holiday Cake Bites are a delightful treat that captures the essence of the festive season in every bite. These bite-sized desserts combine the buttery crunch of NILLA Wafers with the fruity brightness of raspberry jam and a touch of orange juice, coated in velvety vanilla candy. They’re easy to prepare and make for an impressive addition to your holiday gatherings, guaranteed to bring joy to your celebrations.
Why We Love This Nilla Holiday Cake Bites Recipe
These Nilla Holiday Cake Bites are adored not just for their taste but also for their simplicity. You can create a festive dessert that looks elegant while requiring minimal effort. The layers of flavors come together beautifully, with the subtle zing from the orange juice perfectly pairing with the sweetness of the raspberry jam. They are also incredibly versatile, allowing you to customize decorations to match your holiday theme. Each bite is a joyful explosion of flavors, making them a favorite for both kids and adults alike.
Ingredients about Nilla Holiday Cake Bites
- 36 NILLA Wafers
- 2 tablespoons orange juice
- 1/4 cup raspberry jam
- 8 ounces vanilla candy wafers (approximately 1-1/2 cups)
- 1 tablespoon vegetable oil
- Assorted decorations (like sprinkles or edible glitter)
How to Make Nilla Holiday Cake Bites Directions
Creating your Nilla Holiday Cake Bites begins by preparing your workspace for an efficient and enjoyable cooking experience. First, grab a baking sheet and line it with waxed paper; this will prevent the cake bites from sticking once they’re done. Next, you’ll want to treat your NILLA Wafers to a bit of orange juice. Take 24 of the wafers and brush one flat side with the juice, allowing the citrus flavor to infuse into the cookies.
With the juiced wafers ready, spread a layer of raspberry jam on the same side, ensuring an even coating for maximum flavor. Once you’ve layered the jam, take the remaining 12 wafers and place them on the lined baking sheet, rounded sides facing up. Begin assembling your stacks: carefully place two jam-covered wafers on top of each plain wafer. This technique creates a delightful sandwich of flavors that will set the base for your cake bites.
Now that your stacks are assembled, it’s time to let them chill out in the refrigerator. Cover them tightly or use a clean plate to ensure they don’t dry out. Allow them to chill for at least 6 hours or, if you have the time, overnight. This step firms up the texture and intensifies the flavors, making for an even better treat.
Once your stacks have chilled and are ready for the next step, it’s time to melt the vanilla candy wafers. Follow the package instructions for melting, stirring continuously to achieve a smooth consistency. Once melted, add in the tablespoon of vegetable oil – this will help thin out the candy coating and give it that glossy finish you’ll love.


Now comes the fun part: dipping! Carefully take each NILLA stack and submerge it into the melted candy wafers. Make sure to coat each stack evenly for a beautiful appearance. After dipping, place the coated stacks back on the wax paper-lined baking sheet. This is your chance to get creative! Before the coating firms up, sprinkle your choice of decorations on top, whether that be colorful sprinkles or shimmering edible glitter.
Once your decorations are in place, return the baking sheet to the refrigerator for about 30 minutes. This will allow the candy coating to harden completely, so when you take them out, they’ll have a satisfying crunch. Finally, serve your Nilla Holiday Cake Bites on a decorative platter or in small cups, and watch as they disappear in no time!
How to Serve Nilla Holiday Cake Bites
Presentation can elevate your Nilla Holiday Cake Bites from delightful to dazzling! When serving, consider using colorful platters or festive plates that complement the treats’ whimsical design. You can also arrange the cake bites in rows or stacks, making them visually appealing. If you’re hosting a holiday gathering, consider placing them on a dessert table alongside other treats, creating a sweet theme that invites guests to indulge.
Alternatively, for a more casual presentation, consider using small dessert cups. Placing one or two bites in each cup adds a touch of elegance while making them easy to grab and enjoy. Pair them with a hot beverage like cocoa or coffee for an excellent holiday treat. The contrasting textures of the crispy wafers and the creamy chocolate coating make these bites an excellent choice for any dessert table.
Expert Tips: Nilla Holiday Cake Bites
To ensure your Nilla Holiday Cake Bites turn out perfectly, here are some expert tips that can help:
- Precision in Measurements: Accurate measurements for the ingredients can make a difference in texture and flavor. Use measuring cups and spoons for best results.
- Chilling Time: Don’t rush the chilling process. Allowing the stacks to rest in the refrigerator ensures they hold their shape during the candy coating step.
- Melting Candy Coating: If your vanilla candy wafers aren’t melting well, you can add a little more vegetable oil to achieve a smoother consistency.
- Decorating Options: Get creative with your toppings! Aside from sprinkles and edible glitter, consider using crushed nuts, coconut flakes, or chocolate drizzle for variety.
- Taste Test: Always do a taste test of your components before assembling. Adjust the orange juice or raspberry jam levels if necessary to fit your taste preferences.
How to Store Nilla Holiday Cake Bites
Once you’ve delighted in your Nilla Holiday Cake Bites, you’ll want to keep them fresh if there are any leftovers. Store them in an airtight container to prevent moisture and keep them crunchy. They can last up to a week in the refrigerator, though you may find they won’t last that long if you have family and friends around!
If you prefer to store them for a longer duration, consider freezing them. Place the bites in an airtight freezer-safe container, separating layers with parchment paper to prevent sticking. They can be frozen for up to three months. When you’re ready to enjoy them, simply remove them from the freezer and let them thaw at room temperature.
Variation of Nilla Holiday Cake Bites
While the classic Nilla Holiday Cake Bites are delicious, exploring variations can add a fun twist to the recipe! Here are a few ways to put your spin on this treat:
- Flavor Swaps: Instead of raspberry jam, try using strawberry, blueberry, or even a spiced applesauce for a unique flavor profile.
- Alternative Dippers: Experiment with different colored candy melts to create a festive vibe. Consider using dark chocolate or milk chocolate for a richer flavor.
- Creative Fillings: Add a layer of cream cheese frosting or peanut butter between the wafers for a flavor-packed surprise with every bite.
- Seasonal Touches: During the fall, add a dash of cinnamon or nutmeg to the candy coating for a seasonal touch. In the summer, consider adding a sprinkle of lime zest.
- Nutty Additions: Incorporate finely chopped nuts into the melted candy before dipping. This adds crunch and flavor richness to the cake bites.
FAQ
What are Nilla Holiday Cake Bites?
Nilla Holiday Cake Bites are a festive dessert made from NILLA Wafers, raspberry jam, and coated in vanilla candy melts, perfect for holiday gatherings.
How do you store Nilla Holiday Cake Bites?
Store Nilla Holiday Cake Bites in an airtight container in the refrigerator for up to a week, or freeze them for up to three months, separating layers with parchment paper.
Can I use different flavors of jam?
Yes! You can substitute raspberry jam with any flavor of your choice, such as strawberry, blueberry, or even spiced applesauce to suit your taste.
How long do Nilla Holiday Cake Bites need to chill?
The bites should chill for at least 6 hours or overnight for the best flavor and texture.
What can I use for decorations on Nilla Holiday Cake Bites?
You can use various decorations like colorful sprinkles, edible glitter, crushed nuts, or even drizzles of chocolate depending on the occasion or your preferences.

Nilla Holiday Cake Bites
Ingredients
Main Ingredients
- 36 pieces NILLA Wafers
- 2 tablespoons orange juice
- 1/4 cup raspberry jam
- 8 ounces vanilla candy wafers Approximately 1-1/2 cups
- 1 tablespoon vegetable oil
- assorted decorations (like sprinkles or edible glitter) For topping
Instructions
Preparation
- Line a baking sheet with waxed paper.
- Brush the flat side of 24 NILLA Wafers with orange juice.
- Spread a layer of raspberry jam on the juiced wafers.
- Place the remaining 12 wafers on the baking sheet, rounded sides up.
- Carefully stack two jam-covered wafers on each plain wafer to create sandwiches.
- Cover the stacks and chill in the refrigerator for at least 6 hours or overnight.
Candy Coating
- Melt the vanilla candy wafers according to package instructions.
- Add vegetable oil to the melted candy to achieve a smooth consistency.
- Dip each NILLA stack into the melted candy to coat evenly.
- Place the coated stacks back on the lined baking sheet and sprinkle decorations before the coating firms up.
Finalizing
- Return the baking sheet to the refrigerator for about 30 minutes to harden the coating.
- Serve the Nilla Holiday Cake Bites on a decorative platter or in small cups.
Send me this recipe!
Just enter your email below and get it sent straight to your inbox!