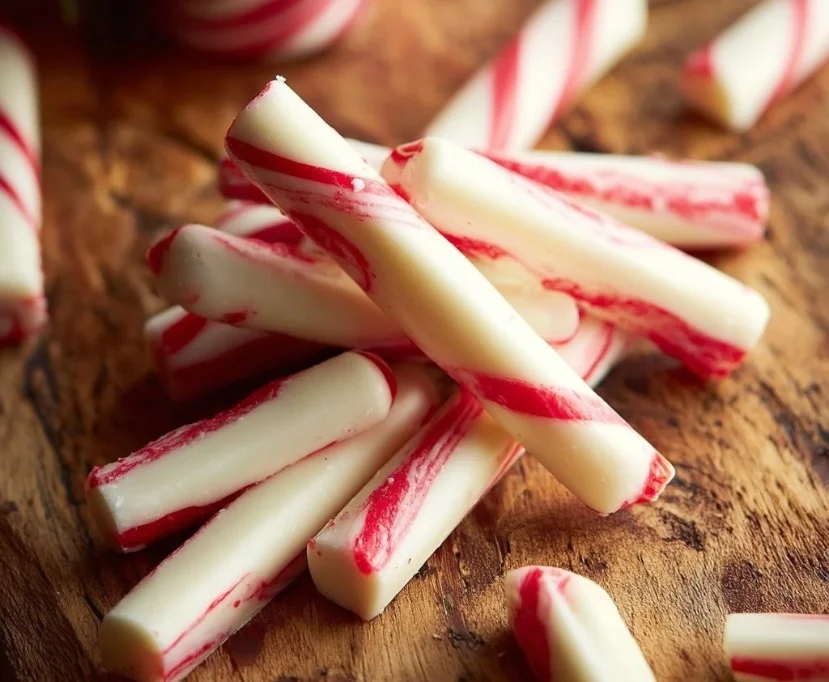
Making homemade Christmas peppermint sticks is a delightful holiday tradition that can bring joy to any kitchen. The unmistakable aroma of fresh peppermint mixed with sugar and chocolate fills the room, instantly creating a festive atmosphere. As you embark on this candy-making journey, you’ll not only prepare a delicious treat but also create fond memories with your loved ones. Homemade peppermint sticks become a symbol of the holiday season, representing the sweetness of togetherness and the magic of giving.
Why We Love This Homemade Christmas Peppermint Sticks Recipe
There are countless reasons to adore homemade Christmas peppermint sticks. First and foremost, they offer a wonderful opportunity to engage in holiday spirit with family and friends. The act of making these treats together can create lasting memories. Additionally, these peppermint sticks are easy to customize, allowing you to get creative with colors and flavors.
Another reason to love this recipe is its simplicity. You need just a handful of basic ingredients, yet the result is remarkably festive and delicious. These peppermint sticks don’t just taste fantastic; they look stunning, making them perfect for gifting. Just imagine presenting a beautifully wrapped batch of these treats to your friends or family, bringing smiles to their faces. Finally, making your own peppermint sticks allows you to control the ingredients, ensuring they are made with love and care.
Ingredients about Homemade Christmas Peppermint Sticks
To create these delightful peppermint sticks, you’ll need the following ingredients:
- 2 cups granulated sugar
- 2/3 cup corn syrup
- 1/2 cup water
- 1/2 teaspoon peppermint extract
- Red food coloring (optional)
- Powdered sugar (for dusting)
- 1/2 cup crushed peppermint candies
Gathering these ingredients will set the stage for a fun candy-making experience. Be sure to have everything on hand before you start, as this will make the process smoother and more enjoyable.
How to Make Homemade Christmas Peppermint Sticks Directions
Creating your homemade Christmas peppermint sticks is a straightforward process that involves a few key steps. Let’s break it down.


- Prepare Your Workspace: Before you begin, ensure your countertop and tools are clean and ready. Line a baking sheet with parchment paper or a silicone baking mat to prevent the peppermint from sticking.
- Combine the Ingredients: In a saucepan over medium heat, combine the granulated sugar, corn syrup, and water. Stir the mixture gently until the sugar dissolves completely. This is crucial for achieving the right texture.
- Heat the Mixture: Allow the mixture to come to a gentle boil without stirring. Use a candy thermometer to monitor the temperature; you want to reach approximately 250°F (hard candy stage). This step is essential, as it determines the final consistency of your peppermint sticks.
- Add Flavor and Color: Once the mixture has reached the desired temperature, remove it from heat and carefully add the peppermint extract. If you want to create red and white striped peppermint sticks, divide the mixture into two bowls. Add a few drops of red food coloring to one bowl and mix until you achieve the desired shade.
- Shape the Candy: Allow the mixtures to cool slightly for about 5-8 minutes. Once slightly cooled but still malleable, pour the white mixture onto your prepared surface. Use a spatula to spread it out, then pour the red mixture on top.
- Create the Stripes: With your hands coated in powdered sugar, gently pull and twist the mixtures together. This will create the signature stripes of your peppermint sticks. Form the candy into long ropes, about half an inch thick.
- Cut to Size: Once you’ve shaped the ropes, use a sharp knife or pizza cutter to slice them into your preferred lengths, typically around 4-6 inches.
- Let Them Set: Allow the peppermint sticks to cool completely on the parchment-lined sheet. This step is crucial for achieving the perfect crunch.
- Add Finishing Touches: Before fully set, you can sprinkle the crushed peppermint candies on top for a festive touch. Once set, these candies can be kept in an airtight container, ensuring their freshness.
Creating homemade Christmas peppermint sticks is not just about following a recipe; it’s an experience filled with joy and creativity. As you watch your candy transform from simple ingredients to beautiful treats, you cultivate a deeper appreciation for the art of candy making.
How to Serve Homemade Christmas Peppermint Sticks
Serving homemade Christmas peppermint sticks can be just as fun as making them. These festive treats can enhance any holiday gathering or party. Here are some creative ways to serve them:
- Gift Giving: Present your peppermint sticks in decorative bags tied with ribbons or place them in nice boxes. They make for thoughtful personal gifts, especially when shared with friends and neighbors.
- Dessert Table Addition: Place the peppermint sticks on a festive dessert table alongside other holiday goodies. Their vibrant colors will pop against cakes, pies, and cookies.
- Hot Chocolate Stirring Sticks: Use your peppermint sticks as stirring sticks for hot chocolate. They will dissolve slightly, adding a delightful minty flavor to the drink.
- Holiday Centerpiece: Arrange the peppermint sticks in a decorative jar or vase as part of your holiday décor. It will serve as both an eye-catching display and a tempting treat for guests.
- Party Favors: Wrap individual peppermint sticks in clear cellophane bags and offer them as party favors. Your guests will appreciate the homemade touch and sweet reminder of your gathering.
By serving these peppermint sticks in creative ways, you can spread the joy of your homemade treats while adding festive flair to your holiday celebrations.
Expert Tips: Homemade Christmas Peppermint Sticks
To ensure your homemade Christmas peppermint sticks turn out perfectly, keep these expert tips in mind:
- Use a Good Candy Thermometer: A reliable candy thermometer is essential for achieving the right temperature. If you don’t have one, you can test the mixture by dropping a small amount into cold water; it should form a hard candy ball.
- Work Quickly: Once the candy has cooled slightly, work fast to shape and cut them. The mixture hardens quickly, so you want to maintain the right texture for forming sticks.
- Coat Your Hands: Powdered sugar on your hands prevents the sticky mixture from clinging and makes handling much easier while shaping the peppermint sticks.
- Don’t Skimp on Peppermint Extract: For a more intense flavor, you can adjust the amount of peppermint extract to your taste.
- Customize Colors: Feel free to experiment with different food coloring combinations or even using chocolate drizzle to create unique variations of these peppermint sticks.
By following these tips, you’ll take your candy-making to the next level, ensuring that your homemade peppermint sticks are not only delicious but also visually appealing.
How to Store Homemade Christmas Peppermint Sticks
Storing your peppermint sticks correctly is essential for maintaining their freshness and flavor. Follow these simple steps for optimal storage:
- Use an Airtight Container: Once cooled completely, place your peppermint sticks in an airtight container. This will help prevent them from becoming sticky or losing their crunch.
- Cool Environment: Store the container in a cool, dry place away from direct sunlight. Extreme temperatures and humidity can negatively impact the texture of your candies.
- Separate Layers: If you’re stacking peppermint sticks, place parchment paper between layers to avoid them sticking together.
- Use Within a Month: While they can stay fresh for longer, aim to enjoy your homemade peppermint sticks within a month for the best quality.
By following these storage tips, you’ll ensure that your homemade Christmas peppermint sticks remain a delightful treat throughout the holiday season and beyond.
Variation of Homemade Christmas Peppermint Sticks
While traditional peppermint sticks are wonderful, you can also explore various variations to keep things exciting. Here are some ideas to get your creative juices flowing:
- Chocolate-Dipped Peppermint Sticks: Dip half of each peppermint stick in melted chocolate or white chocolate. Allow them to harden on parchment paper for a decadent treat that combines the classic mint flavor with rich chocolate.
- Mini Peppermint Sticks: Cut the ropes into shorter pieces for mini peppermint sticks, perfect for topping desserts or adding to gift bags.
- Colorful Stripes: Customize with different colors beyond just red and white. Experiment with green, blue, or any holiday colors you desire for a unique twist.
- Spiced Peppermint Sticks: Add a pinch of cinnamon or nutmeg to the mixture for a seasonal spice twist. This variation can provide a warm flavor profile for the winter months.
- Nutty Crunch: Incorporate finely chopped nuts into your mix or sprinkle them on top. This adds texture and an additional layer of flavor to your peppermint sticks.
With these variations, you can create a selection of peppermint sticks that look fantastic and cater to different tastes and preferences, ensuring there’s something for everyone during the holiday celebrations.
FAQ about Homemade Christmas Peppermint Sticks
1. Can I use different extracts instead of peppermint?
Yes, you can experiment with other extracts such as vanilla, almond, or even chocolate if you want to create unique flavors.
2. How do I know when the candy mixture is ready?
The mixture is ready when it reaches a temperature of approximately 250°F. Alternatively, you can test it by dropping a small amount into cold water; it should form a hard, pliable ball.
3. Can I freeze homemade peppermint sticks?
While it’s not recommended to freeze them as they may lose their texture, you can store them in the refrigerator for extra freshness.
4. What can I use if I don’t have a candy thermometer?
You can use the cold water test as a substitute. Drop a small amount of the mixture into a bowl of cold water, and check the consistency.
5. How long will homemade peppermint sticks last?
If stored properly in an airtight container in a cool, dry place, they can last for about one month, maintaining their flavor and crunch.
Homemade Christmas Peppermint Sticks
Ingredients
Main Ingredients
- 2 cups granulated sugar
- 2/3 cup corn syrup
- 1/2 cup water
- 1/2 teaspoon peppermint extract Adjust for stronger flavor if desired.
- 1 pinch red food coloring Optional for color.
- 1/2 cup crushed peppermint candies For topping.
- 1 cup powdered sugar For dusting.
Instructions
Preparation
- Prepare your workspace by cleaning countertops and tools. Line a baking sheet with parchment paper or a silicone mat.
- In a saucepan over medium heat, combine granulated sugar, corn syrup, and water. Stir gently until sugar dissolves.
Cooking
- Bring the mixture to a gentle boil without stirring, monitoring with a candy thermometer to reach approximately 250°F.
- Remove from heat and add peppermint extract. Divide mixture and add food coloring to one half if desired.
Shaping and Cooling
- Allow mixtures to cool for about 5-8 minutes. Pour the white mixture onto the prepared surface, then pour the red mixture on top.
- Coat hands in powdered sugar and twist the mixtures together to form stripes, then shape into long ropes about half an inch thick.
- Cut the ropes into desired lengths, typically around 4-6 inches.
- Let peppermint sticks cool completely before serving or storing.
- Sprinkle crushed peppermint candies on top for a festive finish before they set.
Send me this recipe!
Just enter your email below and get it sent straight to your inbox!