
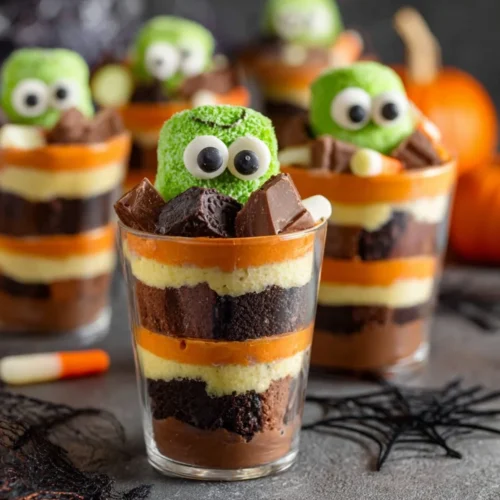
Dirt Pudding Cups are a delightful dessert that combine nostalgia with fun and creativity. With their sumptuous layers of rich chocolate goodness and crunchy Oreo cookies, they are not just treats, but also a wonderful activity for both kids and adults. This playful dessert is perfect for parties, especially during Halloween, where its quirky appearance can be a hit among guests. The combination of familiar ingredients and whimsical garnishes like gummy worms and candy eyes make Dirt Pudding Cups a charming creation that adds a bit of excitement to any gathering.
Why We Love This Dirt Pudding Cups Recipe
Dirt Pudding Cups are beloved for so many reasons. First and foremost, they encompass the joy of childhood with their playful presentation and fun toppings. The involvement of kids in the assembly adds an extra layer of enjoyment, making them a perfect family dessert. Each bite brings back fond memories of digging into delicious treats that excite the imagination.
Furthermore, this recipe is incredibly simple to make, requiring minimal ingredients and effort. You can whip it up in less than an hour, and let it chill while you prepare for your event or gather with friends. The combination of flavors creates a comforting dessert that is hard to resist, satisfying your sweet cravings without overwhelming your palate.
Additionally, Dirt Pudding Cups allow for endless personalization. From different types of toppings to variations in pudding flavors, the options are limitless. This versatility means you can tailor the dessert to fit various occasions or tastes, ensuring it remains a favorite for years to come.
Ingredients about Dirt Pudding Cups
To create these delightful Dirt Pudding Cups, you’ll need the following ingredients:
- 2 packages Oreo cookies (approx. 14.3 oz each)
- 3.9 oz package instant chocolate pudding mix
- 2 cups cold milk
- 8 oz Cool Whip, thawed (1 container)
- 1/2 cup chocolate sprinkles
- Halloween cookies (for decoration)
- Gummy worms
- M&M’s (for decoration)
- Candy corn (for decoration)
With these ingredients on hand, you are close to creating a dessert that delights not only the eyes but also the taste buds.


How to Make Dirt Pudding Cups Directions
Making Dirt Pudding Cups is a straightforward and enjoyable process. Start by crushing the Oreo cookies. You can do this by either using a food processor for a fine consistency or by placing the cookies in a resealable plastic bag and using a rolling pin. Achieving fine crumbs helps create that signature “dirt” look.
Next, move on to the pudding mixture. In a large mixing bowl, combine the instant chocolate pudding mix with the cold milk. Whisk them together until you achieve a smooth mixture—this may take a minute or two. After stirring, let the mixture sit in the refrigerator for about 5 to 10 minutes to allow it to thicken slightly. This brief chilling time makes a big difference in the texture.
Once the pudding is ready, it’s time to fold in your Cool Whip. Gently add the thawed Cool Whip to the pudding, folding it in until the mixture is fully combined and fluffy. This added layer of creaminess contributes to the overall taste and makes the pudding feel rich and indulgent.
Now comes the fun part—assembling your Dirt Pudding Cups! Start by taking individual clear cups, as showcasing the layers enhances the visual appeal. Spoon a layer of the crushed Oreo cookies into the bottom of each cup—this serves as the first “dirt” layer. Follow it with a generous scoop of the pudding mixture, smoothing it out gently with your spoon. Repeat these layers, ending with a final layer of crushed Oreos on top.
To give your Dirt Pudding Cups their signature look, sprinkle chocolate sprinkles generously over the top layer—this mimics the appearance of dirt. For added creativity, prepare Halloween cookies with candy eyes and gently press them into the cookies on top. To add an element of surprise, partially bury gummy worms into the “dirt” layers so that they peek out.
After assembling all your cups, place them in the refrigerator and let them sit for at least one hour. This chilling time allows the pudding to set further and makes the flavors meld together beautifully.
How to Serve Dirt Pudding Cups
Serving your Dirt Pudding Cups is just as fun as making them! To present the cups, arrange them on a colorful platter or serve them individually at each place setting to engage guests. You can enhance the experience by decorating the serving area with seasonal props, like mini pumpkins or autumn leaves, especially if you’re serving them at a fall event or Halloween celebration.
For the ultimate enjoyment, provide extra toppings as a DIY bar, where guests can add their favorite candies on top of their cups. Think about including additional items like crushed nuts, gummy insects, or even sprinkles in different colors. This allows for personalization and elevates the dessert beyond just a simple pudding.
Don’t forget to provide spoons—preferably colorful or themed ones add to the fun. As your guests dig into the cups, watch their delight as they uncover the layers of chocolate pudding, creamy Cool Whip, and crunchy Oreos. It’s this layering of flavors and textures that creates a memorable dessert experience.
Expert Tips: Dirt Pudding Cups
To make your Dirt Pudding Cups even better, consider these expert tips:
- Use high-quality ingredients: Using fresh Oreo cookies and a good brand of instant pudding mix can significantly enhance the flavor of your dessert.
- Chill well: Allowing the cups to chill long enough helps the pudding set properly and lets the flavors meld together beautifully.
- Customize the flavors: If you want to switch things up, try using vanilla pudding mix instead of chocolate, or mix in other flavored whipped toppings for a unique twist.
- Layer creatively: Get playful with your layers—try adding fresh fruit like berries or banana slices for an unexpected burst of flavor and texture.
- Serve in clear containers: Utilize glass dessert cups or jars to show off the appealing layers, making your presentation eye-catching.
These small tweaks can elevate your Dirt Pudding Cups from simply delicious to impressively extraordinary.
How to Store Dirt Pudding Cups
If you have any Dirt Pudding Cups left over, storing them is simple! You can keep them in the refrigerator for up to three days. Ensure they are covered with plastic wrap or sealed in an airtight container to maintain freshness. Just remember that any cookies on top might lose their crunch over time, so it’s best to add them just before serving, if possible.
If you notice the pudding layer becomes a little too firm after storage, giving it a gentle stir can restore its delightful creaminess. Always keep an eye on how cute they look, as that adds to the enjoyment as well!
Variation of Dirt Pudding Cups
There are countless ways to adapt Dirt Pudding Cups to suit your preferences or specific occasions. Here are a few fun variations you might consider:
- Chocolate Mint Variation: Substitute regular Oreos with mint-flavored Oreos. This twist adds a refreshing flavor to your pudding.
- Peanut Butter Lovers: Add a layer of creamy peanut butter to the pudding mixture for a rich, nutty flavor that pairs beautifully with chocolate.
- Healthier Option: Try using low-fat pudding mix and lighter whipped topping to create a lighter version without sacrificing taste.
- Different Themed Cups: Change decorations according to different holidays or seasons. Use pastel colors for spring or colorful candies for birthdays.
These variations empower you to make the Dirt Pudding Cups uniquely yours while keeping the original spirit of the dessert alive.
FAQ
What are Dirt Pudding Cups?
Dirt Pudding Cups are a fun and creative dessert featuring layers of chocolate pudding, crushed Oreo cookies, and various candy toppings that resemble dirt. They are perfect for parties and celebrations.
How do I prepare the Dirt Pudding Cups?
Making Dirt Pudding Cups is easy. Simply crush Oreo cookies, mix chocolate pudding with milk, fold in Cool Whip, and layer the mixture in cups along with the cookie crumbs. Finish with fun toppings!
How long do Dirt Pudding Cups last?
When stored properly in the refrigerator, Dirt Pudding Cups can last for up to three days. For the best experience, it’s advisable to consume them fresh.
Can I customize the toppings for Dirt Pudding Cups?
Absolutely! You can use a wide variety of toppings, from gummy worms to festive candy or even fresh fruits, to customize the presentation of your Dirt Pudding Cups.
Dirt Pudding Cups
Equipment
- Large Mixing Bowl
- Cupcake liners or clear cups
- Rolling pin or food processor
Ingredients
- 2 packages Oreo cookies approx. 14.3 oz each
- 3.9 oz instant chocolate pudding mix
- 2 cups cold milk
- 8 oz Cool Whip thawed (1 container)
- 1/2 cup chocolate sprinkles
- as needed Halloween cookies for decoration
- as needed gummy worms for decoration
- as needed M&M’s for decoration
- as needed candy corn for decoration
Instructions
- Crush the Oreo cookies using a food processor or by placing them in a resealable plastic bag and using a rolling pin until you achieve fine crumbs.
- In a large mixing bowl, combine the instant chocolate pudding mix with the cold milk. Whisk until smooth and let it sit in the refrigerator for 5-10 minutes to thicken.
- Once the pudding has thickened, gently fold in the thawed Cool Whip until fully combined and fluffy.
- In clear cups or bowls, layer the crushed Oreo cookies at the bottom, followed by a generous scoop of the pudding mixture. Repeat the layers until you reach the top, ending with crushed Oreos.
- Sprinkle chocolate sprinkles over the top layer and decorate with Halloween cookies, gummy worms, M&M’s, and candy corn for a spooky appearance.
- Place the cups in the refrigerator for at least 1 hour to chill before serving.
Send me this recipe!
Just enter your email below and get it sent straight to your inbox!