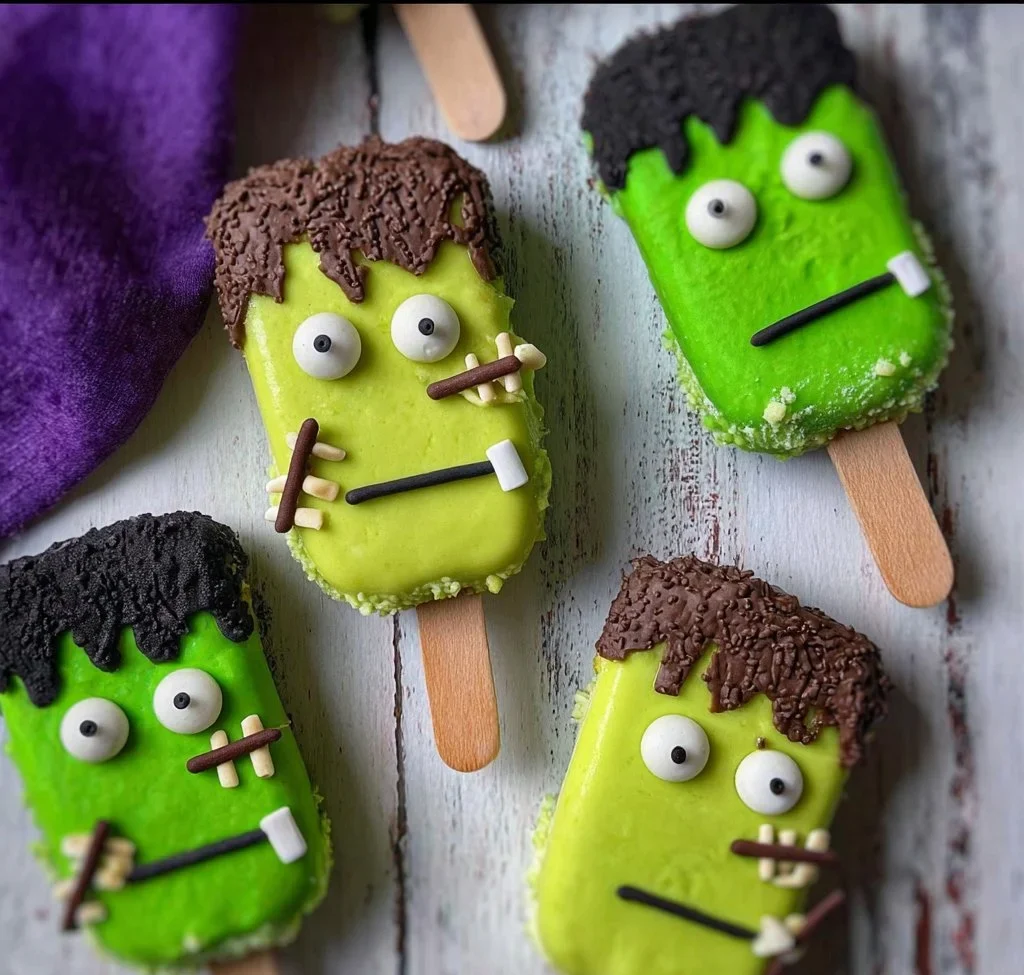
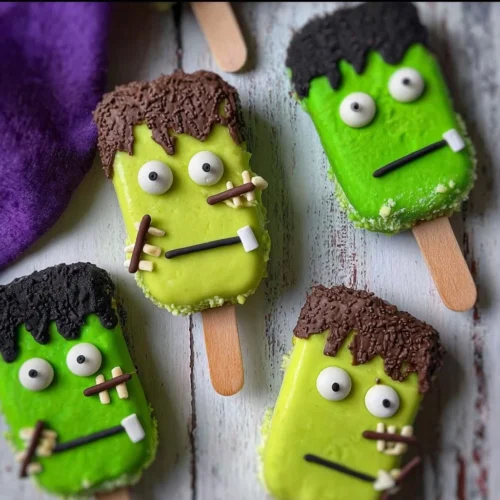
When Halloween rolls around, the quest for creative and delectable treats often begins. Enter Frankenstein Cakesicles, a delightful twist on the traditional cakesicle that merges a playful monster theme with a creamy, crumbly cake center. This treat not only looks frightfully fun but also captures the essence of celebration with its vibrant colors and mouthwatering flavor.
Why We Love This Frankenstein Cakesicles Recipe
There’s something undeniably appealing about these Frankenstein Cakesicles. They’re not just a treat; they’re an experience! Here are a few reasons why this recipe holds a special place in our hearts:
Fun and Festive: The playful design and spooky theme make these cakesicles perfect for Halloween celebrations or any monster-themed party. The rich colors combined with a creative design truly capture the spirit of Halloween.
Versatility: You can let your imagination run wild with the decorating. From different shades of green to adding googly eyes or even other embellishments, the unique designs allow for personal touches that reflect your style.
Easy to Make: This recipe brings an impressive dessert to the table without requiring extensive baking skills or fancy equipment. Whether you’re a novice in the kitchen or a seasoned baker, you’ll find this recipe easy to follow and rewarding to execute.
Deliciously Attractive: With a combination of moist cake, sweet frosting, and creamy chocolate coating, these cakesicles are as tasty as they are adorable. Everyone, from kids to adults, will want to dig in.
Perfect for Any Occasion: While they are ideal for Halloween, you can tailor the colors and decorations to fit any festive occasion—be it a birthday, school function, or holiday party.


Now that you’re excited about the idea of making these fun treats, let’s gather everything you need to whip up your very own batch of Frankenstein Cakesicles!
Ingredients for Frankenstein Cakesicles
To create these spooky delights at home, you will need the following ingredients:
For the Cake:
- 3 cups flour
- 1 Tablespoon baking powder
- 1 Tablespoon baking soda
- 1/2 teaspoon salt
- 2 1/4 cups sugar
- 2 sticks of butter (softened)
- 2 eggs
- 1 1/3 cups milk (any type: soy, almond, or regular)
- 1 teaspoon vanilla extract
- Purple food coloring gel
For the Frosting:
- 2 sticks of butter (softened)
- 4 cups powdered sugar
- 1/2 cup milk
- 1 teaspoon vanilla extract
- Purple food coloring gel
For the Coating:
- White chocolate almond bark
- Green food coloring gel
With these ingredients in hand, you’re one step closer to creating a deliciously spooky treat that everyone will love!
How to Make Frankenstein Cakesicles
Making Frankenstein Cakesicles is a thrilling adventure! Just follow these detailed steps to bring these delicious delights to life:
Preheat the Oven: Start by preheating your oven to 350°F (180°C). This step is crucial as it ensures even baking, helping your cakes to rise beautifully.
Create the Cake Batter: In a large mixing bowl, cream together the softened butter and sugar until the mixture is light and fluffy. This process incorporates air, making your cake soft and airy. Next, add in the eggs, vanilla extract, and purple food coloring gel, mixing until everything is well combined.
Mix Dry Ingredients: In another bowl, whisk together the flour, baking powder, baking soda, and salt. Alternately, add the flour mixture and milk to the creamed butter mixture, beginning and ending with the flour. Mix thoroughly until just combined—be careful not to overmix at this stage!
Bake the Cake: Pour the batter into a greased 9×13 inch baking dish and smooth the top. Bake for about 30-40 minutes or until a toothpick inserted into the center comes out clean. After baking, let the cake cool in the pan for 10-15 minutes before transferring it to a wire rack to cool completely.
Prepare the Frosting: While the cake is cooling, prepare your frosting. In a large bowl, beat together the softened butter, milk, and vanilla extract. Gradually add the powdered sugar and mix until you achieve a desired thickness. Add in purple food coloring to match your theme, mixing well until the color is consistent.
Crumble the Cake: Once your cake has fully cooled, crumble it into a large bowl. You want it to resemble fine crumbs rather than chunky pieces. Gradually add about a cup of frosting at a time to the crumbled cake. Mix gently until the cake holds together well but is not too wet.
Prepare the Coating: Now for the fun part! Melt the white chocolate almond bark in a microwave-safe bowl or using a double boiler. Once melted, add the green food coloring gel and mix until you achieve a vibrant green color.
Mold the Cakesicles: Coat the molds for the cakesicles with the melted chocolate, making sure to cover all sides. Place the coated molds in the freezer for about 30 minutes or until firm.
Fill the Molds: Once the chocolate has set, fill the molds with the cake and frosting mixture. Press it down gently but firmly to ensure there are no air pockets. Insert sticks into the molds, making sure they’re centered.
Seal with Chocolate: Coat the tops with additional melted green chocolate, ensuring the entire mixture is covered. Place it back in the freezer for another 30 minutes to allow everything to set firmly.
Decorate: Melt additional chocolate for decorating faces on your Frankenstein Cakesicles. You could create eyes, mouths, and bolts—whatever your imagination conjures. Once decorated, return to the fridge to set again.
Enjoy: Once everything is set, carefully remove the cakesicles from the molds. Serve them at your party, and watch as guests delight in their fun and flavorful appearance!
With patience and creativity, you’ve successfully made Frankenstein Cakesicles that are not only visually appealing but also deliciously satisfying.
How to Serve Frankenstein Cakesicles
Serving these delightful Frankenstein Cakesicles is simple yet exciting. Here are a few ideas to make your dessert table pop:
Themed Display: Arrange the cakesicles on a spooky-themed platter alongside other Halloween treats. You could even add props like mini pumpkins or cobwebs to elevate the theme.
Individual Treats: Wrap each cakesicle in clear cellophane tied with colorful ribbons. This makes for an excellent treat bag for guests to take home.
Pair with Drinks: Serve alongside fun beverages like green punch or themed cocktails for a cohesive Halloween party experience.
Garnish: Consider adding sprinkles or edible glitter as a finishing touch. This brings an extra flair and gives a monster-movie vibe that adds to the overall party theme.
These cakesicles will undoubtedly attract attention and bring a burst of joy to any gathering. They are perfect for sharing, making them a fun dessert option for both kids and adults alike.
Expert Tips: Frankenstein Cakesicles
To help you achieve the best possible results with your Frankenstein Cakesicles, keep these expert tips in mind:
Use Quality Ingredients: The quality of your ingredients can significantly affect the final taste. Choose good quality butter, chocolate, and food colorings to enhance the overall flavor and appearance.
Cake Consistency: When mixing the cake and frosting, ensure the mixture holds together but isn’t too wet. This will help achieve the right texture for your cakesicles.
Cooling Time: Be patient and allow your cakes and chocolate coats to cool thoroughly before proceeding. Rushing this step can lead to melting or misshaped cakesicles.
Flexible Decorating: Feel free to go beyond typical Frankenstein decorations. You can incorporate other Halloween elements like ghosts or spiders to make the treats even more exciting.
Don’t Skimp on Color: Use enough food coloring to ensure that your treats pop visually. A little extra gel can make a big difference in achieving that vibrant green color for your Frankenstein characters.
Practice Makes Perfect: If you’re new to cakesicles, don’t be discouraged if they don’t come out perfect the first time. Each attempt will improve your skills, and soon enough, you’ll have a delicious batch ready for sharing.
How to Store Frankenstein Cakesicles
To enjoy your Frankenstein Cakesicles beyond the initial indulgence, proper storage is essential:
Room Temperature: If you plan to consume them within a few days, storing them at room temperature in an airtight container is fine. Just make sure they are kept away from direct sunlight or heat.
Refrigeration: For longer-lasting freshness, keep the cakesicles in the refrigerator. Just ensure they’re sealed properly to prevent them from drying out or absorbing other flavors.
Freezing: If you want to store them for even longer, you can freeze the cakesicles. Wrap them individually in plastic wrap and then place them in a freezer-safe container. When you’re ready to enjoy, simply remove them from the freezer and let them thaw at room temperature.
Following these storage tips ensures that your Frankenstein Cakesicles remain fresh and delicious, allowing you to save some for later or share them with family and friends—long after the party is over!
Variation of Frankenstein Cakesicles
While the original Frankenstein design is undeniably fun, you can switch things up with these creative variations:
Different Color Themes: Instead of green, why not try spooky purple or even black cakesicles? Adjust the food coloring accordingly to create a new color palette that suits your occasion.
Flavored Cake: Switch out the vanilla cake for chocolate or red velvet cake. The flavor variations will surprise your guests and keep things interesting.
Add Fun Fillings: Experiment with different fillings! You might add a layer of jelly or jam between the cake and frosting for an unexpected twist.
Alternative Coatings: Instead of white chocolate almond bark, consider using dark chocolate or adding flavors to the chocolate, like peppermint or orange, to give a unique flavor combination.
Seasonal Designs: As Halloween approaches, you can adapt the theme. Consider adding seasonal decorations like candy corn, fall leaves, or autumn colors for a festive touch.
These variations allow you to tailor the treats to your liking or event needs, making every batch unique and special. Get creative and have fun experimenting!
FAQ about Frankenstein Cakesicles
What are Frankenstein Cakesicles?
Frankenstein Cakesicles are a playful dessert made by combining cake and frosting, shaping them into popsicle forms, coating them with colored chocolate, and decorating them to resemble the famous monster from classic horror tales.
How do you ensure Frankenstein Cakesicles won’t fall apart?
To ensure your cakesicles hold together, be sure to mix the crumbled cake with enough frosting. It should hold its shape without being overly moist. Also, properly chilling the molds before removing them can help solidify their structure.
Can I make these cakesicles ahead of time?
Absolutely! These cakesicles can be made in advance. Just store them in an airtight container in the refrigerator or freeze them for later enjoyment. Just ensure to wrap them well to maintain freshness.
What if I don’t have cakesicle molds?
If you don’t have cakesicle molds, you can use paper or plastic popsicle molds or even muffin tins to shape and set your cakes. Just ensure to adjust the stick size or shape to accommodate your molds.
Can I use other flavors or types of frosting?
Certainly! Feel free to get creative with different flavors of cake or frosting. You can use cream cheese frosting, chocolate ganache, or even whipped cream to make these cakesicles even more delicious.
Frankenstein Cakesicles
Equipment
- Mixing Bowls
- Baking Dish
- Cakesicle molds
- Piping bag
- Oven
Ingredients
- 3 cups flour
- 1 tablespoon baking powder
- 1 tablespoon baking soda
- 1/2 teaspoon salt
- 2 1/4 cups sugar
- 2 sticks butter softened
- 2 large eggs
- 1 1/3 cups milk any type
- 1 teaspoon vanilla extract
- purple food coloring gel for cake and frosting
- 2 sticks butter softened for frosting
- 4 cups powdered sugar
- 1/2 cup milk for frosting
- 1 teaspoon vanilla extract for frosting
- green food coloring gel for coating
- white chocolate almond bark for coating
Instructions
- Preheat your oven to 350°F (180°C) and grease a 9×13 inch baking dish.
- Cream together softened butter and sugar until light and fluffy, then add eggs, vanilla, and purple food coloring.
- In another bowl, whisk together flour, baking powder, baking soda, and salt. Gradually mix into the wet ingredients, alternating with milk.
- Pour the batter into the baking dish and smooth the top. Bake for 30-40 minutes, or until a toothpick comes out clean.
- Let the cake cool before crumbling it into a bowl. Mix in frosting until the mixture holds together.
- Melt white chocolate and mix in green food coloring. Coat the cakesicle molds with the melted chocolate.
- Fill molds with the cake mixture, insert sticks, and seal with more melted chocolate. Freeze until set.
- Decorate with additional melted chocolate to create facial features and details.
- Carefully remove from molds and serve!
Send me this recipe!
Just enter your email below and get it sent straight to your inbox!