Halloween is that enchanting time of year when the nights grow longer, and everyone embraces the spirit of creativity and fun. One of the most delightful ways to celebrate Halloween is with festive treats, and what could be better than Halloween Chocolate Covered Oreos? These treats are not just delicious; they are also a canvas for your imagination. With vibrant colors and spooky designs, they add an element of fun to your Halloween gatherings. You can easily whip them up for a party, give them as gifts, or simply enjoy them with your family.
Why We Love This Halloween Chocolate Covered Oreos Recipe
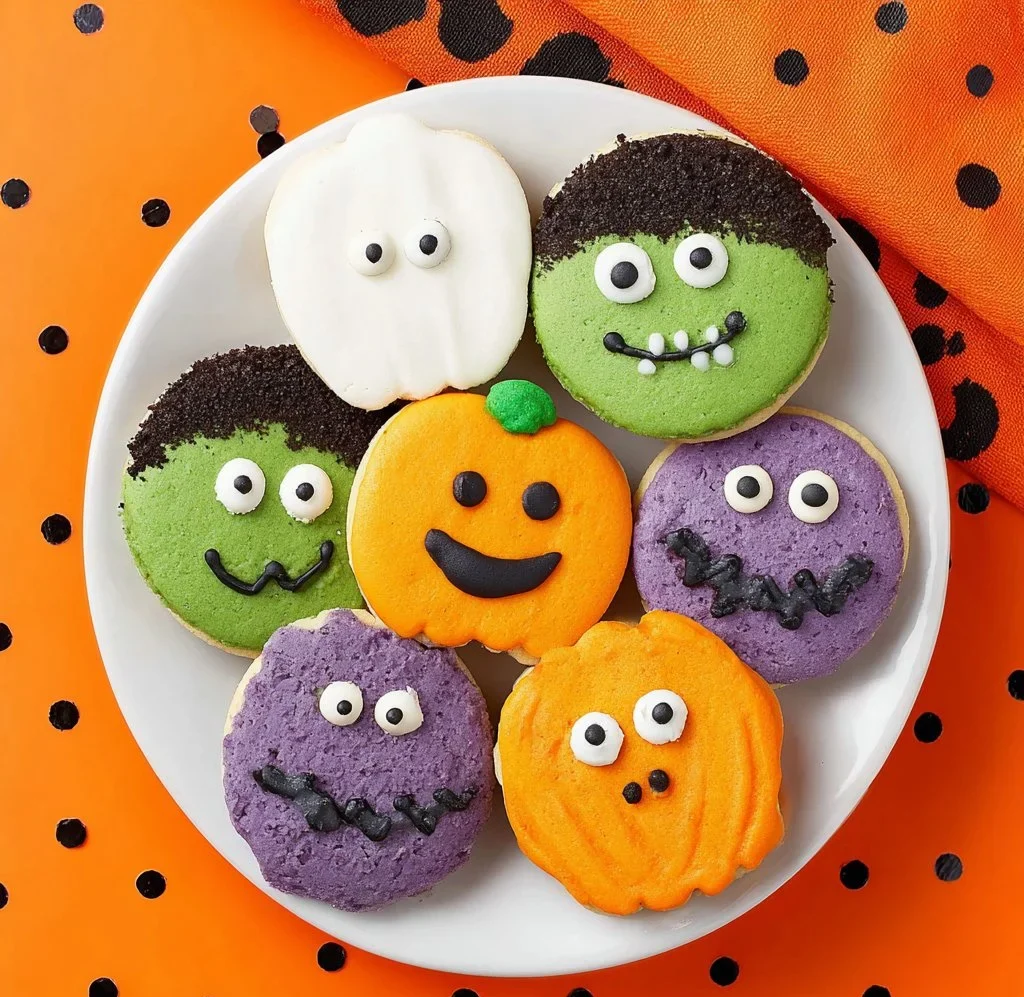
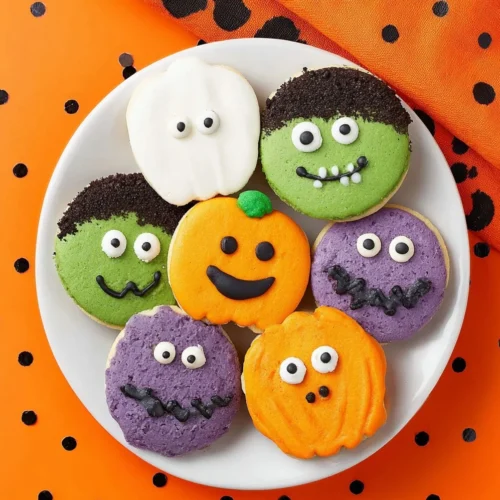
The appeal of Halloween Chocolate Covered Oreos lies in their perfect blend of gooey and crunchy textures, along with a delightful sweetness that every cookie lover can appreciate. You get the rich, creamy filling of a Double Stuffed Oreo, enveloped in a candy shell that you can customize according to your Halloween theme.
Not only are these cookies fun and festive, but they are also incredibly versatile. You can personalize them to suit your Halloween party or your own aesthetic preferences. Whether you want spooky ghosts, creepy vampires, or cheerful Jack-O-Lanterns, you can let your creative juices flow. Plus, they are quick to make, which is a huge plus when you have a busy holiday season ahead. These cookies will surely become a favorite for both kids and adults alike!
Ingredients about Halloween Chocolate Covered Oreos
To create these delightful Halloween Chocolate Covered Oreos, gather the following ingredients:
-
40 Double Stuffed Oreos: These are the base of your treat and provide that delicious, creamy filling.
-
1 cup Orange Candy Melts: Perfect for creating those vibrant pumpkin designs.
-
1 cup Purple Candy Melts: Great for a spooky, Halloween twist.
-
1 cup Green Candy Melts: Ideal for adding accents like Frankenstein’s hair or leaves for your pumpkins.
-
1 cup White Chocolate Chips or White Chocolate Candy Melts: Useful for the ghostly coatings.
-
1/2 cup Milk Chocolate Chips: Adds a rich touch for decorative details.
-
Candy Eyes: Essential for bringing your spooky creations to life.


How to Make Halloween Chocolate Covered Oreos Directions
Making Halloween Chocolate Covered Oreos is a fun and engaging activity that you can do with friends or family. Follow these detailed steps to create your spooky treats:
-
Prepare Your Workspace: Start by laying out a sheet of wax or parchment paper on a flat surface. This is where your finished cookies will rest.
-
Melt the Candy Melts: In separate microwave-safe bowls, melt each color of candy melts. Use 15-second intervals to heat them, stirring in between each interval until smooth. This careful melting will help prevent burning and ensure a great coating.
-
Dip the Oreos: Using a fork, carefully dip one Oreo at a time into the melted candy. Make sure to coat it thoroughly, then lift it out and allow any excess candy to drip off. Place the coated Oreo on the wax paper.
-
Add Eyeballs for the Monsters: Before the coating hardens, place candy eyes on your Oreos to turn them into Frankenstein or Vampire designs. You’ll want to be swift to ensure the eyes stick!
-
Create Jack-O-Lanterns: For the Jack-O-Lantern design, add small green leaves using the melted green candy. Use melted dark chocolate to draw voodoo-like eyes and a mouth on the orange-coated Oreos.
-
Frankenstein and Vampire Accents: Use the dark chocolate to pipe hair, stitches on Frankenstein, or fangs and a hairline for the Vampire. Get as creative as you wish!
-
Make Ghosts: For your spooky white ghosts, pipe two eyes and a mouth using the dark chocolate. Let your artistry shine through!
-
Set the Coatings: Once decorated, let the chocolate and candy coatings set completely on the wax paper before you serve. This step ensures they hold their shape and designs.
Making these Halloween Chocolate Covered Oreos not only fills the air with a sweet aroma but also sets the scene for a festive Halloween atmosphere.
How to Serve Halloween Chocolate Covered Oreos
When it comes to serving your Halloween Chocolate Covered Oreos, think about creating an appealing display. You can arrange the cookies on a decorative platter or in a clear container to showcase their vibrant colors and spooky designs. For an engaging touch, consider placing them in a themed basket adorned with Halloween decorations, like cobwebs or miniature pumpkins.
You can also pair these treats with other Halloween snacks, such as caramel apples or themed cupcakes, creating a diverse and colorful spread. If you’re hosting a party, don’t forget to make little treat bags filled with your spooky Oreos for guests to take home. They make for great party favors that will leave a lasting impression!
Expert Tips: Halloween Chocolate Covered Oreos
Creating perfect Halloween Chocolate Covered Oreos is easier with these expert tips:
-
Chill the Oreos First: Pop your Oreos in the fridge for about 30 minutes before dipping them. This helps maintain their shape and makes them easier to handle.
-
Use Quality Chocolate: Opt for high-quality candy melts or chocolate to ensure a smooth coating that tastes great.
-
Temperature Control: When melting the candy, be sure to do it slowly. Quick bursts of heat are best to maintain a nice texture without burning.
-
Decorate While Wet: Always add decorative elements like candy eyes or piping details while the chocolate is still wet to ensure they adhere properly.
-
Cohesive Designs: Choose color schemes that complement each other for a more polished look. For instance, pairing the orange and green for pumpkins, or the black and purple for spooky vampires, can leave a stunning impact.
How to Store Halloween Chocolate Covered Oreos
To keep your Halloween Chocolate Covered Oreos fresh, store them in an airtight container. Place parchment paper between layers if you have stacked cookies to avoid sticking. They can be kept at room temperature for several days, but make sure to keep them away from direct sunlight or heat, as this can cause the chocolate to melt or spoil.
If you need to keep them for longer, consider refrigerating them. Just remember to let them sit at room temperature for a bit before serving, as this will bring back their delightful texture.
Variation of Halloween Chocolate Covered Oreos
Feel free to experiment with different variations of Halloween Chocolate Covered Oreos to make them unique to your tastes:
-
Monster Mash: Instead of just using candy eyes, use assorted candy pieces (like gummies or M&Ms) to create different monster faces.
-
Spooky Sprinkles: Add sprinkles that match the Halloween theme, like orange, black, and purple, for a festive touch.
-
Layering Flavors: Instead of just chocolate, you could fill your Oreos with flavored frosting or cream before coating them. Think about adding peanut butter or pumpkin spice!
-
Gluten-Free Options: For those with dietary restrictions, look for gluten-free Oreos or candy melts to make your Halloween treats accessible to everyone.
FAQ
What are Halloween Chocolate Covered Oreos?
Halloween Chocolate Covered Oreos are popular Halloween-themed treats that involve dipping Double Stuffed Oreos in various colors of melted candy, allowing for creative decorations to give them a festive spooky appearance.
How can I make Halloween Chocolate Covered Oreos?
To make Halloween Chocolate Covered Oreos, you’ll need Double Stuffed Oreos, various colors of candy melts, chocolate chips, and candy eyes. Melt the candy, dip the Oreos, and decorate them before the coating sets.
How long can I store Halloween Chocolate Covered Oreos?
You can store Halloween Chocolate Covered Oreos in an airtight container at room temperature for several days. They can also be refrigerated for longer freshness, but let them reach room temperature before serving.
Can I customize the designs for Halloween Chocolate Covered Oreos?
Absolutely! You can create a range of designs from spooky ghosts to fun jack-o-lanterns and monsters based on your creativity and preferences. Use different colored melts and various candies for your designs.
Are there variations I can try with Halloween Chocolate Covered Oreos?
Yes! You can try using different flavors of fillings, varied toppings, or unique color combinations to create your own version of Halloween Chocolate Covered Oreos that suit your taste.
Halloween Chocolate Covered Oreos
Equipment
- Microwave-safe bowls
- Baking Sheet
- Piping bag
- Parchment Paper
Ingredients
- 40 Double Stuffed Oreos
- 1 cup orange candy melts
- 1 cup purple candy melts
- 1 cup green candy melts
- 1 cup white chocolate chips or candy melts
- 1/2 cup milk chocolate chips
- candy eyes for decoration
Instructions
- Prepare your workspace by laying out wax or parchment paper on a flat surface.
- Melt each color of candy melts in separate microwave-safe bowls using 15-second intervals, stirring until smooth.
- Using a fork, dip each Oreo into the melted candy, ensuring it’s fully coated. Let excess candy drip off.
- Place the coated Oreos on the wax paper and add candy eyes immediately to create monster designs.
- For Jack-O-Lanterns, add small green leaves using melted green candy and use dark chocolate to draw faces.
- Pipe hair, stitches, or fangs using melted dark chocolate for Frankenstein and Vampire designs.
- For ghosts, pipe two eyes and a mouth using dark chocolate on white-coated Oreos.
- Let the chocolate and candy coatings set completely before serving.
Send me this recipe!
Just enter your email below and get it sent straight to your inbox!