When the leaves start to change and the air turns crisp, it’s time to embrace the spookiness of Halloween. One of the most delightful treats you can whip up during this festive season is Halloween Lush. This no-bake dessert is not only visually striking, with its vibrant hues of orange, green, and purple, but it also packs a flavor punch that’ll have your guests coming back for seconds. Perfect for Halloween parties or a cozy night in with family, Halloween Lush is all about the fun and festivity of this haunted holiday.
Why We Love This Halloween Lush Recipe
There are countless desserts out there, but few are as fun and festive as Halloween Lush. It’s a wonderful way to celebrate the season while indulging your sweet tooth. This layered dessert is easy to make and doesn’t require baking, making it a perfect option for those who want delicious results without spending too much time in the kitchen.
The layers of chocolate cookies, creamy pudding, and whipped topping create a delightful contrast of textures and flavors. Plus, with the vibrant colors that scream Halloween, this dessert doubles as a centerpiece at any holiday gathering. As you dig into the layers of this treat, you can enjoy the unique combination of flavors and the delicious nostalgia of Halloween traditions.
So, whether you’re hosting a gathering, attending a potluck, or just want to treat yourself, Halloween Lush is the perfect dessert that brings joy and festivity to your table.
Ingredients about Halloween Lush
To create this magnificent Halloween Lush dessert, gather the following ingredients. Each component plays a crucial role in achieving the flavor and presentation you desire. Make sure to use quality ingredients for the best outcome!
- 36 chocolate sandwich cookies
- 6 tablespoons butter, melted
- 6 ounces orange gelatin
- 1/3 cup boiling water
- 6.8 ounces vanilla instant pudding
- 2 1/2 cups cold milk
- 8 ounces cream cheese, softened
- 1 cup powdered sugar
- 16 ounces whipped topping
- Green and purple food coloring
- Halloween sprinkles
How to Make Halloween Lush Directions
Now that you have your ingredients ready, it’s time to bring this delightful dessert to life. Follow these simple steps to create your Halloween Lush:


- Crush the Cookies: Begin by placing all the chocolate sandwich cookies into a food processor. Blend them until they reach a crumb-like consistency. If you don’t have a food processor, you can put the cookies in a zip-top bag and crush them with a rolling pin.
- Mix in Butter: Pour the cookie crumbs into a large mixing bowl. Add the melted butter to the crumbs and mix until they are well combined. The mixture should resemble wet sand.
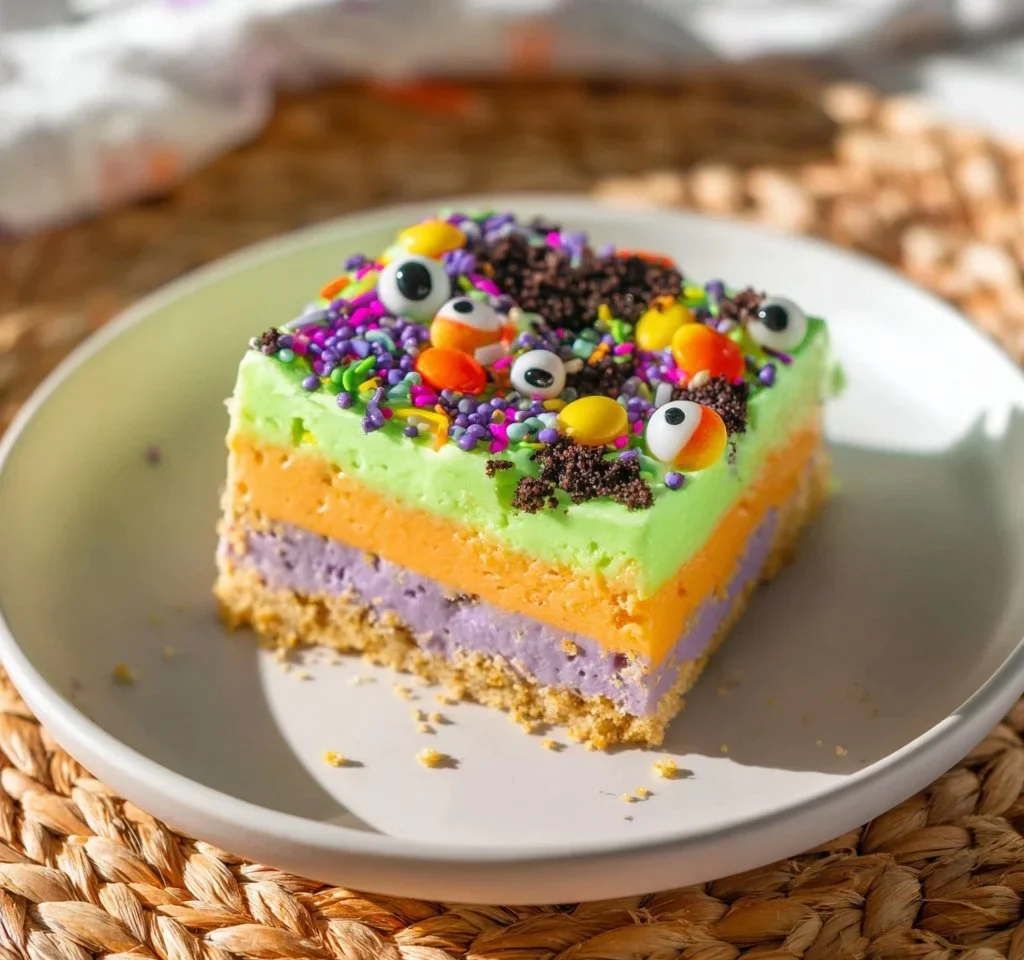
- Prepare the Crust: Press the cookie mixture firmly into the bottom of a 9×13 glass baking dish, creating an even layer. This will serve as the base of your Halloween Lush.
- Make the Gelatin Layer: In a small bowl, combine the orange gelatin with 1/3 cup of boiling water. Whisk until most of the gelatin is dissolved. Set it aside while you prep the next layer.
- Create the Pudding Layer: In a medium-sized bowl, whisk together the dry vanilla pudding mix and cold milk until it’s well combined. Then, slowly pour in the dissolved orange gelatin mixture, whisking until everything is combined and smooth.
- Prepare the Cream Cheese Mixture: In a large bowl, use an electric mixer to beat the softened cream cheese and powdered sugar together until smooth. Fold in 2 cups of the whipped topping until well blended. Add a few drops of purple food coloring and mix until you achieve the desired shade.
- Layer the Cream Cheese Mixture: Spread the cream cheese mixture evenly over the chocolate cookie crust. You want to ensure it covers the crust completely.
- Add the Pudding Layer: Spoon the orange gelatin pudding mixture over the cream cheese layer, spreading it evenly.
- Top with Whipped Topping: Take the remaining whipped topping and add a few drops of green food coloring until you achieve a nice shade of green. Gently spread it over the gelatin layer.
- Finish with Sprinkles: To give your Halloween Lush a festive touch, sprinkle it with Halloween-themed sprinkles on top.
- Chill Before Serving: Cover the dish with plastic wrap and refrigerate for at least 4 hours, allowing the layers to set properly before serving.
Once the chilling time is up, you’ll be ready to slice into this vibrant dessert!
How to Serve Halloween Lush
Serving Halloween Lush is as important as preparing it. The colorful layers of the dessert will wow your guests, and using the right serving tools can enhance their experience. Here’s how to enjoy it:
- Cut into Squares: Use a sharp knife to cut the dessert into squares, making sure to get through all the layers. This will highlight the beautiful colors and textures.
- Garnish Individual Servings: For an extra special touch, consider topping each serving with a dollop of whipped topping and a sprinkle of more Halloween sprinkles.
- Pair with Festive Drinks: Serve your Halloween Lush alongside some seasonal beverages like pumpkin spice lattes or festive punch to complement the dessert.
- Use Decorative Dishware: Present the Lush in a fun way, perhaps in Halloween-themed glasses or small jars for individual servings. This adds to the festive atmosphere!
Enjoy this treat at parties, family gatherings, or as a sweet reminder of the holiday spirit.
Expert Tips: Halloween Lush
To ensure your Halloween Lush turns out perfectly, consider the following expert tips:
- Make Ahead of Time: This dessert is perfect for making ahead of time. Prepare it the night before your gathering to give it plenty of time to chill.
- Quality Ingredients: Use high-quality chocolate sandwich cookies and fresh cream cheese for the best flavor. The quality of your ingredients can really elevate the dessert.
- Adjust Colors: Don’t hesitate to adjust the colors! If you prefer a different shade than green or purple, feel free to play with food coloring to match your party theme.
- Use a Sharp Knife for Clean Cuts: When cutting the dessert, use a sharp knife dipped in hot water. This will help you achieve cleaner cuts like a bakery-style treat.
- Experiment with Flavors: If you’d like to add a twist to the recipe, consider mixing in some crushed candies or Halloween-themed toppings.
Following these tips will help you create an impressive dessert that will leave your guests buzzing with excitement.
How to Store Halloween Lush
Storing your Halloween Lush properly will ensure that it remains as delightful as when you first made it. Here are some storage tips:
- Refrigerate for Freshness: Always store your Halloween Lush in the refrigerator. Cover the dish with plastic wrap or a lid to keep it fresh and prevent it from absorbing fridge odors.
- Can be Kept for Days: This dessert can last for up to 5 days in the refrigerator, making it perfect for leftovers after your party.
- Avoid Freezing: While it may be tempting to freeze leftovers, this dessert is best enjoyed fresh. Freezing can alter the texture of the whipped topping and pudding layers.
Variation of Halloween Lush
While the traditional Halloween Lush recipe is a winner on its own, you might want to try some variations to keep things interesting. Consider the following options:
- Switch Up the Flavors: Instead of using orange gelatin, you could try lime or raspberry for a different fruity twist.
- Add Layered Flavor: Consider adding crushed candy corn or Halloween-themed chocolate candies between the layers for added sweetness and crunch.
- Use Different Toppings: Decorate the top of your Lush with mini chocolate spiders, gummy worms, or candy eyeballs for a fun surprise.
- Switch the Cookie Crust: Try using a different flavored cookie to change the base, such as vanilla or peanut butter.
These variations will keep your Halloween Lush exciting and can cater to different tastes among your guests.
FAQ about Halloween Lush
What is Halloween Lush?
Halloween Lush is a delightful no-bake dessert that combines layers of chocolate cookies, creamy pudding, and whipped topping. It’s perfect for Halloween gatherings, offering both a fun visual appeal and a delicious taste.
Can I make Halloween Lush ahead of time?
Absolutely! In fact, making it ahead of time allows the layers to set properly in the refrigerator. It’s best prepared the day before your event for maximum flavor and ease.
How long does Halloween Lush last in the fridge?
When stored properly in the refrigerator, Halloween Lush can last for up to 5 days. Just make sure to cover it to keep it fresh.
Can I freeze Halloween Lush?
While you can freeze many desserts, it’s not recommended for Halloween Lush. Freezing can alter the textures of the pudding and whipped topping layers.
Can I change the flavors in Halloween Lush?
Definitely! You can switch the flavors by using different jello, pudding, or whipped topping. Feel free to experiment with various flavor combinations to suit your preference.
Halloween Lush
Equipment
- Food Processor
- Mixing Bowls
- 9×13 glass baking dish
- Whisk
Ingredients
- 36 cookies chocolate sandwich cookies
- 6 tbsp butter melted
- 6 oz orange gelatin
- 1/3 cup boiling water
- 6.8 oz vanilla instant pudding
- 2 1/2 cups cold milk
- 8 oz cream cheese softened
- 1 cup powdered sugar
- 16 oz whipped topping
- green and purple food coloring
- Halloween sprinkles
Instructions
- Crush the chocolate sandwich cookies in a food processor until crumb-like. Mix in melted butter until combined.
- Press the cookie mixture firmly into the bottom of a 9×13 glass baking dish to form the crust.
- In a small bowl, combine the orange gelatin with 1/3 cup boiling water. Whisk until dissolved and set aside.
- In another bowl, whisk together the vanilla pudding mix and cold milk until smooth. Slowly add the dissolved orange gelatin and mix until combined.
- In a large bowl, beat the softened cream cheese and powdered sugar until smooth. Fold in 2 cups of whipped topping and add a few drops of purple food coloring until desired color is achieved.
- Spread the cream cheese mixture over the cookie crust evenly.
- Spoon the orange gelatin pudding mixture over the cream cheese layer, spreading evenly.
- Top with the remaining whipped topping mixed with green food coloring.
- Sprinkle Halloween-themed sprinkles on top and cover with plastic wrap. Refrigerate for at least 4 hours.
Send me this recipe!
Just enter your email below and get it sent straight to your inbox!