As Halloween approaches, one of the most enjoyable activities is creating themed treats to celebrate the spooky season. Among these delightful creations, Halloween Oreo Balls stand out as an exciting option that’s both fun to make and delicious to eat. These bite-sized treats combine the rich flavor of Oreos with creamy texture and an eye-catching spooky appearance, making them perfect for parties, trick-or-treaters, or just a festive snack for yourself.
Why We Love This Halloween Oreo Balls Recipe
There are plenty of reasons to love Halloween Oreo Balls. First, they perfectly encapsulate the spirit of Halloween with their spooky designs and rich flavors. You can personalize your Oreo Balls with your favorite colors, making it easy to get festive based on your party’s theme. The combination of Oreos and cream cheese results in a lush filling that is both sweet and satisfying, and you can hardly get an easier recipe than this!
Not only are they a hit with children, but adults also can’t resist popping one (or a few) in their mouths. The crunchy texture from the Oreos coupled with the creaminess of the chocolate coating brings together an irresistible treat that will have everyone coming back for more. Plus, these Oreo Balls require no baking, making them perfect for those who may not have kitchen confidence or time to spare. You just mix, roll, dip, decorate, and serve.
Ingredients for Halloween Oreo Balls
Creating your Halloween Oreo Balls requires just a handful of ingredients that you can easily find at your local grocery store. Here’s what you’ll need to gather:
- 8 ounces Cream cheese, softened
- 14.3 ounces Oreo cookies, finely crushed (about 3 cups)
- 16 ounces White candy melts
- 4 ounces Colored candy melts (green, purple, or yellow)
- 2 ounces Black candy melts
- 2 ounces Red candy melts
These ingredients come together beautifully to create the nostalgic flavors of Oreos while offering a fun and festive appearance.
How to Make Halloween Oreo Balls Directions
Getting started on your Halloween Oreo Balls is straightforward and a lot of fun. Here’s how you can create these spooky delights step by step:


Crushing the Oreos: Begin by placing your Oreos in a gallon-sized freezer bag. Using a rolling pin, crush them until they turn into fine crumbs. This step not only releases the delicious flavor of the Oreos but also creates the perfect texture for your mixture.
Creating the Mixture: In a large mixing bowl, combine the softened cream cheese and the crushed Oreo cookies. Mix until they form a smooth dough-like consistency. This is often the point where you can get your hands a little messy, but don’t worry – it’s all part of the fun!
Forming the Balls: Next, roll the mixture into 1 inch balls. Place them on a baking sheet lined with wax or parchment paper. Make sure to give them enough space between each ball to prevent them from sticking together.
Chilling the Balls: Pop the baking sheet with the Oreo balls into the freezer for at least 30 minutes. This step is essential as it helps the balls firm up, making them easier to dip in chocolate later.
Melting the White Chocolate: While those balls are chilling, go ahead and microwave the white candy melts in a bowl. Start by heating them for 30 seconds, then stir. After that, continue microwaving in 10-second intervals, stirring between each interval until completely melted and smooth.
Dipping the Oreo Balls: Once your Oreo balls are firm and your white chocolate is ready, it’s time for the fun to begin. Dip each ball into the melted white chocolate, ensuring it’s fully coated, then return it to the lined baking sheet.
Hardening the Chocolate: Allow the chocolate coating to harden. You might place the baking sheet in the refrigerator to speed up this process if needed.
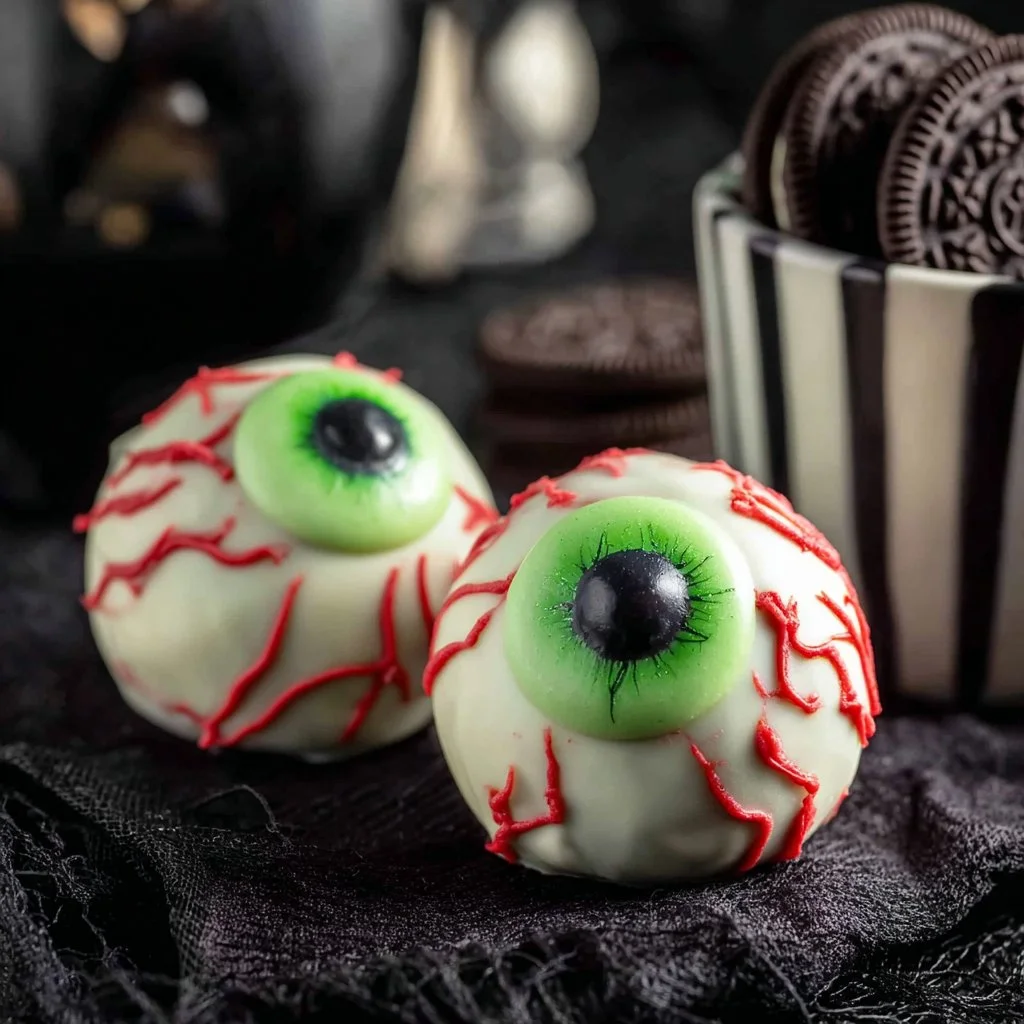
Decorating Your Treats: To create the spooky designs, melt your colored candy melts, and use them to draw irises on each ball. For added detail, use the black candy melts for pupils and the red candy melts for veins.
Final Touch: Finally, let everything harden completely before serving these spooky delights. They can be served right away or stored for later enjoyment.
How to Serve Halloween Oreo Balls
Once your Halloween Oreo Balls are beautifully decorated and ready to go, it’s time to think about serving. These treats can be placed on a Halloween-themed platter or simply served in a large bowl. Consider using decorative cupcake liners for added flair, which adds a pop of color and keeps them neat for guests.
If you’re hosting a Halloween party, set them up on a dessert table along with other treats like cupcakes and candy corn. Alternatively, you could wrap them in clear bags tied with ribbon for easy grab-and-go treats for trick-or-treaters or party attendees.
These Oreo Balls are also perfect for sharing with friends and family. Pack them into boxes for gifts or bring them along to school Halloween parties and gatherings. Their fun colors and festive designs are sure to excite everyone, making your treats the talk of the party!
Expert Tips: Halloween Oreo Balls
Perfecting your Halloween Oreo Balls involves a few expert tips that can help enhance the flavor and presentation:
Use Softened Cream Cheese: Ensure your cream cheese is at room temperature for the best mixing. This will help in blending it smoothly with the crushed Oreos.
Alternative Crunch: If you’re looking to mix things up a bit, consider adding some finely chopped nuts or sprinkles into the Oreo mixture for an added crunch and flavor.
Tempering Candy Melts: Make sure to avoid overheating your candy melts. If they become too thick, add a small amount of coconut oil to thin them out while maintaining the glossy finish.
Themed Decorations: Feel free to get creative with your design! You can use edible glitter, sprinkles, or even orange-colored candy melts for a more festive look.
Experiment with Flavors: Switch up the flavor of Oreos to match your theme. Pumpkin spice Oreos, for example, can add a seasonal twist to your treats.
How to Store Halloween Oreo Balls
Keeping your Halloween Oreo Balls fresh is simple. After they have fully hardened and you are ready to store them, place them in an airtight container. They can be kept in the refrigerator for up to one week. The cold will also help preserve their texture and flavor, ensuring they remain delectable for when you want to indulge.
If you would like to keep them longer, these treats can also be frozen. Place them in a freezer-safe container with layers of wax paper in between to prevent sticking. When ready to enjoy, simply thaw them in the refrigerator.
Variations of Halloween Oreo Balls
There are countless ways to customize your Halloween Oreo Balls to fit special diets or to introduce new flavors. Here are some creative variations:
Pumpkin Spice Oreo Balls: Substitute regular Oreos with pumpkin spice-flavored Oreo cookies for an autumn-inspired twist.
Chocolate Coated Oreo Balls: Instead of using white candy melts, coat your Oreo balls with semi-sweet or milk chocolate for a different flavor profile.
Vegan Version: Replace cream cheese with a vegan alternative and use dairy-free chocolate melts to cater to a vegan crowd.
Peanut Butter Lovers: Add peanut butter to the mixture for a nutty flavor that complements the sweetness of the Oreo cookies.
Candy Coated Oreo Balls: Instead of just melting candy melts, roll the Oreo balls in crushed Halloween-themed candies after dipping to add more texture and richness.
FAQ About Halloween Oreo Balls
What are Halloween Oreo Balls?
Halloween Oreo Balls are no-bake treats made from crushed Oreos mixed with cream cheese, rolled into balls, coated in chocolate, and decorated in a spooky theme. They are perfect for Halloween gatherings.
Can I store Halloween Oreo Balls?
Yes! You can store Halloween Oreo Balls in an airtight container in the refrigerator for up to one week or freeze them for longer storage.
How can I decorate my Halloween Oreo Balls?
You can use colored candy melts to create fun designs like eyes or spooky faces, or get creative with sprinkles and edible glitter for added flair.
Are Halloween Oreo Balls gluten-free?
If you use gluten-free Oreo cookies, then yes! Check the packaging to confirm they are gluten-free to accommodate those with dietary restrictions.
Can kids help make Halloween Oreo Balls?
Absolutely! This recipe is simple and fun, and kids can help with rolling the balls and decorating them with candy melts.

Halloween Oreo Balls
Equipment
- Mixing Bowl
- Baking Sheet
- Parchment Paper
- Microwave-Safe Bowl
Ingredients
- 8 oz cream cheese softened
- 14.3 oz Oreo cookies finely crushed (about 3 cups)
- 16 oz white candy melts
- 4 oz colored candy melts green, purple, or yellow
- 2 oz black candy melts
- 2 oz red candy melts
Instructions
- Crush the Oreo cookies into fine crumbs using a food processor or a rolling pin in a zip bag.
- In a large mixing bowl, combine softened cream cheese and crushed Oreos until smooth.
- Roll the mixture into 1-inch balls and place them on a baking sheet lined with parchment paper.
- Chill the balls in the freezer for at least 30 minutes to firm up.
- Meanwhile, melt the white candy melts in a microwave-safe bowl in 30-second intervals until smooth.
- Dip each chilled ball into the melted white candy coating, ensuring they are fully covered.
- Place the coated balls back on the parchment paper and allow them to set.
- Using melted colored candy melts, pipe designs on the truffles to create spooky faces or eyes.
- Let the decorations set before serving.
Send me this recipe!
Just enter your email below and get it sent straight to your inbox!