
As the leaves turn orange and the air gets a little cooler, Halloween creeps up on us with all its trick-or-treating fun and spooky décor. One delightful way to celebrate this frightful festivity is by making Halloween Pudding Cups. Not only do these pudding cups look festive and fun, but they also taste delicious and are a great activity to do with friends or family. Imagine digging into vibrant layers of homemade pudding that captures the essence of Halloween—now that’s something you’ll want to serve at your next gathering.
Why We Love Halloween Pudding Cups
These Halloween Pudding Cups have a unique combination of charm and taste. First off, they’re incredibly easy to prepare, making them a fantastic choice for both seasoned chefs and novice bakers. You’ll love how quickly you can whip these up, giving you more time to enjoy the festivities.
The customization aspect elevates their appeal; you can decorate them in countless ways. Whether you’re crafting Jack O’Lanterns, Frankenstein monsters, or playful ghosts, there’s no end to your creativity. Each pudding cup becomes a tasty expression of your Halloween spirit.
What’s fantastic about these cups is their versatility. You can adjust the flavors or colors to suit your preferences or even accommodate food allergies. The use of fresh mint or curry leaves gives an interesting twist that not only adds flavor but also contributes to the visual presentation. Plus, kids absolutely love them! Making them a family activity can bring everyone together for some spooky fun.
Ingredients for Halloween Pudding Cups
To create your spooky treats, you’ll need the following ingredients:
Homemade Vanilla Pudding
- 2 cups milk
- 1/2 cup sugar
- 1/4 cup cornstarch
- 1/4 teaspoon salt
- 2 teaspoons vanilla extract
- 2 tablespoons butter
Gel Colors
- Orange
- Green
- Blue
Decorative Ingredients
- 1 Pretzel rod (for Jack O’Lantern)
- 2-3 Mint leaves or curry leaves (for decoration)
- 2-3 tablespoons Crushed Oreos (for topping)
These ingredients create a delightful balance of flavors and colors that look just as good as they taste.
How to Make Halloween Pudding Cups
Creating your Halloween Pudding Cups is a simple and enjoyable process that allows you to get delightfully creative. Here’s how you can make them step by step:
Prepare Your Pudding: Start by making your homemade vanilla pudding. Pour the milk into a saucepan and mix in sugar, cornstarch, and salt. Heat over medium heat, stirring constantly until it thickens and begins to bubble. Remove from heat and stir in vanilla extract and butter until smooth. Allow the pudding to cool.
Color Your Pudding: Once the pudding has cooled slightly, divide it into four equal portions in separate bowls. Using gel colors, dye one portion orange for your Jack O’Lantern, another portion green for Frankenstein, one portion blue for the Monster, and leave one portion as white for the Ghost. Make sure to mix well until fully incorporated.
Prepare Your Cups: Grab your plastic cups and start decorating them! Use a black sharpie to create faces on each cup:
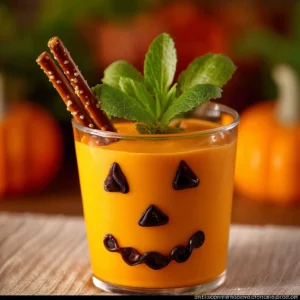
- For the Jack O’Lantern, draw two triangle eyes, an upside-down triangle nose, and a zig-zag mouth.
- For Frankenstein, draw googly eyes, a zig-zag mouth, and a few stitch marks.
- For the Monster, create one round eye with little dots around it, a triangular eyebrow arch, and a wavy mouth.
- For the Ghost, draw two oval eyes and a big oval mouth.
Fill the Cups: Carefully pour the appropriately colored pudding into each cup. Make sure the pudding is distributed evenly, creating visually appealing layers.
Chill the Pudding: Once filled, place the pudding cups in the refrigerator. Allow them to chill until you are ready to serve, ideally for at least 30 minutes.
Add Fun Toppings: Before serving, push a pretzel rod into the Jack O’Lantern cup for a stem and stick mint leaves or curry leaves on the side for an aesthetic finish. For the Frankenstein cup, sprinkle crushed Oreos on top to create an eerie look.
Serve and Enjoy: Once everything is prepared, bring out your spooky creations and watch as your friends and family delight in this colorful and festive treat.
How to Serve Halloween Pudding Cups
When serving your Halloween Pudding Cups, presentation is key. Layered desserts always attract attention, but Halloween-themed decorations add an extra layer of charm. Arrange the cups on a spooky-themed tray, or create a fun centerpiece with fake cobwebs, small plastic spiders, or pumpkins for that haunted vibe.
You can also set up a DIY station, letting guests create their own faces on the cups if you’re hosting a gathering. This interactive element can enhance the excitement. Place all your decorating materials like markers, mint leaves, pretzel rods, and crushed Oreos on the table for guests to create their own whimsical pudding cups.
If you’re looking for an easy grab-and-go option for a party or potluck, prepare individual cups ahead of time and cover them with plastic wrap until you’re ready to serve. This makes for a hassle-free dessert option that’s perfect for sharing.
Expert Tips for Halloween Pudding Cups
Chill your pudding: Make sure to chill the pudding cups before serving to enhance the flavor and texture. It allows the pudding to set properly, making it more enjoyable to eat.
Use quality ingredients: The flavor of your pudding largely depends on the quality of your ingredients. Opt for real vanilla extract and high-quality milk for the best results.
Be creative with decorations: Don’t hesitate to add extra decorations, such as candy eyes, sprinkles, or any other spooky-themed edible décor you can find. The more creative, the better!
Flavor variations: If you’re not a vanilla pudding fan, consider adjusting the pudding flavor. Chocolate pudding could make for an equally delightful option. You can even add some food-safe flavoring to each colored portion if you’re feeling adventurous.
Involve the kids: Get the little ones involved in the decorating process. They’ll love helping you with the art and will be excited to show off their festive creations.
How to Store Halloween Pudding Cups
If you have any leftover pudding cups, storing them properly is essential to maintain their freshness. Simply cover each cup with plastic wrap or transfer the pudding into airtight containers to keep them fresh in the fridge. Consume the pudding the next day to ensure optimal flavor.
Avoid freezing them, as it might change the texture and taste of the pudding. When served cold, they taste the best!
Variations of Halloween Pudding Cups
You can easily mix up these Halloween Pudding Cups to cater to various tastes and dietary preferences. Here are some delightful variations you can try:
Chocolate Pudding Cups: Swap the vanilla pudding for chocolate pudding. You can layer chocolate pudding with crushed Oreos for a deliciously indulgent Halloween treat.
Fruit Flavored Puddings: Add your favorite fruit-flavored pudding mixes, like strawberry or banana, for an unexpected twist. You can mix the fruit flavors with your spooky colors for added visual appeal.
Healthy Alternatives: If you prefer a healthier option, consider making a yogurt-based pudding using Greek yogurt mixed with honey for sweetness. You can still color it with gel food coloring for the spooky effect.
Dairy-Free Options: Use almond milk or coconut milk to create a dairy-free version of your pudding. There are also plenty of vegan pudding mixes available that you can color and decorate just like the traditional version.
Mini Versions: For a more petite indulgence, use mini cups instead of larger ones. These smaller servings are perfect for parties, allowing guests to sample without filling up too quickly.
Frequently Asked Questions about Halloween Pudding Cups
What are Halloween Pudding Cups?
Halloween Pudding Cups are playful desserts made from homemade vanilla pudding, colored with gel food colors to create festive designs. They are decorated with fun faces, using simple ingredients like pretzels and crushed Oreos.
How can I make Halloween Pudding Cups in advance?
You can prepare the pudding and the decorated cups the day before your event. Just ensure they are covered properly so they stay fresh until serving.
Can I use store-bought pudding instead of homemade?
Yes, you can use store-bought pudding if you prefer a quick option. Just remember to pour it into decorated cups like the homemade pudding would be.
How long do Halloween Pudding Cups last?
When stored in an airtight container in the fridge, they ideally last for about 2-3 days without losing flavor or texture.
Are there any dietary modifications for Halloween Pudding Cups?
Absolutely! You can create dairy-free, gluten-free, or lower-sugar versions by substituting milk alternatives, using gluten-free crushed cookies, or adjusting the sugar content in the pudding.
Halloween Pudding Cups
Equipment
- Saucepan
- Mixing Bowls
- Plastic cups
- Whisk
- Spoon
Ingredients
- 2 cups milk
- 1/2 cup sugar
- 1/4 cup cornstarch
- 1/4 teaspoon salt
- 2 teaspoons vanilla extract
- 2 tablespoons butter
- gel colors orange, green, blue
- 1 pretzel rod for Jack O’Lantern
- 2-3 mint leaves or curry leaves for decoration
- 2-3 tablespoons crushed Oreos for topping
Instructions
- Prepare the pudding by mixing milk, sugar, cornstarch, and salt in a saucepan. Heat over medium, stirring until thickened. Remove from heat and stir in vanilla and butter.
- Once cooled slightly, divide pudding into four bowls and color with gel colors: orange, green, blue, and leave one white.
- Decorate plastic cups with Halloween faces using a black sharpie.
- Layer the colored pudding in the cups, starting with the orange for Jack O’Lantern, green for Frankenstein, blue for the Monster, and white for the Ghost.
- Chill the cups in the refrigerator for at least 30 minutes.
- Before serving, add a pretzel rod into the Jack O’Lantern cup, mint or curry leaves for decoration, and crushed Oreos on Frankenstein.
- Serve and enjoy your spooky creations!
Send me this recipe!
Just enter your email below and get it sent straight to your inbox!