If you’re looking for a dessert that’s effortless yet extraordinarily delicious, the No Bake Biscoff Pie is the perfect choice. This creamy, dreamy treat is ideal for any occasion, whether you’re celebrating a special event or simply seeking a sweet indulgence. The rich flavors of Biscoff cookie butter paired with a light and fluffy texture will make your taste buds dance. Plus, there’s no baking involved!
Why We Love This No Bake Biscoff Pie Recipe
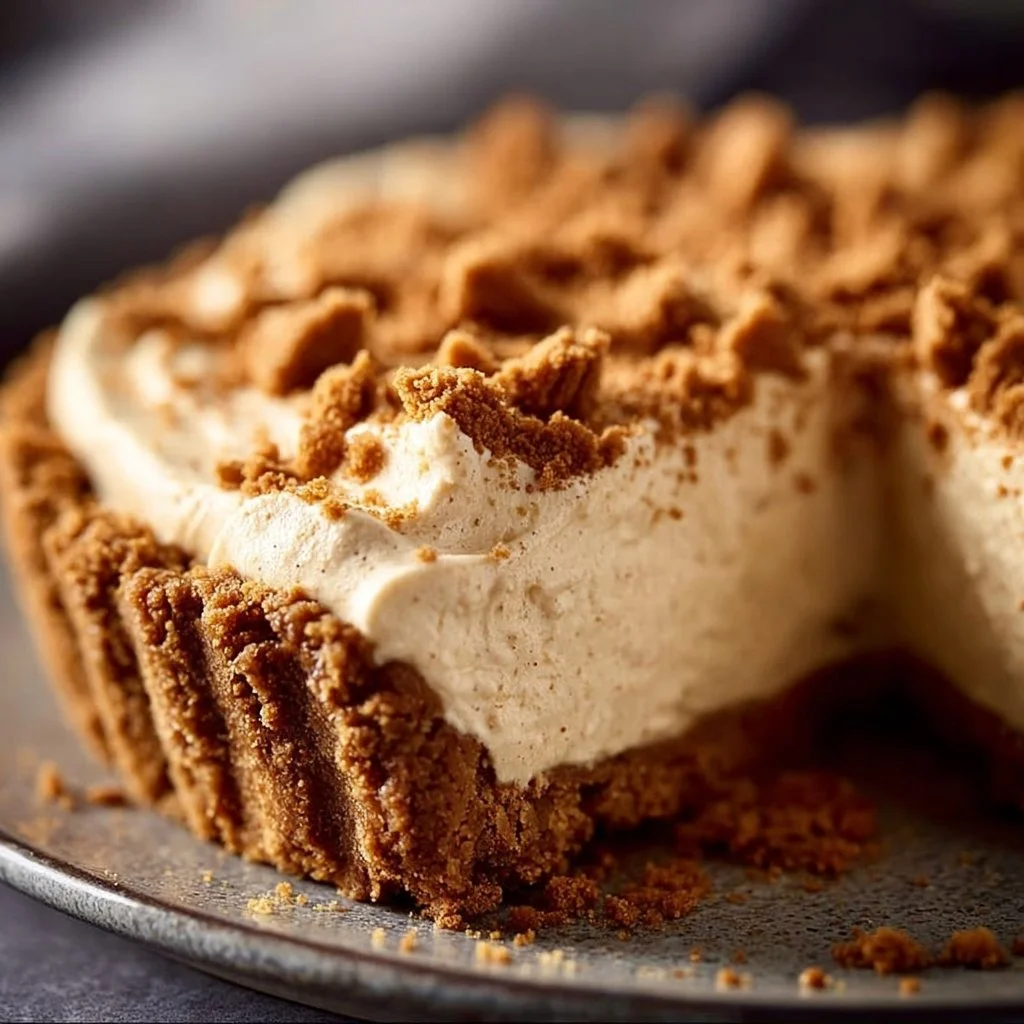
This No Bake Biscoff Pie checks all the boxes for dessert lovers. It’s incredibly simple to prepare—no need to turn on the oven, making it a perfect option for warm days or busy weeks. The combination of creamy cheese and sweet cookie butter creates a velvety filling that melts in your mouth. Each bite is an experience, bringing together the caramelized flavors of Biscoff cookies in a stunning pie. You can make it ahead of time, allowing the flavors to meld beautifully while it chills in the fridge. Plus, with the endless possibilities for toppings, you can elevate the presentation to be as delightful as the taste itself!
Ingredients about No Bake Biscoff Pie
To make this irresistible No Bake Biscoff Pie, you will need a few simple ingredients. Gather the following items:
List of ingredients with measurements
- 1 Biscoff pie crust (store-bought or homemade, 23 cm diameter)
- 225 grams cream cheese, softened
- 240 grams Biscoff cookie butter
- 90 grams powdered sugar
- 225 grams whipped topping (such as Cool Whip), thawed
How to Make No Bake Biscoff Pie Directions
Creating this delicious No Bake Biscoff Pie involves just a few straightforward steps. Begin by gathering all your ingredients to make the process smooth and simple. It’s important that your cream cheese is softened; this ensures a creamy and well-mixed filling.
- In a large mixing bowl, combine the softened cream cheese and Biscoff cookie butter. Using an electric mixer, beat the mixture on medium speed until it becomes creamy and smooth. This should take just a minute or two.
- Gradually add the powdered sugar while mixing on low speed. This keeps the sugar from flying everywhere and helps it incorporate evenly into the mixture. Continue to mix until the sugar is fully combined.
- Once your mixture is well combined, gently fold in the thawed whipped topping with a spatula. Be careful not to overmix, as you want to keep that light, airy texture; mix it just until no white streaks remain visible.
- Carefully transfer the creamy filling into the prepared Biscoff pie crust. Use a spatula to spread the filling evenly and smooth out the surface.
- After smoothing the filling, cover the pie with plastic wrap to prevent it from absorbing any odors from your fridge. Place it in the refrigerator for at least three hours to chill and set properly. This will help the filling hold its shape when you slice into it.
- When you’re ready to serve, remove the pie from the fridge. Garnish it with a drizzle of melted Biscoff cookie butter, some crushed Biscoff cookies, or a dollop of whipped cream for an extra touch of elegance.
How to Serve No Bake Biscoff Pie
Serving your No Bake Biscoff Pie is just as delightful as making it. Slice the pie into generous portions, allowing everyone to enjoy a taste of this creamy treat. If you’re hosting a gathering, consider serving it with some additional toppings on the side, such as chopped nuts or chocolate shavings, so guests can customize their slices to their liking. The contrast between the creamy filling and the crispy crust makes each mouthful truly enjoyable. Pairing it with a fresh cup of coffee or tea can elevate your dessert experience even further.
For an impressive presentation, use a sharp knife to make clean cuts through the pie. You might also want to bring out your finest plates for serving; a beautiful presentation always enhances the enjoyment of dessert!


Expert Tips: No Bake Biscoff Pie
To achieve the best results with your No Bake Biscoff Pie, keep in mind these simple expert tips:
- Properly Soften Cream Cheese: Make sure your cream cheese is at room temperature. If it’s too cold, it won’t mix well, leading to lumps in your filling. Leaving it out for about 30 minutes works wonders.
- Whipped Topping: If you can’t find Cool Whip, any brand of frozen whipped topping will work. Alternatively, you can whip your own heavy cream with some sugar until stiff peaks form for a homemade version.
- Crust Choices: While a Biscoff pie crust is traditional, feel free to experiment! A graham cracker crust or an Oreo crust also pairs beautifully with the flavors of Biscoff.
- Chill Time: Allow the pie to chill longer than three hours if possible. A longer chilling time helps the filling firm up even more, making it easier to slice and serve.
- Garnishing with Style: When garnishing, consider swirling the melted Biscoff cookie butter or arranging the crushed cookies in a pretty pattern. This adds a visual appeal that will impress your guests.
How to Store No Bake Biscoff Pie
Storing your No Bake Biscoff Pie is quite straightforward. After making and chilling the pie, cover it with plastic wrap or place it in an airtight container to keep it fresh. It can be stored in the refrigerator for up to five days. The flavors will continue to meld, and the pie will remain deliciously creamy for days!
If you find yourself with leftover pie (which might be a tough task!), freezing is an option. Simply slice the pie, wrap individual pieces tightly in plastic wrap, and place them in a freezer-safe bag. You can freeze the pie for up to three months. When you’re ready to enjoy it again, let it thaw in the refrigerator overnight.
Variation of No Bake Biscoff Pie
While the classic No Bake Biscoff Pie is undeniably delicious on its own, you can easily customize it for a unique twist. Here are a few variations to consider:
- Chocolate Lovers Delight: For a chocolate version, mix in some cocoa powder with the cream cheese and Biscoff cookie butter, or add a layer of chocolate ganache on top before serving.
- Nutty Addition: Fold in some chopped nuts, like pecans or almonds, into the filling for added crunch and flavor. You can also top the pie with toasted nuts for an extra crunch.
- Fruit Infusion: Incorporate a layer of your favorite fruit such as strawberries or bananas. Slice the fruit and layer it on the cookie butter filling before chilling for a fruity surprise in each slice.
- Spiced Variation: Add some spice for warmth by incorporating cinnamon or nutmeg into the filling. This can bring a holiday feel to your dessert, perfect for gatherings.
- Make it Mini: Create individual servings by using small tart shells or ramekins instead of a large pie. This is great for parties or when you want a personal-sized dessert.
FAQ
What is No Bake Biscoff Pie?
No Bake Biscoff Pie is a creamy dessert made with Biscoff cookie butter and cream cheese, set in a crust and chilled until firm. It’s delicious, simple to make, and doesn’t require baking!
How do I make a homemade Biscoff pie crust?
To make a homemade Biscoff pie crust, crush Biscoff cookies and mix them with melted butter. Press the mixture into a pie dish, forming an even layer. Chill until firm before adding the filling.
Can I use regular cream cheese instead of low-fat?
You can absolutely use regular cream cheese for the pie. Low-fat options can also work, but the texture and flavor may change slightly.
How long does No Bake Biscoff Pie last in the fridge?
The pie can last up to five days in the refrigerator when stored properly. Just cover it to keep it fresh!
Can I freeze No Bake Biscoff Pie?
Yes, you can freeze the pie! Slice it first, wrap pieces tightly, and store in a freezer-safe bag. It can last up to three months frozen.

No Bake Biscoff Pie
Ingredients
For the Pie Base
- 1 piece Biscoff pie crust (store-bought or homemade, 23 cm diameter)
For the Pie Filling
- 225 grams cream cheese, softened Ensure it is at room temperature for easy mixing.
- 240 grams Biscoff cookie butter
- 90 grams powdered sugar Add gradually to prevent flying.
- 225 grams whipped topping (such as Cool Whip), thawed Alternatively, homemade whipped cream can be used.
Instructions
Preparation
- Gather all your ingredients and ensure the cream cheese is softened.
- In a large mixing bowl, combine the softened cream cheese and Biscoff cookie butter.
- Using an electric mixer, beat on medium speed until creamy and smooth.
- Gradually add the powdered sugar while mixing on low speed until fully combined.
- Gently fold in the thawed whipped topping using a spatula until no white streaks remain.
- Transfer the creamy filling into the prepared Biscoff pie crust and smooth the surface.
- Cover the pie with plastic wrap and refrigerate for at least three hours to chill and set.
Serving
- Slice the pie into generous portions and garnish with melted Biscoff cookie butter, crushed Biscoff cookies, or a dollop of whipped cream.
- Serve with additional toppings like chopped nuts or chocolate shavings for customization.
Send me this recipe!
Just enter your email below and get it sent straight to your inbox!