
Fall is just around the corner, bringing with it the joy of pumpkins, colorful leaves, and all things cozy. One delightful treat that embodies the spirit of the season is the Pumpkin Patch Dirt Cups. These whimsical dessert cups not only look charming but also taste heavenly, making them a perfect addition to your autumn festivities.
Why We Love This Pumpkin Patch Dirt Cups Recipe
Pumpkin Patch Dirt Cups are not only visually appealing but also a wonderful blend of flavors and textures. The combination of creamy chocolate pudding and crunchy Oreo cookie crumbles is simply irresistible. As you savor each spoonful, you experience the velvety pudding paired with the delightful crunch of the cookies.
Another reason you’ll adore this dessert is its versatility. You can serve it at Halloween parties, family gatherings, or even as a fun weekend treat. The preparation is straightforward, making it a hit among novice and experienced bakers alike. This recipe invites creativity, allowing you to customize the presentation and ingredients based on your preferences. Let’s explore what you need to whip up this delightful dessert!
Ingredients for Pumpkin Patch Dirt Cups
To make these delicious Pumpkin Patch Dirt Cups, gather the following ingredients:
- 1 package (3.9 oz) Chocolate Instant Pudding
- 2 cups Milk
- 1 (8 ounce) Cool Whip
- 1 regular size package of Oreo Cookies
- Candy Pumpkins
- Shredded Coconut
- Green food coloring
With these ingredients on hand, you’re well on your way to creating a dessert that will steal the show.
How to Make Pumpkin Patch Dirt Cups Directions
Making Pumpkin Patch Dirt Cups is an enjoyable experience that requires just a few simple steps. Here’s a detailed guide to help you create this delightful dessert:


Crush the Oreos: Start by crushing the Oreo cookies into fine crumbs. You can do this by either using a food processor for an even texture or placing the cookies in a gallon-size ziploc bag and using a rolling pin to crush them. You want little chunks of cookie that will resemble soil.
Prepare the Pudding: In a medium bowl, whisk together the chocolate instant pudding mix and milk. Follow the package directions for the pudding, whisking for about two minutes until it starts to thicken. Allow the pudding to set for about five minutes. This step is essential as it helps achieve the best texture for the pudding layer.
Fold in the Cool Whip: Once the pudding has set, gently fold in the Cool Whip. This will create a light and airy pudding mixture that enhances the dessert’s creaminess.
Layer the Cups: Grab your serving cups or bowls. Start by placing one tablespoon of the crushed Oreos at the bottom of each cup, creating the first layer. Next, add a layer of the pudding mixture on top of the Oreos, smoothing it out for an even presentation.
Repeat the Layers: Continue adding layers, alternating between the crushed cookie mixture and the pudding until you reach the top of the cup, finishing with a layer of crushed cookies. This layering is what gives you that delightful “dirt” look.
Chill the Dessert: Place the assembled cups in the refrigerator and let them chill for at least one hour. This step allows the flavors to meld together and the dessert to chill to a perfect serving temperature.
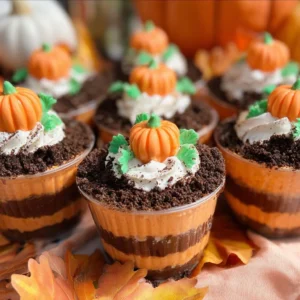
Color the Coconut: While the cups are chilling, prepare the colored coconut for the topping. In a container with a lid, add the shredded coconut and a few drops of green food coloring along with a touch of water. Shake it until the coconut is evenly colored, resembling grass fresh from the pumpkin patch.
Add Toppings Before Serving: Right before you’re ready to serve, sprinkle a generous amount of the colored coconut on top of each cup to simulate grass. Then, place a few candy pumpkins on top for that adorable finishing touch!
Now, you’re ready to present your Pumpkin Patch Dirt Cups that not only look festive but also taste fantastic!
How to Serve Pumpkin Patch Dirt Cups
Serving your Pumpkin Patch Dirt Cups can be a fun part of the experience. Decorate your dessert table with fall-themed decorations like mini pumpkins, hay bales, and autumn leaves to create a cozy atmosphere. These cups can be served individually, which makes them not only easy to serve but also reduces the messiness of cake serving.
For an added touch, consider placing a small pumpkin or autumn-themed napkin beside each cup. This attention to detail will make your guests feel special and excited to dig in. These delightful cups are perfect for Halloween gatherings, Thanksgiving dessert tables, or even as a sweet treat for movie nights at home. They can easily steal the spotlight at any occasion!
Expert Tips: Pumpkin Patch Dirt Cups
Here are some expert tips to help you create the perfect Pumpkin Patch Dirt Cups:
Chill the Pudding: Ensure that the pudding is well-chilled before folding in the Cool Whip. A cold pudding creates a better texture and flavor.
Opt for High-Quality Cookies: When using Oreos, choose high-quality cookies that will not crumble too quickly. This ensures that your layers maintain structure.
Mix It Up: Feel free to experiment with different types of cookies or candy. If you want a different flavor profile, consider using chocolate sandwich cookies or vanilla pudding.
Adjust the Layers: If you prefer a more subdued cookie flavor, you can reduce the amount of Oreo cookies. Enhancing the pudding layers adds to the creaminess of the dessert.
Use a Clear Cup: Using clear plastic or glass cups allows your guests to see the beautiful layers, making them more enticing.
Get Creative with Toppings: Beyond coconut and candy pumpkins, consider adding gummy worms for a spooky touch or edible glitter for a glamorous vibe.
With these tips in mind, you’ll become a pro at making Pumpkin Patch Dirt Cups that will impress your family and friends!
How to Store Pumpkin Patch Dirt Cups
If you have any leftovers (though they’re unlikely, given how delicious they are!), storing your Pumpkin Patch Dirt Cups is simple. Keep them covered in the refrigerator where they can last for up to three days. Make sure to keep the cups tightly sealed to prevent them from drying out.
If you’ve made the colored coconut ahead of time, store it separately. Combine it with the cups only right before serving to prevent it from getting soggy. This will keep your dessert looking fresh and vibrant for as long as possible.
Variation of Pumpkin Patch Dirt Cups
The beauty of Pumpkin Patch Dirt Cups lies in their versatility. You can easily customize this recipe to suit your tastes or dietary needs. Here are some easy variations you can try:
Gluten-Free Version: Use gluten-free sandwich cookies in place of traditional Oreos to make this dessert accessible for those with gluten sensitivities.
Vegan Option: Replace the Cool Whip with a non-dairy whipped topping and use almond milk instead of regular milk for a completely vegan-friendly version.
Flavor Twists: Experiment with different pudding flavors. Vanilla or butterscotch puddings could offer a delightful twist to the chocolate flavor.
Nutty Add-Ins: If you enjoy nuts, consider adding a layer of crushed nuts between the Oreo and pudding layers. This will add texture and richness to your dessert.
Fruit Additions: Layer in some fruit, like sliced bananas or strawberries, for added freshness and a touch of sweetness, giving your cups a fruity kick.
Feel free to explore these variations to craft the perfect Pumpkin Patch Dirt Cups that align with your taste preferences!
FAQ about Pumpkin Patch Dirt Cups
What is a Pumpkin Patch Dirt Cup?
A Pumpkin Patch Dirt Cup is a fun and creative dessert that features layers of chocolate pudding, crushed Oreo cookies, and colorful toppings that mimic the look of a pumpkin patch. It’s an easy-to-make and visually appealing treat, perfect for fall festivities.
How long does it take to make Pumpkin Patch Dirt Cups?
The prep time for Pumpkin Patch Dirt Cups is approximately 20 minutes. Be sure to account for at least an hour of chilling time in the refrigerator to achieve the best texture and flavor.
Can I make Pumpkin Patch Dirt Cups ahead of time?
Absolutely! Pumpkin Patch Dirt Cups can be prepared a day in advance. Just remember to keep them covered in the refrigerator until you’re ready to serve.
How do I add more pumpkin flavor to the recipe?
For a pumpkin flavor twist, you can incorporate pumpkin puree into the pudding mix. A small amount can add subtle pumpkin flavor without overwhelming the chocolate.
Can children help make Pumpkin Patch Dirt Cups?
Definitely! Pumpkin Patch Dirt Cups are an excellent dessert for kids to help with. They can assist with crushing the cookies, layering the ingredients, and decorating the cups.
Pumpkin Patch Dirt Cups
Equipment
- Mixing Bowls
- Cupcake liners or serving cups
- Whisk
- Food processor or rolling pin
Ingredients
- 1 package Chocolate Instant Pudding 3.9 oz
- 2 cups Milk
- 1 container Cool Whip 8 oz
- 1 regular size package Oreo Cookies
- 12 Candy Pumpkins
- 1 cup Shredded Coconut
- Green food coloring
Instructions
- Crush the Oreo cookies into fine crumbs using a food processor or by placing them in a zip bag and rolling a pin over them.
- In a medium bowl, whisk together the chocolate instant pudding mix and milk for about 2 minutes until it thickens. Let it set for 5 minutes.
- Gently fold in the Cool Whip into the pudding mixture until well combined.
- In serving cups, layer one tablespoon of crushed Oreos at the bottom, followed by a layer of the pudding mixture.
- Continue layering with crushed Oreos and pudding until cups are filled, finishing with a layer of crushed Oreos on top.
- Chill the cups in the refrigerator for at least one hour.
- Prepare colored coconut by mixing shredded coconut with green food coloring until evenly colored.
- Before serving, sprinkle the green coconut on top of each cup and place candy pumpkins on top for decoration.
Send me this recipe!
Just enter your email below and get it sent straight to your inbox!