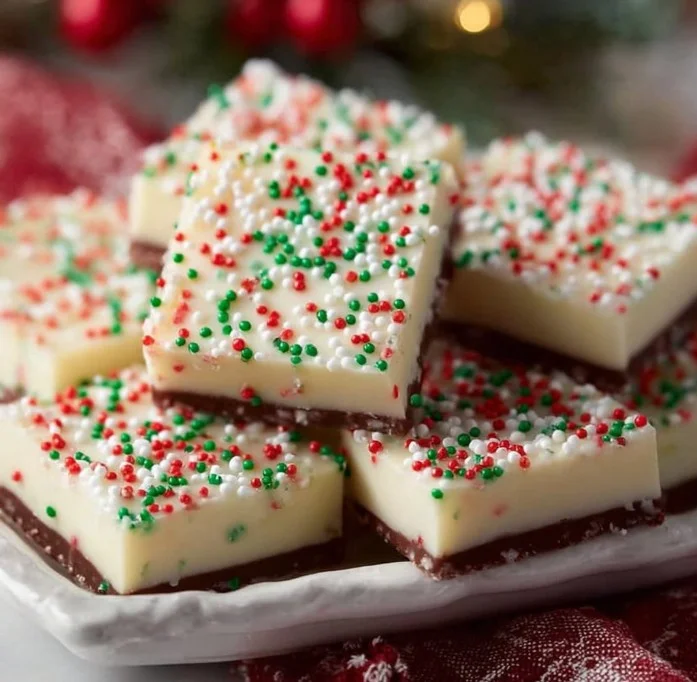
The holiday season is a magical time filled with joy, family gatherings, and, of course, delicious treats. Among all the goodies that fill our tables, Christmas fudge holds a special place in our hearts and stomachs. This indulgent treat is not just a dessert; it’s a nostalgic memory for many of us, often associated with cherished moments spent with loved ones. The best Christmas fudge recipe combines white and semi-sweet chocolate for a delightful contrast in flavor, wrapped in the spirit of the season with festive sprinkles.
Why We Love This The Best Christmas Fudge Recipe
What makes this fudge recipe a favorite among holiday treats? For starters, it’s incredibly easy to make! Even if you’re not an experienced baker, you can whip up this delicious fudge in no time. The combination of sweetened condensed milk with chocolate chips results in a smooth and creamy texture that is hard to resist.
Moreover, the festive aspect of this fudge can’t be overlooked. The vibrant Christmas sprinkles add a touch of whimsy, making it visually appealing and perfect for holiday celebrations. This fudge isn’t just a tasty treat; it’s also a delightful addition to your holiday spread that can bring smiles to everyone’s faces. Plus, it’s an adaptable recipe, making it easy to customize according to your preferences.
Ingredients about The Best Christmas Fudge Recipe
To make the best Christmas fudge, you’ll need simple ingredients that are easy to find:
- 14 oz sweetened condensed milk (divided)
- 6 oz white chocolate chips
- 6 oz semi-sweet chocolate chips
- 2 tsp vanilla extract (divided)
- 2 tbsp Christmas sprinkles
Gathering these ingredients is a breeze. You most likely have a few of these items in your pantry already. Once you have everything in place, you’re ready to create a batch of fudge that’s sure to impress!
How to Make The Best Christmas Fudge Recipe Directions
Let’s get into the fun part—making your Christmas fudge! Follow these easy steps to prepare your fudge and fill your home with delightful aromas.


- Prepare Your Baking Pan: Begin by lining an 8×8 baking pan with parchment paper. This step ensures that the fudge doesn’t stick and makes for easy removal later. For added assurance that it won’t stick, spray the parchment paper lightly with non-stick cooking spray and set it aside.
- Melt the Chocolate: Next, take your white chocolate chips and place them in a medium bowl. Do the same for the semi-sweet chocolate chips in another bowl. Now, divide your sweetened condensed milk in half. You’ll want about 7 oz (or half the can) to pour into each bowl with the chocolate chips.
- Create the Semi-Sweet Fudge Layer: Start with the semi-sweet chocolate mixture. Heat it in the microwave for 30 seconds, stirring after each interval, until smooth. Once melted, add 1 teaspoon of vanilla extract and mix well to combine. The rich chocolate aroma will fill your kitchen, making it hard to resist.
- Spread the Base Layer: Carefully spread the melted semi-sweet chocolate mixture into the prepared baking pan, evening it out with a spatula to form a solid base. This will be the bottom layer of your fudge.
- Make the White Chocolate Fudge: Next, melt the white chocolate chips in the microwave, following the same 30-second intervals, stirring until creamy. Once melted, incorporate the remaining teaspoon of vanilla extract and mix until well combined. This step enhances the flavor and creates a delightful depth.
- Add the Festive Touch: Fold in the Christmas sprinkles into the melted white chocolate mixture. This will add a burst of color and excitement to your fudge! Gently spread this mixture on top of the semi-sweet fudge layer in the baking pan, making sure it covers the entire surface.
- Final Touches: To really get into the holiday spirit, sprinkle extra Christmas sprinkles on top of the white chocolate layer for an added festive flair.
- Chill and Set: Place the baking pan in the refrigerator for at least one hour. This chilling time allows the fudge to set properly, making it easier to cut later.
- Slice and Enjoy: Once the fudge has chilled, remove it from the refrigerator. Carefully lift the fudge out using the parchment paper and cut it into squares. Now, your delicious Christmas fudge is ready to be enjoyed!
How to Serve The Best Christmas Fudge Recipe
Serving your Christmas fudge can be just as fun as making it! Here are a few clever ideas to elevate your fudge presentation for festive gatherings:
- Decorative Trays: Place your fudge squares on a beautiful decorative tray, arranging them in a colorful pattern. Add some holly or a few festive ornaments around the tray for an eye-catching display.
- Gift Jars: If you’re planning to give this fudge as gifts, consider packaging it in charming mason jars. Layer the fudge in the jar and tie a ribbon around the lid for a personal touch.
- Party Favor Bags: Cut the fudge into bite-sized pieces and place them in small treat bags. Hand these out at holiday parties or include them in goodie bags for guests.
- Coordinated Dessert Table: If you are hosting a holiday party, incorporate your fudge into a larger dessert table. It pairs wonderfully with classic Christmas cookies, brownies, and even cupcakes, creating a festive assortment.
Each piece of fudge is not only a stand-alone treat but also a part of the overall holiday experience, making it a perfect addition to your celebrations.
Expert Tips: The Best Christmas Fudge Recipe
Creating the best fudge requires a few expert pointers. Following these tips will help you achieve perfect fudge every time:
- Don’t Overheat the Chocolate: Be cautious not to overheat the chocolate in the microwave. It’s best to melt it slowly to avoid burning. Stir frequently as it melts, so it stays creamy.
- Use Quality Ingredients: Using high-quality chocolate chips will result in richer flavors. It’s worth opting for brands that are known for their great taste.
- Experiment with Sprinkles: While Christmas sprinkles are fun, feel free to try other decorations depending on the occasion. You might use colored sprinkles for birthdays or themed sprinkles for other holidays.
- Let it Chill: Ensure you chill the fudge completely before slicing. This step is crucial for the fudge to set properly and hold its shape when cut.
- Keep an Eye on the Dough: The fudge should have a smooth and glossy appearance when finished. If it seems too thick or lumpy, it might need a minute longer in the microwave.
By incorporating these tips, you will not only perfect your fudge but also impress friends and family with your culinary skills!
How to Store The Best Christmas Fudge Recipe
Proper storage of your Christmas fudge is essential for maintaining freshness and flavor. Here’s how to do it:
- Cool Completely: Before storing, ensure the fudge has cooled completely and set properly.
- Use Airtight Containers: Place the cut pieces into an airtight container. This will protect your fudge from drying out and keep it fresh longer.
- Refrigeration: For longer shelf life, store the fudge in the refrigerator. It can last up to three weeks when properly stored.
- Freezing for Later: If you want to save some for later, consider freezing the fudge. Wrap each piece in wax paper and place it in a freezer-safe container or bag. It can last up to three months in the freezer. When you’re ready to enjoy it again, simply let it thaw at room temperature.
Variation of The Best Christmas Fudge Recipe
While the original recipe is delightful on its own, you might want to explore variations to suit your tastes or impress your guests. Here are a few delicious ideas to try:
- Nutty Christmas Fudge: Add nuts such as chopped pecans or walnuts to the fudge mixture for a crunchy texture that complements the creaminess of the chocolate.
- Peppermint Fudge: Infuse the white chocolate mixture with peppermint extract instead of vanilla for a refreshing seasonal twist. You can also top it off with crushed candy canes for an extra festive feel.
- Swirled Fudge: Create a swirled effect by not fully blending the two chocolate mixtures. Pour them on top of each other and use a knife to swirl them together before chilling.
- Flavored Fudge: Experiment with different flavored chips, such as butterscotch or peanut butter, to create your unique fudge recipe. Mix and match for surprising flavor combinations!
- Darker Chocolate Fudge: If you prefer a darker chocolate flavor, try using dark chocolate chips instead of semi-sweet. This tweak will give your fudge a rich taste that chocolate lovers will adore.
With these variations, you can turn your basic Christmas fudge into a delightful array of flavors!
FAQ Section
What is the best way to cut the fudge?
All you need is a sharp knife; it’s important to cut the fudge into clean squares. For ease, let the fudge sit at room temperature for a few minutes before cutting, as it helps soften the chocolate slightly for less resistance.
How long can I store the best Christmas fudge?
When stored properly in an airtight container in the refrigerator, your fudge can last for up to three weeks. If frozen, it can maintain its quality for up to three months.
Can I use different chocolate for the fudge?
Absolutely! If you prefer a different type of chocolate, you can substitute milk chocolate or dark chocolate chips for semi-sweet or white chocolate. Just make sure to maintain the bubbly sweetness of the fudge by adjusting the ratio of sweetened condensed milk.
Is it possible to make this fudge dairy-free?
You can definitely modify this recipe to make it dairy-free by using dairy-free chocolate chips and coconut or almond condensed milk instead. Check as many brands now offer dairy-free alternatives!
Can I add other mix-ins to the fudge?
Yes! Feel free to add your favorite mix-ins, such as dried fruits, coconut flakes, or even cookie crumbs, to provide different textures and flavors to your fudge.
The Best Christmas Fudge
Equipment
- 8×8 baking pan
- Medium bowls
- Microwave
- Spatula
Ingredients
- 14 oz Sweetened Condensed Milk (divided)
- 6 oz White Chocolate Chips
- 6 oz Semi-Sweet Chocolate Chips
- 2 tsp Vanilla Extract (divided)
- 2 Tbsp Christmas Sprinkles
Instructions
- Line an 8×8 baking pan with parchment paper and spray lightly with non-stick cooking spray.
- In separate bowls, combine the white chocolate chips and semi-sweet chocolate chips with half (7 oz) of the sweetened condensed milk.
- Melt the semi-sweet chocolate mixture in the microwave for 30 seconds, stirring after each interval until smooth. Stir in 1 teaspoon of vanilla extract.
- Spread the melted semi-sweet chocolate evenly into the prepared baking pan.
- Melt the white chocolate mixture in the microwave using the same method, then stir in the remaining teaspoon of vanilla extract and fold in the Christmas sprinkles.
- Spread the white chocolate mixture over the semi-sweet chocolate layer in the baking pan. Top with additional sprinkles if desired.
- Chill in the refrigerator for at least 1 hour until set.
- Once set, lift the fudge out of the pan using the parchment paper and cut into squares.
Send me this recipe!
Just enter your email below and get it sent straight to your inbox!